Using Normal Maps and Additive / Multiply Blending to simulate metallic shininess

Hi all, first post here. Been lurking the threads a while learning up on LVGL things, it’s fun stuff, thanks so much to the developers. I’m sure it’s been a lot of work.

So I almost put this into feature requests but my LCD supplier insists I use 8.x LVGL so even if it was added as a feature I probably couldn’t use it until I figure out how to get my LCD working with 9.x… but here’s what I want to do, and maybe I can cook up my own implementation here for 8.x and if it’s useful the community can help bring that functionality to 9.x

I’m making a little smartwatch project, and the interface I’ve designed is very old school, 3D rendered, textured, kind of like classic PC game interfaces used to look in the 90s. Lots of shiny gold and silver. However to really get the effect of shiny metal, what would be great is if each pixel of the UI image also had a normal map pixel it could reference off screen that represents an offset into a refmap (or matcap, if you prefer Blender terms), that would add or subtract from the base UI image pixel color, to create metallic shine. Then I’d like to use the tilt sensor to offset all of the pixels of the refmap by some amount so if you turn and twist the display, the metallic shine on it would also twist and distort around the geometry of the UI, but without actually computing any sort of 3d in realtime, the normal map would be entirely pre-rendered in Blender as a render-baked texture.

I was reading up a bit on custom image decoders, and it seems like that might be what I’m looking for, but I’m very new to LVGL so before I dive into that particular rabbit hole I thought I’d say hi here on the forums and see if anyone had any suggestions that might be a little easier or maybe there’s already some kind of support for this.

Thanks

1 Like

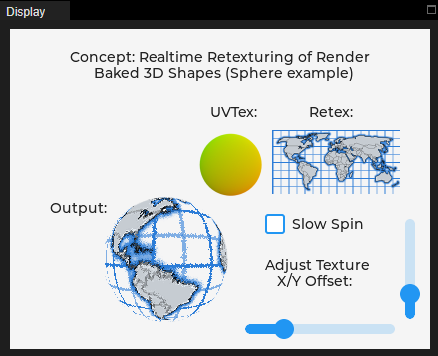
Here is a small concept sample I cooked up in the simulator. The frame rate is quite low but I think it will run better on an ESP32S3 I have here. You can try it out and use the sliders to adjust the simulated tilt. A slow timer gradually shifts the reflection around as well.

I’m programming my hardware here in C in Arduino IDE with LVGL 8.3.10 - If anyone would care to demonstrate a more performant way to accomplish this sample, I would very much appreciate it.

This same idea could also do something like “Mode 7” graphics on the SNES.

If there is a better way for me to share / update simulator scripts, please let me know.

Because the binary data used for the image sources is so large, I’ve pruned them out of this code snippet, or it exceeds the max post length. I’ll post those images as PNG files in the next reply, and you can convert them to binary yourself and paste them in to the marked areas, or maybe I can find a way to post the script without any changes in a compressed file as an attachment.


# Initialize 
import display_driver
import lvgl as lv
from lv_utils import event_loop
import utime

def make_refmap():
    mc20_tiny_data = bytearray(b'\x1b\x2e\x4e ... etc big binary blob here... \x4e\xff')
    return lv.img_dsc_t({
        'header': {'always_zero': 0, 'w': 64, 'h': 64, 'cf': lv.img.CF.TRUE_COLOR_ALPHA},
        'data_size': len(mc20_tiny_data),
        'data': mc20_tiny_data})

def make_sample_img():
    sample_img_data = bytearray(b'\x00\x00\x00\x00 ...another large blob of binary... \x00\x00\x00\x00')
    return lv.img_dsc_t({
        'header': {'always_zero': 0, 'w': 128, 'h': 128, 'cf': lv.img.CF.TRUE_COLOR_ALPHA},
        'data_size': len(sample_img_data),
        'data': sample_img_data})

def make_output_buf():
    olen = 128*128*4
    return lv.img_dsc_t({
        'header': {'always_zero': 0, 'w': 128, 'h': 128, 'cf': lv.img.CF.TRUE_COLOR_ALPHA},
        'data_size': olen,
        'data': bytearray(olen)})
    

def update_debug(sX, sY):
    rCol = my_img_dsc.buf_get_px_color(sX, sY, lv.color_t())
    rAlpha = my_img_dsc.buf_get_px_alpha(sX, sY)
    outimage_dsc.buf_set_px_color(sX, sY, rCol)
    outimage_dsc.buf_set_px_alpha(sX, sY, rAlpha)
    debuglabel.set_text('sX:'+str(sX)+' sY:'+str(sY)+' -> [R:'+str(rCol.ch.red)+' G:'+str(rCol.ch.green)+' B:'+str(rCol.ch.blue)+' A:'+str(rAlpha)+']')

def update_output():
    global last_update_line
    global last_offX, offX, offX_dirty
    global last_offY, offY, offY_dirty
    if (offX_dirty or offY_dirty):
        last_offX = offX
        last_offY = offY
        debuglabel.set_text('offX:'+str(offX)+' offY:'+str(offY)+'\n     timerX:' +str(timerX))

    else:
        return
    oX = last_offX + timerX
    oY = last_offY + timerX
    for isY in range(0,32):
        sY = (last_update_line + isY) % 128
        for sX in range(0,128):
            rCol = my_img_dsc.buf_get_px_color(sX, sY, lv.color_t())
            if (rAlpha > 0):
                rAlpha = my_img_dsc.buf_get_px_alpha(sX, sY)
#                rX = (int((rCol.ch.red * 64) / 255) + oX) % 64
#                rY = (int((rCol.ch.green * 64) / 255) + oY) % 64
                rX = ( (rCol.ch.red >> 2) + oX ) % 64
                rY = ( (rCol.ch.green >> 2) + oY ) % 64
                rmCol = mc20_tiny_dsc.buf_get_px_color(rX, rY, lv.color_t())
                outimage_dsc.buf_set_px_color(sX, sY, rmCol)
                outimage_dsc.buf_set_px_alpha(sX, sY, rAlpha)
    last_update_line += 32
    if (last_update_line >= 128):
        last_update_line = 0
        if (last_offX != offX):
            offX_dirty = True
        else:
            offX_dirty = False
        if (last_offY != offY):
            offY_dirty = True
        else:
            offY_dirty = False


def timer_small_tick():
    update_output()
    outimage.invalidate()

def timer_big_tick():
    global timerX, offX_dirty
    timerX = (timerX + 1) % 128
    offX_dirty = True
    
def hslider_event_cb():
    global offX, last_offX, offX_dirty
    offX = 64 - hslider.get_value()
    if (last_offX != offX):
        offX_dirty = True

def vslider_event_cb():
    global offY, last_offY, offY_dirty
    offY = 64 - vslider.get_value()
    if (last_offY != offY):
        offY_dirty = True

offX_dirty = True
offY_dirty = True
last_offX = -1
last_offY = -1
offX = 64
offY = 64
timerX = 0
last_update_line = 0
scr = lv.obj()

debuglabel = lv.label(scr)
infolabel1 = lv.label(scr)
infolabel2 = lv.label(scr)
infolabel3 = lv.label(scr)

my_img_dsc = make_sample_img()
img1 = lv.img(scr)
img1.align(lv.ALIGN.CENTER, 0, 0)
img1.set_src(my_img_dsc)
img1.set_pos(-120, -45)

mc20_tiny_dsc = make_refmap()
refmap = lv.img(scr)
refmap.align(lv.ALIGN.CENTER, 0, 0)
refmap.set_src(mc20_tiny_dsc)
refmap.set_pos(10, -50)

outimage_dsc = make_output_buf()
outimage = lv.img(scr)
outimage.align(lv.ALIGN.CENTER, 0, 0)
outimage.set_src(outimage_dsc)
outimage.set_pos(-55, 70)

debuglabel.align(lv.ALIGN.BOTTOM_RIGHT, -65, -65)

infolabel1.align(lv.ALIGN.TOP_MID, 0, 5)
infolabel2.align(lv.ALIGN.TOP_LEFT, 30, 45)
infolabel3.align(lv.ALIGN.BOTTOM_RIGHT, -70, -115)

infolabel1.set_text("Concept: Realtime Application of Tilt Shifted\n"
                    "Reflection Map onto Screen Space Normals")
infolabel2.set_text("Baked Normals:               \n"
                    "                                       Refmap:\n\n\n\n\n\n\n\n"
                    "Output:")
infolabel3.set_text("Simulate Tilt\nAdjustment:")

hslider = lv.slider(scr)
hslider.set_width(150)
hslider.set_height(20)
hslider.set_range(-64,64)
hslider.align(lv.ALIGN.BOTTOM_RIGHT, -35, -15)
hslider.add_event_cb(lambda e: hslider_event_cb(), lv.EVENT.VALUE_CHANGED, None)

vslider = lv.slider(scr)
vslider.set_height(150)
vslider.set_width(20)
vslider.set_range(-64,64)
vslider.align(lv.ALIGN.BOTTOM_RIGHT, -15, -35)
vslider.add_event_cb(lambda e: vslider_event_cb(), lv.EVENT.VALUE_CHANGED, None)

update_debug(42,24)
update_output()


timer1 = lv.timer_create(lambda e: timer_small_tick(), 25, None)
timer2 = lv.timer_create(lambda e: timer_big_tick(), 200, None)

lv.scr_load(scr)

Here is the script without any changes (327k uncompressed)

simulator_refmap_test1b_micropython.zip (45.3 KB)

Your output should look like this:

image

Here are the source images as png’s:

The baked normals made in Blender (in ‘Workbench’ render mode, with the Normals Matcap selected and ‘Standard’ View Transform selected in Color Management)

monkey_normal

A Small matcap from the Blender standard matcaps, shrunk down from 512x512 to 64x64 - this is preset #20
mc20_tiny

To disable the timer, comment out the last line. It will work your PC a bit simulating while the timer is enabled.

I was messing around with your code in the simulator. You can get it to run faster on the esp32 using the viper code emitter but you are going to have to directly access the image buffers to collect and to set the pixel data.

Here is an example of getting and setting the data directly using the image buffers.

This is not written in viper code and I can do that if you need me to…

def get_color(x, y, width, buf):
    line = y * (width * 4)
    index = (x * 4) + line
    return [buf[index], buf[index + 1], buf[index + 2], buf[index + 3]]


def set_color(color, x, y, width, buf):
    line = y * (width * 4)
    index = (x * 4) + line
    buf[index: index + 4] = bytearray(color)

the above collects the data from the bytearrays used for the images. I did away with the functions to created the image descriptors so the byte arrays would be accessable.

in my testing I removed all throttling of the update speed caused by the display driver and the event loop and I manually forced LVGL to update the display. It was still on the slow side when doing the pixel manipulation to get your wanted effect.

The viper code emitter is built into MicroPython and it allows you to get close to C speeds with the cost being some additional memory use. The syntax of the code insaide of the function is going to be different and you need to declare variable types and things of that nature much like what is done in C code.

Also to let you know I have written a spin off of the LVGL MicroPython binding and that will get you up and running on the S3 using the latest versions of both MicroPython and LVGL. I have written drivers for 35 or so different displays and a whole mess of touch drivers as well. You can get up and running a whole lot faster without needing to mess about with writing a display driver or a touch driver. Chances are it’s already written…

That’s great thanks a lot. It will take me a while to make sense of that, would you mind taking your modified version (as it is, no need to ‘clean it up’), making it a zipped text file and posting it in a reply/edit? There’s a number of concepts you mentioned that I’m not familiar with, I think it’d help me to see how you’re doing it as a starting point.

Or if you’d prefer, cut out the blob data and post the code as a snippet, and i’ll reinsert the bloaty blob data here locally. Either way, thanks for checking it out and for your suggestions

edit: Would the viper code emitter still be of help if I’m ultimately porting all the code to C anyways? I’m only using micropython for the online simulator.

If you are more comfortable writing python code you can continue to use it. You will be able to do what you are wanting to do without any issue. I have spent a lot of time optimizing the drivers fr performance and also memory use. I have also expanded the drivers so they support SPI,DUAL SPI, QUAD SPI, 8 lane I8080, 16 lane I8080, 8 lane RGB and 16 lane RGB. DMA memory use works for all of the drivers as well. It only take a single command to compile. almost all requirements are handled by the build script. The whole built process is different than than “official” binding. It is easy to keep LVGL updated and also MicroPython as well.

Or you can port it to C code. The Viper code emitter is a MicroPython only thing so if you port the code to C then you don’t need to worry about it because you will already be getting the maximum in terms of performance when updating the colors.

Sounds great man, I’ll def check it out. For now I’ll probably stick with C for this experiment (once I’ve hashed out a basic strategy in MicroPython). It seems to work out for me, but Python’s fun too and sometimes it’s a better fit.

So here’s another variant of the same basic idea, this one retextures a 3d sphere with a shifted texture image (world map). I found one way to improve update rate, using invalidate_area and only updating about 16 lines of output image pixels per frame. However for reasons I don’t understand, if the (unrelated) image that shows the yellow/green sphere in this isn’t at least slightly overlapping the output image globe, it simply won’t update or invalidate at all. But if they overlap by even one pixel, it’s fine. Which makes me think I’m still updating unnecessary pixels in the yellow sphere image (which never changes and shouldn’t ever need updated). I’d love to figure out whats going on there.

Screen shot:
image

Zipped Code (843kb unzipped):
simulator_refmap_test2b_micropython.zip (84.1 KB)

The checkbox I added can toggle the timer based constant update now so it doesn’t try to cook your CPU in the background.

Thanks for your help with this, I appreciate the feedback and suggestions

are you running Ubuntu? If you are I can give you a binary of lvgl_micropython that you can run locally to test with.

This looks incredible. Got a video of it?

I am working on cleaning up the code so it run smoother and without glitching. Once I get that finalized I will increase the resolution of the maps being used and see how well it performs.

I can see this as being something very useful. If we can eliminate the floating point math it would greatly improve the speed.

I am working on cleaning up the code some to see if I can get rid of the glitching and to improve the performance of it. I have it running a lot smoother. I am working on removing the glitching and I just thought of how to go about going that.

Hey thanks! Nope no video yet, but there could be. I’ll see if I can capture some short clips later and post them. It’s pretty easy to try out in the simulator if you’d like.

edit: kdchlosser has posted a short clip below with his optimizations, if you’d like to see the globe spin.

No not running Ubuntu here. I should be, Windows is such a drag. Thanks for the offer tho, I’ll let you know if I get a Ubuntu machine spun up here, I’ve been thinking about it a while anyways. And hey that’s great that you’d digging into the code some, I’m sure it’ll be a big help. Let me know how it goes or if I can help. When I get it ported over to C I’ll post that too. 100% agree regarding floating point math.

This concept here is something I’ve done a few times on a few platforms, it works out great for some stuff. GPU acceleration sure would help it out but oh well. Originally I was doing this on a 486, 30 or 40 years ago, hah. I never in a million years could have imagined the code running on a chip significantly smaller than a penny.

Thanks, it’s really great to have more experienced eyes on this, I haven’t been working with LVGL very long.

Have you ever heard of ‘dual shear’ rotation? It’s an old trick to reduce the number of sin/cos calls needed to rotate a bitmap. The idea is first you shear a bitmap left /right by some amount, then you shear that again, vertically up or down some amount. Once both shears are applied, what you end up is effectively a rotation, but the math was a lot more minimal and shouldn’t particularly require any floating points.

I’ve been thinking about that a bit and how it might fit in here. Soon I’ll do another 3D Retex sample with a flat plane you’re above, like F-Zero style 3d. I think dual-shearing is probably how I’d go about sampling rotated pixel data to project onto the surface, so it can freely turn any which way over the surface.

Here it is…

20250331113341-ezgif.com-video-to-gif-converter

1 Like

If you are running Windows all you need to do is get WSL up and running. It’s built into Windows and it will allow you to run Ubuntu.

Wow that’s amazing, so much smoother! I’m optimistic we’ll be able to get this moving at a nice frame rate on modest hardware. I see you changed the UVTex, good call, one of those channels was (so far) totally unused. In the past, I’ve implemented that unused channel for other stuff, like splitting it into one or two 4 bit values, or one 6 bit value and a couple flags, and then using that to add other effects into the rendering (like lightening/darkening the output pixel, things like that). With LVGL I’m not sure there’s particularly any benefit to encoding that data as it’s own bitmap color channel though. It could just be a pair of 4 bit alpha bitmaps, etc. Probably easier to work on that way too, encoding weird information into different channels of an RGBA image tends to make the image itself look like incomprehensible gibberish.

Great stuff man, that’s gotta be 300% faster than my tests here, at least. Nice.

I’ll get WSL setup. I’d rather test locally anyways, I have a sneaking suspicion my use of the online simulator might be a little taxing on the server, since it’s so heavy with big binary data embedded. Kinda amazing the simulator works at all in-browser, but I think I’m pushing the edges of what it’s designed for as an online test area.

what I did to get it to run smooth is I am using 2 buffers to render to… I removed the code that directly sets the pixels in the image widget and I set the pixels directly into the buffers instead.

Here is the meat and potatoes of the code that does the rendering. This code is for LVGL 9.2 and changing it to work with LVGL v8.3 would be easy to do. The big difference is I am mnot using the image widget and instead I am using the canvas widget. IDK if the canvas widget is available in LVGL 8.3… I know it is not going to have the exact same API if it does.

# gets the color data from a buffer
def get_pixel(x, y, width, buf):
    index = y * (width * 4)
    index += x * 4
    return [buf[index], buf[index + 1], buf[index + 2],  buf[index + 3]]


# sets the color data to a buffer
def set_pixel(color, x, y, width, buf):
    index = y * (width * 4)
    index += x * 4
    buf[index: index + 4] = bytearray(color)


# first buffer to render to
out_buf = bytearray(128 * 128 * 4)
out_buf_mv = memoryview(out_buf)

# second buffer to render to
new_buf = bytearray(128 * 128 * 4)
new_buf_mv = memoryview(new_buf)


def update_output():
    global last_update_line, timerX
    global last_offX, offX, offX_dirty
    global last_offY, offY, offY_dirty
    global out_buf, out_buf_mv
    global new_buf, new_buf_mv
    # global invcam

    if not (
        offX_dirty or
        offY_dirty or
        tcheck.get_state() & lv.STATE.CHECKED
    ):
        return

    if last_update_line == 0:
        last_offX = offX
        last_offY = offY
        # debuglabel.set_text('offX:'+str(offX)+' offY:'+str(offY)+'\n     timerX:' +str(timerX))
        
        # When the rendering needs to start over again I create a new buffer to remnder to. 
        # Doing this is faster than iterating over the buffer and clearing all of the pixels. 
        # downside to doing this is memory fragmentation which could cause a problem 
        # on a memory constrained MCU
        new_buf = bytearray(128 * 128 * 4)
        new_buf_mv = memoryview(new_buf)

    oX = last_offX + timerX + 1024
    oY = last_offY + 1024  # + timerX
    rPix = sample_img2_data
    mPix = worldmap_data
    ALLOW_ROLL = False

    if ALLOW_ROLL is False:
        for isY in range(16):
            sY = (last_update_line + isY) % 128
            lineIndex1 = sY << 7
            for sX in range(128):
                rIndex = (lineIndex1 + sX) << 2
                rAlpha = rPix[rIndex + 3]
                if rAlpha > 0:
                    moving_rX = (rPix[rIndex + 2] + oX) % 256
                    moving_rY = (256 - rPix[rIndex + 1] + oY) % 128
                    moving_alpha = mPix[(((moving_rY << 8) + moving_rX) << 2) + 3]
                    if moving_alpha > 0:
                        # get the pixel data from the map
                        color = get_pixel(moving_rX, moving_rY, 256, worldmap_data_mv)
                        color[-1] = (rAlpha * moving_alpha) >> 8
                        
                        # set the new pixel data to the render buffer
                        set_pixel(color, sX, sY, 128, new_buf)

    else:
        roll_ang = last_offY * (3.1415926 / 180.0)
        roll_cos = int(math.cos(roll_ang) * 1024)
        roll_sin = int(math.sin(roll_ang) * 1024)
        for isY in range(0, 16):
            sY = (last_update_line + isY) % 128
            lineIndex1 = sY << 7
            for sX in range(0, 128):
                rIndex = (lineIndex1 + sX) << 2
                rAlpha = rPix[rIndex + 3]
                if rAlpha > 0:
                    prerot_moving_rX = rPix[rIndex + 2] - 128
                    prerot_moving_rY = 256 - rPix[rIndex + 1] - 128
                    moving_rX = (((prerot_moving_rX * roll_cos - prerot_moving_rY * roll_sin) >> 10) + oX + 128) % 256
                    moving_rY = (((prerot_moving_rX * roll_sin + prerot_moving_rY * roll_cos) >> 10) + oY + 128) % 128

                    mIndex = ((moving_rY << 8) + moving_rX) << 2
                    moving_alpha = mPix[mIndex + 3]
                    if moving_alpha > 0:
                        # get the pixel data from the map
                        color = get_pixel(moving_rX, moving_rY, 256, worldmap_data_mv)
                        color[-1] = (rAlpha * moving_alpha) >> 8
                        
                        # set the new pixel data to the render buffer
                        set_pixel(color, sX, sY, 128, new_buf)

    last_update_line += 16

    if last_update_line >= 128:
        last_update_line = 0
        
        # if this is the last run of the render we swap the buffers
        out_buf = new_buf
        out_buf_mv = new_buf_mv
        
        # then we set the just rendered buffer to the widget. In LVGL V8.3 
        # you will need to create a new image descriptor and set the image src
        # instead of setting the raw buffer data. It's just a single additional 
        # step that would need to be done. 
        outimage.set_buffer(out_buf_mv, 128, 128, lv.COLOR_FORMAT.ARGB8888)
        
        lv.refr_now(None)
        # outimage.invalidate()
        if last_offX != offX:
            offX_dirty = True
        else:
            offX_dirty = False

        if tcheck.get_state() & lv.STATE.CHECKED:
            timerX = (timerX + 1) % 256
            offX_dirty = True

        if last_offY != offY:
            offY_dirty = True
        else:
            offY_dirty = False

1 Like