How to run LVGL under Micropython on the Cheap Yellow Display?

Hello,
First,apologies for a long post.

My objective is to run LVGL under Micropython on the Cheap Yellow Display,
but so far without success.

My starting point is this post:

from where I follow the link to a prebuild version of the lvgl firmware 8.3.6. for CYD:
https://stefan.box2code.de/2023/11/18/esp32-grafik-mit-lvgl-und-micropython/

This website is in German, but with help of Google Translate, I have downloaded:
lv_micropython-WROOM.zip, and extracted it.
It contains flash.sh. I have edited it to replace python3 with python, and for
port COM4, which is where my CYD is connected. So it now reads (but without
any carriage returns):

python -m esptool --chip esp32 -p COM4 -b 460800 --before=default_reset
 --after=hard_reset write_flash --flash_mode dio --flash_freq 40m 
 --flash_size 4MB 0x1000 bootloader/bootloader.bin 0x10000 
 micropython.bin 0x8000 partition_table/partition-table.bin  

When above is run on command window it installs the three .bin files.
The installation proceeds as expected with no errors.

From the following webpage:
GitHub - JettIsOnTheNet/Micropython-Examples-for-ESP32-Cheap-Yellow-Display: Micropython examples for Cheap Yellow Display ESP32
I have downloaded three files:
ili9341.py for the CYD display controller
xpt2046.py for the CYD touch screen controller
boot.py which is the code that is to be run.
Using the Thonny IDE, I have copied these files on to the ESP32 chip.
I click the Run button, and the code runs as expected. Each touch on the screen
places a small marker, and shows the screen co-ordinates. If you go to above
link and have a look at the boot.py file you will see thatā€™s what itā€™s meant to do.

So everything is working just fine so far.

BUT the above example does not use LVGL.

To try LVGL, I followed the link in the starting point post to:
GitHub - de-dh/CYD2-MPY-LVGL: This repository is about running LVGL under Miropython firmware on the cheap yellow display.
and from there I downloaded the code as .zip file, and extracted it.
The demo_lvgl folder contains some example files.
I decided to try demo_simple.py. So I took a copy of it, renamed it to main.py.
I added the following at end so that I can see if it is running:
count = 0
while(count<20):
print("Count= ",count)
count+=1
time.sleep(1)

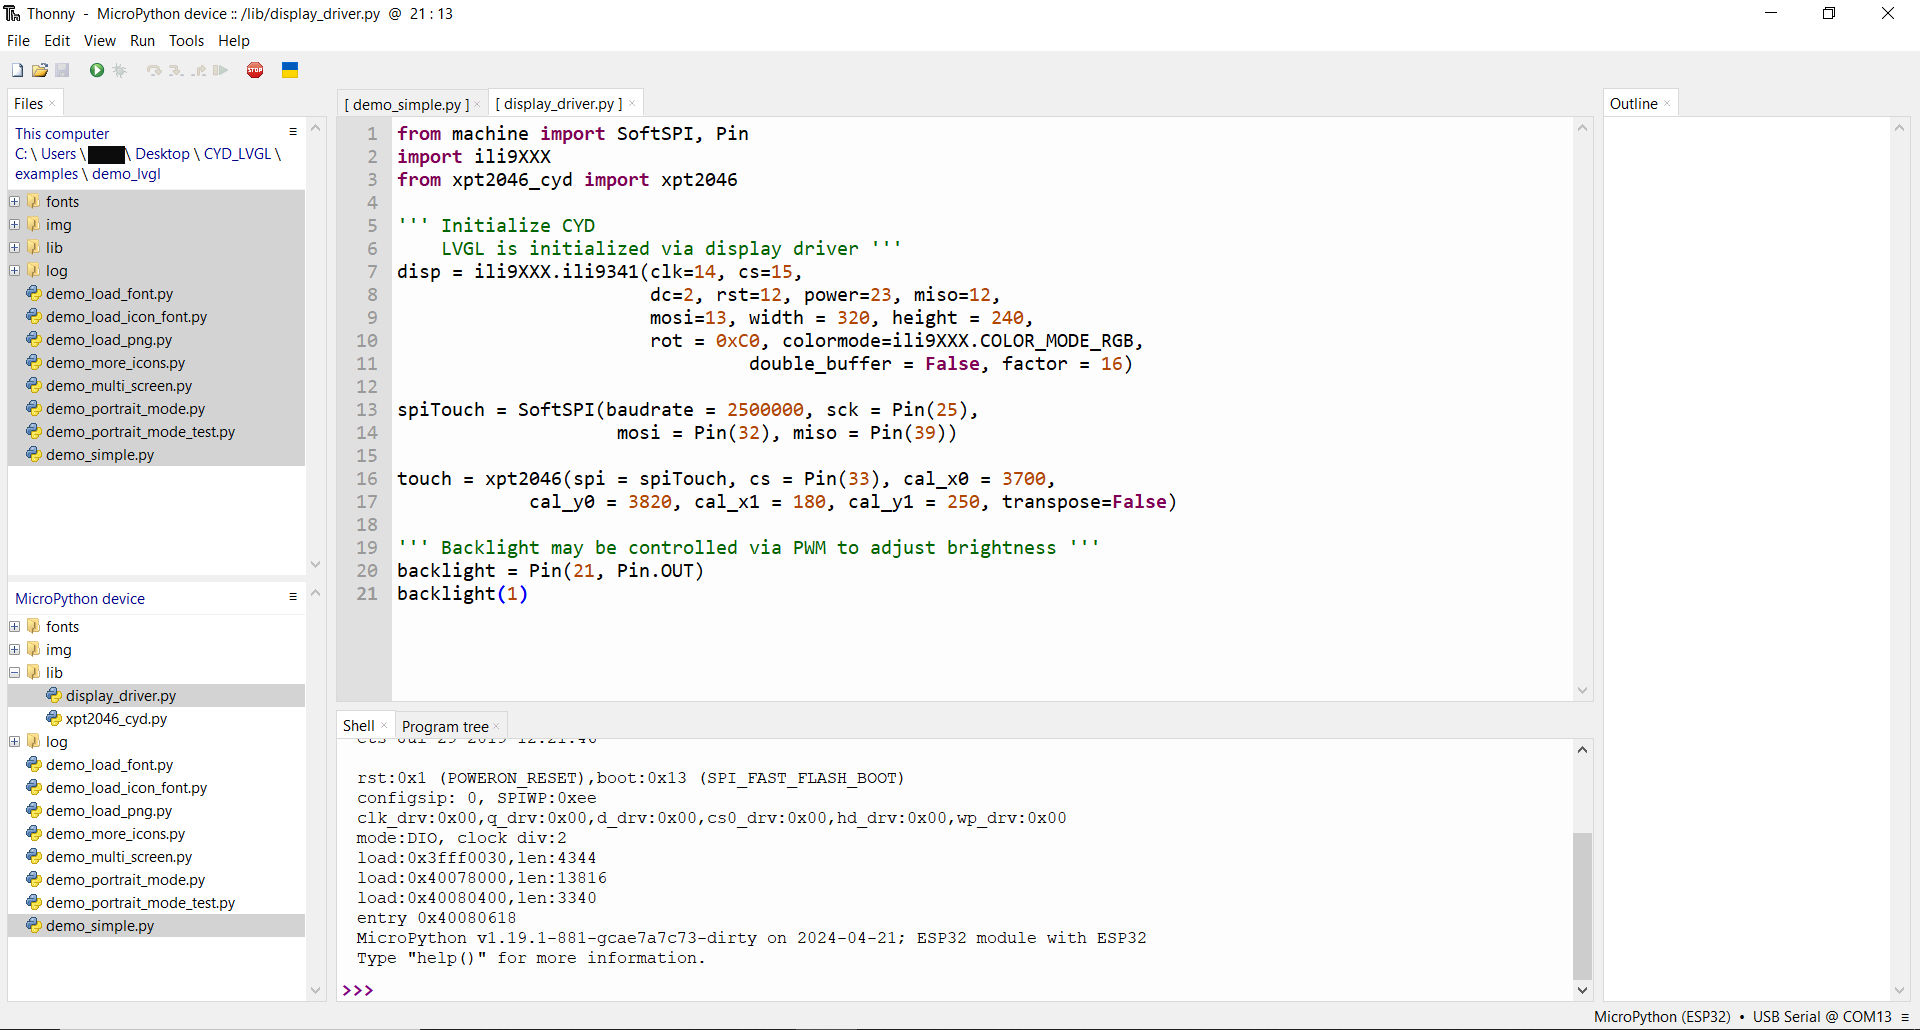
I made a new file, display_driver.py, as instructed in the German website.

I deleted all three previous files from the chip, then loaded main.py and display_driver.py
Then I click Run in Thonny.
I get following error message:
File ā€œdisplay_driver.pyā€, line 5, in
AttributeError: ā€˜moduleā€™ object has no attribute ā€˜LANDSCAPEā€™
To fix this, I replace rot=ili9341.LANDSCAPE with rot=0

I click Run again, and now get this message in shell

**************************************
* This library is obsoled now!
* Please, use ili9XXX library instead:
* from ili9XXX import ili9341
*************************************** 

I then tried pressing Reset button on the board, and it seemed to run!!
The line ā€œcount= 1ā€ etc was printed in shell at 1 sec intervals, and it
finshed cleanly after 19 sec.
BUT: Nothing at all appeared on the display.

I now click Run again, and get error:
RuntimeError: Failed initializing SPI bus

Pressing Reset button causes it to run again as above.

And thatā€™s as far as Iā€™ve got.

I must mention that my CYD board has only one USB port, so it is not CYD2.
The German website seems to be for CYD2, so perhaps that is the problem.

Can you offer any advice, or direct me to alternative websites ?

Thank you, Ken.

1 Like

Did you try to upload the whole demo_lvgl folder to your CYD? It already contains a display_driver.py and the xpt2046 driver in the lib folder, which should work. Also, the ILI9XXXX driver is included in the custom *.bin file you uploaded, so this driver is build into your Micropython version. You donā€™t need it as an external file.

AFAIK, the major difference between the CYD and CYD2 is the colormode used for the driver. You may have to change that in the display_driver.py file. However, Iā€™ve ordered several CYD2ā€™s now and some of them work with normal colormode, other need bgr mode. Also, some of them require a different rotation setting.

I suggest you try to upload the whole demo_lvgl folder to your CYD and try to make the simple demo work first. Just upload it, open the demo_simple.py and press run.

If it doesnā€™t run correctly, you need to open display_driver.py in the lib folder and modify the following code:

disp = ili9XXX.ili9341(clk=14, cs=15, dc=2, rst=12, power=23, miso=12, mosi=13, width = 320, height = 240,
rot = 0xC0, colormode=ili9XXX.COLOR_MODE_RGB, double_buffer = False, factor = 16)

Try colormode=ili9XXX.COLOR_MODE_BGR instead of colormode=ili9XXX.COLOR_MODE_RGB and find the right rotation setting by trying the following rot-values (use the hex-codes).

    MIRROR_ROTATE = {  # MADCTL configurations for rotation and mirroring
        (False, 0): 0x80,  # 1000 0000
        (False, 90): 0xE0,  # 1110 0000
        (False, 180): 0x40,  # 0100 0000
        (False, 270): 0x20,  # 0010 0000
        (True, 0): 0xC0,   # 1100 0000
        (True, 90): 0x60,  # 0110 0000
        (True, 180): 0x00,  # 0000 0000
        (True, 270): 0xA0  # 1010 0000
    }

another alternative is to try using this MicroPython binding.

It addresses some of the limitations that are seen in the ā€œofficialā€ binding. It is also easier to compile because it takes care of collecting any requirements that are needed. The API is common across all display drivers which also makes it easier to use.

Give it a try and see how you make out. If you have any issues or get stuck open an issue on that repo and you will be helped out.

First, apologies for the big bold typeface of:
ā€œAnd thatā€™s as far as Iā€™ve gotā€
I have no idea how that happened, and did not mean to look as if Iā€™m shouting.

  1. Hello de-dh,

You ask:
"Did you try to upload the whole demo_lvgl folder to your CYD? "

Using Thonny, I have tried that now.
A panel pops up saying that it expects a file of type .py.
I ignored that and uploaded the folder, or rather I think I did.
Can you have folders on the device?  Thonny shows the folder
on the device, but the upload was so quick I suspect it contains nothing.
   
When I click Run, I get error message:
    ImportError: no module named 'display_driver'
    
Or, when you say "upload the whole demo_lvgl folder", do you

mean I should upload all the individual files and files in
sub-folders ?
I tried that too, although only sub-folder lib seems to be relevant.
Sub-folders img and log are clearly not required (?), and fonts
contains .bin files for fonts, which I guess are not essential initially.

When I click Run this time, I get error message:  
     File "<stdin>", line 72
     SyntaxError: invalid syntax
I guess file <stdin> is embedded in the firmware, so I cannot
get at it to check or edit.
   
I have also tried the alternative color mode, but not different

rotations ā€“ I suspect these are not relevant to getting it running
initially.

So, I'm still stuck.   
  1. Hello kdschlosser,
    Iā€™ve followed the link you give to MicroPython binding,
    downloaded the code and extracted it, and read the README.md
    file.
    Iā€™m afraid I have little understanding of how to go about the
    Build and/or Compile processes, or how to set up the necessary
    support libs.
    I would need step-by-step guidance.
    I cannot find the Python script you mention that handles
    Building the binding.
    Also, I am on Windows 11, and your instructions seem to be
    only for Linux and macOS.

Thanks both, Ken.

By the way, I type up my posts and replies in a text editor, and
then copy and paste into the Reply box. I do not know why
when posted the text switches back and forth between two
typfaces ā€“ looks very odd.

clone the repo or download it as a zipfile and decompress it. The from the shell run the build command I posted above. That will compile it. The last line of test you are going to see if going to tell you how to flash it. You need to run that last command replacing ā€œ(PORT)ā€ with the serial port the ESP32 is using when you plug it in. That will write the firmware to the ESP32. You need to write the firmware not transfer a file.

Hello,
I have downloaded and extracted as you instruct. But I canā€™t find the build command which
you say you ā€œposted aboveā€. I also canā€™t find anything that looks like a build command in
the README.md file.

Iā€™m sorry I got you mixed up with another topic on the forum.

do you have a link to the datasheet for the display you have? I believe the CYDā€™s are RGB bus if memory serves but I would have to double check.

once I have that I can put together the build command for ya.

Since you are running on Windows you will need to use WSL (Windows Subsystem for Linux) to compile. Itā€™s not that hard to get WSL up and running. search them Microsoft Store for ā€œUbuntuā€ and when you install that it will activate WSL for you.

WSL allows you to run Linux applications which is what is needed to compile the binary. To make things a bit easier for connecting the ESP32 so WSL will be able to see it I recommend using ā€œWSL USB Managerā€ which you can download from here

Get WSL installed and running and then get the USB manager installed and running. Once you get that done I will explain the rest to you.

If you can get me a link to the datasheet for the display I can tell you what you what the build command is.

The CYD displays can be a little more work to get running because a lot of them make use of an IO expander which makes it a more complicated process. I need the data sheet to determine that and the type of display IC being used.

Here is a link to CYD spec:

It says: ā€œsupports 16 BIT RGB 65K color displayā€
Display chip is ili9341.

Ubuntu installed
WSL USB Manager installed.

My delay in replying because I wasted a lot of time trying to get Ubuntu to run
before I had installed the USB manager. Anyway, all seem OK now.

OK so now that you have WSL installed and the USB manager installed we can proceed to the next step.

Read this post as it will tell you the next things to do.

You are going to be using a different build command. I want you to use this one insteadā€¦

python3 make.py esp32 BOARD=ESP32_GENERIC DISPLAY=ili9341 INDEV=xpt2046 --flash-size=4

Hello,

Apologies for delay in replying, but Iā€™ve had multiple problems, all described here, all eventually overcome except for the last step.
So here we go:

  1. First, I needed to get Ubuntu running:
    In command window:

    net start WslService
    wsl --distribution Ubuntu

  2. Mapping network drive;
    You say: The path you enter is \wsl.localhost
    But that does not work for me.
    After much time, I found that path is \wsl$\Ubuntu

  3. To open wsl terminal:
    In command window, enter wsl
    and the command window is now the wsl terminal.

    The sudo apt-get install ā€¦ does not work
    I spent much time trying to find my github account and password, to no avail
    Eventually somewhere I came across suggestion to try: sudo apt-get update
    I then enter sudo apt-get install ā€¦ again
    This time I was NOT prompted for a password.
    and the install now seems to work OK ā€“ lots of stuff installed.

  4. I now moved on to: git clone GitHub - lvgl-micropython/lvgl_micropython: LVGL module for MicroPython
    This did not work. Again after much time, as a last resort I tried quitting
    from wsl terminal then re-opening it.
    And now it worked !
    The cd command works OK
    The python3 make.pyā€¦ command mostly works, took sveral minutes, and a lot
    of Extracting activity reported in terminal.
    But seemed to finish with an error, as follows:

    The virtual environment was not created successfully because ensurepip is not
    available. On Debian/Ubuntu systems, you need to install the python3-venv
    package using the following command.
    apt install python3.12-venv
    You may need to use sudo with that command. After installing the python3-venv
    package, recreate your virtual environment.

    So I did that; python3 installed OK

    Ran the python3 make.pyā€¦ command again
    A lot more activity reported, took several minutes.
    ( What is all this stuff, and where is it saved ? You donā€™t need to answer that )

  5. Opened USB manager
    Connected the CYD board.
    It appears in the top section
    USB-SERIAL CH340 (COM6)
    Right click and selected Attach to WSL ā€“ bound box turns blue with tick
    but it is NOT listed in Forwarded Devices.
    You say: ā€œTo collect the path to the serial port in WSL you need to open up
    that mapped network drive.ā€
    I guess I do that by clicking on it in Forwarded Devices ? If so, I am stuck.
    If not, then how do I open up that mapped network drive ?

  6. But I now see that an error is reported at bottom of the USB Manager
    which says: ā€œThis program only works with WSL2 distributionsā€
    and I am on version 1.
    So in a command window I entered:
    wsl --set-version Ubuntu 2
    The response is:
    Conversion in progress, this may take a few minutes.
    The operation could not be started because a required feature is not installed.
    Error code: Wsl/Service/CreateVm/HCS/HCS_E_SERVICE_NOT_AVAILABLE.

So now I am stuck.
Do I need to convert to WSL2 ?
How do I open the mapped network drive ?

In my last reply, I forgot to mention :
At end of the the python3 make.pyā€¦ command
an error is reported:
root@DESKTOP:/mnt/c/Windows/System32/lvgl_micropython# Error: 0xd00002fe
Error code: Wsl/Service/0xd00002fe

OK,m you can blame your errors on me. I made assumptions I should not have. WSL 2 needs Virtual Machine set up for it to run. You donā€™t have this up and running.

There are 2 ways to get it up and running. The first one will require you to reinstall Ubuntu and everything else associated with it. Not really an option in my opinion and should be only used as a last resort.

The second one is to manually get the Virtual Machine services up and running. You can read on how to do that in the link below.

You are going to need to have access to the computers BIOS to make sure that the settings for Virtualization are turned on. Once you know that those are turned on then you can enable the Virtual Machine services in Windows using the Add/Remove Features app.

It explains all of the steps to get that up and running in that link above.

Sorry you have had so much headache with this, itā€™s my fault because I assumed that you were ready to rock and has WSL2 installed and running. Didnā€™t realize that we would be starting from the absolute beginning with it. There is a a good thing that comes from this though, You are learning about something that you never knew was possible in Windows.

The mapped network drive is referring to what you did in step 2

Once you get the Ubuntu distribution upgraded to use WSL2 you are going to end up having to make the mapped drive again. The reason why is the path to the drive is going to be the one I provided as this is one of those things that has changed betweemn WSL1 and WSL2m, I believe this is the case and I guess we will know once you get WSL upgraded to version 2.

There are a lot of differences in how things are going to run between WSL1 and WSL2 and most of the things that you have had to alter to get it running may have to be redone when you get WSL upgraded to version 2. I really am sorry about the extra work you are having to go through with this. It was big time boneheaded of me to make assumptions.

also to let you know to upgrade WSL to version 2 after you have got the Virtualization stuff all set up if thisā€¦

Open the command prompt as Administrator. to do this click the start button and in the search box type in ā€œcmdā€ (without the quotes). you will see an icon appear below the search box. Right click on that icon and then click onm ā€œRun as Administratorā€.

Once you have the command prompt opened use the following commands to upgrade your Ubuntu versionā€¦

wsl --update
wsl --shutdown
wsl --set-version Ubuntu 2

First, I should have mentioned that Iā€™m running on Windows 11 Pro

  1. Followed link to
    Enable virtualization on Windows - Microsoft Support
    and followed instructions.
    But everything was already enabled ā€“ I did not have to change anything.
    In Widows Features:
    Hyper V box is enabled (blue)
    But when I click on ā€œ+ā€ to see the sub-folders,
    NONE ARE ENABLED!! I suspect this was cause of problems
    So I enabled them, and when OK get message:
    Windows completed the requested changes

  2. C:\Windows\System32>wsl --set-version Ubuntu 2
    For information on key differences with WSL 2 please visit Comparing WSL Versions | Microsoft Learn
    Conversion in progress, this may take a few minutes.
    The operation completed successfully.

wsl -l -v shows version 2

  1. Opened WSL USB Manager.
    In Forwarded Devices, it now shows USB-SERIAL CH340 (COM6)
    I can now find the required path, and edited it to:
    /dev/serial/by-id/usb-1a86_USB_Serial-if00-port0
    Copied and pasted that to replace (PORT) in the flash command

  2. Finally, at last I can try to load the firmware:

First try:

root@DESKTOP:/mnt/c/Windows/System32# sudo /root/.espressif/python_env/idf5.2_py3.12_env/bin/python -m esptool --chip esp32s3 -p /dev/serial/by-id/usb-1a86_USB_Serial-if00-port0 -b 460800 --before default_reset --after hard_reset write_flash --flash_mode dio --flash_size 8MB --flash_freq 80m --erase-all 0x0 /mnt/c/Windows/System32/lvgl_micropython/build/lvgl_micropy_ESP32_GENERIC_S3-SPIRAM_OCT-8.bin

Terminal response:

esptool.py v4.8.1
Serial port /dev/serial/by-id/usb-1a86_USB_Serial-if00-port0
Connectingā€¦
A fatal error occurred: This chip is ESP32 not ESP32-S3. Wrong --chip argument?

Second try, changed esp32s3 to esp32:

root@DESKTOP:/mnt/c/Windows/System32# sudo /root/.espressif/python_env/idf5.2_py3.12_env/bin/python -m esptool --chip esp32 -p /dev/serial/by-id/usb-1a86_USB_Serial-if00-port0 -b 460800 --before default_reset --after hard_reset write_flash --flash_mode dio --flash_size 8MB --flash_freq 80m --erase-all 0x0 /mnt/c/Windows/System32/lvgl_micropython/build/lvgl_m
icropy_ESP32_GENERIC_S3-SPIRAM_OCT-8.bin

Terminal response:

esptool.py v4.8.1
Serial port /dev/serial/by-id/usb-1a86_USB_Serial-if00-port0
Connectingā€¦
Chip is ESP32-D0WD-V3 (revision v3.1)
Features: WiFi, BT, Dual Core, 240MHz, VRef calibration in efuse, Coding Scheme None
Crystal is 40MHz
MAC: d8:bc:38:f8:a5:ac
Uploading stubā€¦
Running stubā€¦
Stub runningā€¦
Changing baud rate to 460800
Changed.
Configuring flash sizeā€¦
Unexpected chip id in image. Expected 0 but value was 9. Is this image for a different chip model?

A fatal error occurred: /mnt/c/Windows/System32/lvgl_micropython/build/lvgl_micropy_ESP32_GENERIC_S3-SPIRAM_OCT-8.bin is not an ESP32 image. Use --force to flash anyway.
root@DESKTOP:/mnt/c/Windows/System32#

Third try, repeat with --force:

root@DESKTOP:/mnt/c/Windows/System32# sudo /root/.espressif/python_env/idf5.2_py3.12_env/bin/python -m esptool --chip esp32 -p /dev/serial/by-id/usb-1a86_USB_Serial-if00-port0 -b 460800 --before default_reset --after hard_reset write_flash --flash_mode dio --flash_size 8MB --flash_freq 80m --erase-all 0x0 /mnt/c/Windows/System32/lvgl_micropython/build/lvgl_micropy_ESP32_GENERIC_S3-SPIRAM_OCT-8.bin --force

Terminal response:

esptool.py v4.8.1
Serial port /dev/serial/by-id/usb-1a86_USB_Serial-if00-port0
Connectingā€¦
Chip is ESP32-D0WD-V3 (revision v3.1)
Features: WiFi, BT, Dual Core, 240MHz, VRef calibration in efuse, Coding Scheme None
Crystal is 40MHz
MAC: d8:bc:38:f8:a5:ac
Uploading stubā€¦
Running stubā€¦
Stub runningā€¦
Changing baud rate to 460800
Changed.
Configuring flash sizeā€¦
WARNING: Set --flash_size 8MB is larger than the available flash size of 4MB.
Erasing flash (this may take a while)ā€¦
Chip erase completed successfully in 2.7s
Compressed 2524624 bytes to 1464417ā€¦
Wrote 2524624 bytes (1464417 compressed) at 0x00000000 in 32.9 seconds (effective 613.1 kbit/s)ā€¦
Hash of data verified.
Leavingā€¦
Hard resetting via RTS pinā€¦
root@DESKTOP:/mnt/c/Windows/System32#

So firware successfully installed, but will it work given the fatal error warning?
Unfortunately NO.
I tried it on Thonny IDE ā€“ as soon as I connected it, the Thonny shell
shows it is stuck in a forever loop, just the same as I have seen in earlier
attempts to install firware.

It would seem that in this command:

 python3 make.py esp32 BOARD=ESP32_GENERIC_S3 BOARD_VARIANT=SPIRAM_OCT 
    -- flash-size=8 DISPLAY=rgb_display INDEV=gt911

the BOARD= and BOARD_VARIANT= parameters are not correct for the CYD board.

Iā€™m guessing now, but I wonder should I change it to:
python3 make.py esp32 BOARD= ESP32-D0WD-V3
BOARD_VARIANT =SPIRAM_OCT
ā€“ flash-size=8 DISPLAY=rgb_display INDEV=gt911
or maybe:
python3 make.py esp32 BOARD= ESP32-D0WD
BOARD_VARIANT=V3
ā€“ flash-size=8 DISPLAY=rgb_display INDEV=gt911
and run that command again ?

I am not sure of the MCU that is on that CYD. Itā€™s not an RGB display if itā€™s an ESP32 the RGB bus driver is only available on the ESP32-S3 and one other version but not the EP32.

what is the model number of the CYD you are using again?

OK looking at the spec sheet you linked to closer this is what your build command should beā€¦

python3 make.py esp32 BOARD=ESP32_GENERIC DISPLAY=ili9341 INDEV=xpt2046 --flash-size=4

Sorry, I didnā€™t get a notification on your post.

Iā€™m sorry if I was unclear, you need to upload the whole content of the demo_lvgl folder.
Iā€™ve attached screenshots.
You do it like that:

  • Open Thonny and connect your device (which seems to work for you). You can open any file.
  • Navigate to the ā€˜demo_lvglā€™ folder in the file-panel on the top-left side. Open the demo_lvgl folder and select all files (click first file, hold shift, click last file in the window).
  • RIght-click the sellected files and select ā€˜upload to /ā€™
  • Files should now be uploaded to your device.
  • In the lower left panel double click demo_simple.py and press F5.
  • If it doesnt work, open display_driver.py, change seetings, save it and try demo again.

Ran build command again:

python3 make.py esp32 BOARD=ESP32_GENERIC DISPLAY=ili9341 INDEV=xpt2046 --flash-size=4

Then ran flash command:

sudo /root/.espressif/python_env/idf5.2_py3.12_env/bin/python -m esptool --chip esp32 -p /dev/serial/by-id/usb-1a86_USB_Serial-if00-port0 -b 460800 --before default_reset --after hard_reset write_flash --flash_mode dio --flash_size 4MB --flash_freq 40m --erase-all 0x0 /mnt/c/Windows/System32/lvgl_micropython/build/lvgl_micropy_ESP32_GENERIC-4.bin

This time it has flashed the chip with no errors, success at last (I think).

I tried it again in Thonny, and it does not show any unexpected behaviour.
It shows a single file on the chip, boot.py, which has just five lines
of code, all commented out:
# This file is executed on every boot (including wake-boot from deepsleep)
#import esp
#esp.osdebug(None)
#import webrepl
#webrepl.start()

To start with, I have just removed comment from import esp

To give it a try with some actual code, I loaded file demo_simple.py,
copied from CYD2-MPY-LVGL/demo_lvgl at main Ā· de-dh/CYD2-MPY-LVGL Ā· GitHub
and added import demo_simple to the boot.py
and clicked Run.

It finds errors in the code:
File ā€œdemo_simple.pyā€, line 34, in
AttributeError: ā€˜moduleā€™ object has no attribute ā€˜scr_actā€™
Lines 33 to 35 are as follows:
line 33 ā€˜ā€™ā€™ Get reference to active screen for drawing ā€˜ā€™ā€™
line 34 scr = lv.scr_act()
line 35 scr.set_style_bg_color(lv.color_white(), lv.PART.MAIN)

So, success at last with loading the firmware, but now I cannot get demo
code to run. I guess I am missing something ?

This binding is NOT the official LVGL binding. It uses a newer version of LVGL and MicroPython. The drivers are different as well.

I need to write a test script for ya to use to get the display all operational.