You are going to need to be able to redirect USB devices to your WSL installation. To do this I recommend using a program called WSL USB Manager. It makes it easier to manage the devices by providing a GUI to do so. You can download the program from here.
You are also going to need to know where the device “file” is in WSL. The easiest way to do that is to map a network drive to your WSL installation.
Open up Windows/File Explorer on the left side bottom pane you will see “This PC”. right click on that and click on “map network drive”. The path you enter is \\wsl.localhost. set the drive letter to something that is not being used… Once you do that a new drive will be added to that left hand lower pane.
Now you need to install the binaries that are needed to compile.
In the WSL terminal key in the following command…
sudo apt-get install build-essential cmake ninja-build libusb-1.0-0-dev
It is going to prompt you for the root password. Go ahead an enter that and press enter. When entering the password you are not going to see anything on the screen. If it asks for the password again you entered it incorrectly.
The steps above only need to be done a single time.
When you are done with the above steps you are ready to compile.
In a WSL terminal key in the following commands.
git clone https://github.com/lvgl-micropython/lvgl_micropython
cd lvgl_micropython
python3 make.py esp32 BOARD=ESP32_GENERIC_S3 BOARD_VARIANT=SPIRAM_OCT --flash-size=8 DISPLAY=rgb_display INDEV=gt911
Depending on your system it may take a bit to compile. If it looks like it has stalled just wait it is still working so don’t cancel it.
When it has finished compiling it will tell you the command you have to enter to flash the ESP32. That command needs to have the “(PORT)” replaced in it with the unix file for the ESP32 serial port. To get that filename you will need to open up the USB Manager. Look at the list of devices in the top section. Now connect the ESP32 to you computer and click the “Refresh” button in the USB Manager. You will see a new device get added to the list at the top. It is not going to say “ESP32” it is going to appear something along the lines of what is seen in the image below.
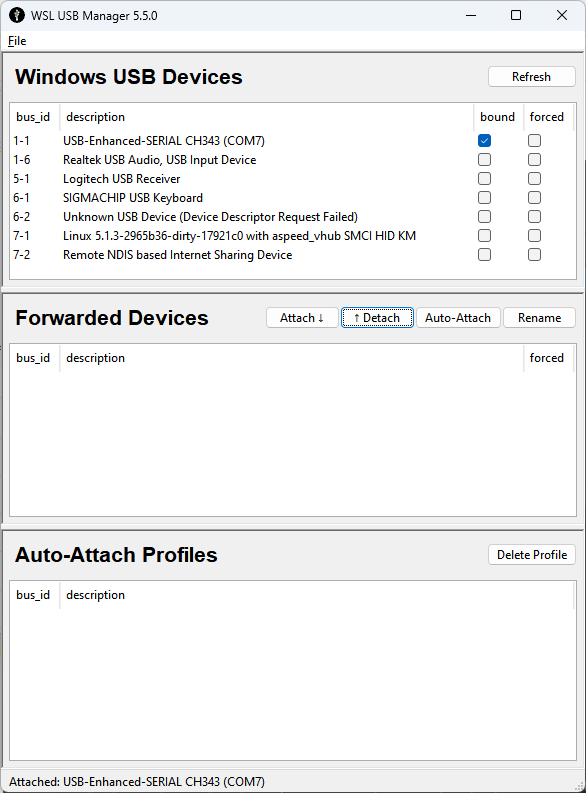
Select the device and then click the “Attach” button and then press the “Refresh” button. When it is connected to WSL it will be listed in the “Forwarded Devices”. Forwarded devices cannot be shared between Windows and WSL so when it is forwarded it is not going to be available in Windows. If the device is in use on Windows it is going to throw an error if you try to attach it to WSL. If you get an error you will need to close whatever application is accessing the device. If you want to connect to the device using a native windows application like Putty or some other terminal program then you need to select the device in the “Forwarded Devices” section and click on the “Detach” button. Only do that once the flashing has finished.
To collect the path to the serial port in WSL you need to open up that mapped network drive. Navigate to “dev\serial\by-id” folder. You should see a single file listed in that folder, right click on that file and click on “copy as path”.
If you always plug the ESP32 into the same USB port on the computer this path/file will always get created having the same name. So this path/file can be used over and over again without any problems.
You will need to adjust the path so it is in unix syntax. so in a text editor past the path. It will appear similar to the following.
"Z:\dev\serial\by-id\usb-1a86_USB_Single_Serial_56E1012191-if00"
you will need to change it so it reads
/dev/serial/by-id/usb-1a86_USB_Single_Serial_56E1012191-if00
The now changed path is what you are going to use to replace “(PORT)” in the flash command.
The flash command that is output will be something along the lines of the following.
/home/****/.espressif/python_env/idf5.2_py3.10_env/bin/python -m esptool --chip esp32s3 -p (PORT) -b 460800 --before default_reset --after hard_reset write_flash --flash_mode dio --flash_size 8MB --flash_freq 80m --erase-all 0x0 /home/****/rgb_test/lvgl_micropython/build/lvgl_micropy_ESP32_GENERIC_S3-SPIRAM_OCT-8.bin
Once you replace the “(PORT)” you end up with
/home/****/.espressif/python_env/idf5.2_py3.10_env/bin/python -m esptool --chip esp32s3 -p /dev/serial/by-id/usb-1a86_USB_Single_Serial_56E1012191-if00 -b 460800 --before default_reset --after hard_reset write_flash --flash_mode dio --flash_size 8MB --flash_freq 80m --erase-all 0x0 /home/****/rgb_test/lvgl_micropython/build/lvgl_micropy_ESP32_GENERIC_S3-SPIRAM_OCT-8.bin
if you want you can increase the speed it flashes with. Most ESP32 boards can be flashed using 921600 To do that change the flash command to read
/home/****/.espressif/python_env/idf5.2_py3.10_env/bin/python -m esptool --chip esp32s3 -p /dev/serial/by-id/usb-1a86_USB_Single_Serial_56E1012191-if00 -b 921600 --before default_reset --after hard_reset write_flash --flash_mode dio --flash_size 8MB --flash_freq 80m --erase-all 0x0 /home/****/rgb_test/lvgl_micropython/build/lvgl_micropy_ESP32_GENERIC_S3-SPIRAM_OCT-8.bin
Depending on how your WSL installation is done you may have to run the flash command as root. to do that simply add "sudo " to the beginning of the flash command.
while this does deem to be complicated it really isn’t. A lot of it are things that only need to be done a single time. If you want to update the code being used when compiling the firmware then you will need to do a recursive delete of the lvgl_micropython folder. It is faster to do this from a wsl terminal than if you use the Windows File Explorer. to do the recursive delete make sure you are in the parent folder of lvgl_micropython and enter rm -rf lvgl_micropython into the WSL terminal and that will erase the repo and you will need to clone it again using git clone https://github.com/lvgl-micropython/lvgl_micropython and then you can build it again. You can flash the ESP32 with the compiled firmware as many times as you like. If you need to adjust the firmware at all you can do so by using the build command again, you do not have to clone the repo over and over again. The second time you run the build command it is going to compile a lot faster because it is not going to have to collect all of the requirements again. It will clean the last build and then do a fresh build.
Once you get the ESP32 running ask me about running MicroPython and LVGL on your desktop without needing to use the ESP32.