GT911 touch initilization error for waveshare 4.3 inch capacitive touch screen display

I have followed the installation procedures and the files carefully from the following wiki https://www.waveshare.com/wiki/ESP32-S3-Touch-LCD-4.3. LVGL seems to run and upload but i keep getting a touch initilization error. i tried to run the touch test it also seems to fail. i tried running the porting code and this is the error i got . for people who own a similar display can you tell me how you got around this error

D (78) ESP_PanelBus_I2C: Panel IO @0x3fcecc7c created
D (83) ESP_PanelTouch: Disable interruption
E (87) lcd_panel.io.i2c: panel_io_i2c_rx_buffer(135): i2c transaction failed
E (94) GT911: touch_gt911_read_cfg(362): GT911 read error!
E (99) GT911: esp_lcd_touch_new_i2c_gt911(128): GT911 init failed
E (105) GT911: Error (0xffffffff)! Touch controller GT911 initialization failed!
E (112) GT911_CPP: [ESP_FAIL] begin(43): New driver failed
E (117) ESP_Panel: begin(540): Begin touch failed
Initialize LVGL
D (133) ESP_PanelTouch: Get invalid handle
Create UI
LVGL porting example end

What MCU/Processor/Board and compiler are you using?

I am using a waveshare 4.3 inch capacitive touch display with esp32s3

What LVGL version are you using?

V8.3.3

What do you want to achieve?

I am getting a touch initialization error for GT911 .

What have you tried so far?

Code to reproduce

( This it the porting code i am using that is given in the manufacturers WIKI. i have also configuered the GT911 touch driver correctly in the custom board.h file)
#include <Arduino.h>
#include <ESP_Panel_Library.h>
#include <lvgl.h>
#include “lvgl_port_v8.h”

/**
/* To use the built-in examples and demos of LVGL uncomment the includes below respectively.

  • You also need to copy lvgl/examples to lvgl/src/examples. Similarly for the demos lvgl/demos to lvgl/src/demos.
    */
    //#include <demos/lv_demos.h>
    //#include <examples/lv_examples.h>

void setup()
{
String title = “LVGL porting example”;
//waveshare_esp32_s3_touch_reset();
Serial.begin(115200);
Serial.println(title + " start");

Serial.println("Initialize panel device");
ESP_Panel *panel = new ESP_Panel();
panel->init();

#if LVGL_PORT_AVOID_TEAR
// When avoid tearing function is enabled, configure the RGB bus according to the LVGL configuration
ESP_PanelBus_RGB *rgb_bus = static_cast<ESP_PanelBus_RGB *>(panel->getLcd()->getBus());
rgb_bus->configRgbFrameBufferNumber(LVGL_PORT_DISP_BUFFER_NUM);
rgb_bus->configRgbBounceBufferSize(LVGL_PORT_RGB_BOUNCE_BUFFER_SIZE);
#endif
panel->begin();

Serial.println("Initialize LVGL");
lvgl_port_init(panel->getLcd(), panel->getTouch());

Serial.println("Create UI");
/* Lock the mutex due to the LVGL APIs are not thread-safe */
lvgl_port_lock(-1);


/**
 * Try an example. Don't forget to uncomment header.
 * See all the examples online: https://docs.lvgl.io/master/examples.html
 * source codes: https://github.com/lvgl/lvgl/tree/e7f88efa5853128bf871dde335c0ca8da9eb7731/examples
 */
//  lv_example_btn_1();

/**
 * Or try out a demo.
 * Don't forget to uncomment header and enable the demos in `lv_conf.h`. E.g. `LV_USE_DEMOS_WIDGETS`
 */
 //lv_demo_widgets();
// lv_demo_benchmark();
//lv_demo_music();
// lv_demo_stress();

/* Release the mutex */
lvgl_port_unlock();

Serial.println(title + " end");

}

void loop()
{
Serial.println(“IDLE loop”);
delay(1000);
}
Give this repo a try. It works with your display without any issue. It’s easy to compile and easy to get up and running.

you can compile on Linux and MacOS. if you are running Windows then you will need to use WSL…

This is the build command you are going to want to use…

python3 make.py esp32 BOARD=ESP32_GENERIC_S3 BOARD_VARIANT=SPIRAM_OCT --flash-size=8 DISPLAY=rgb_display INDEV=gt911

when it is finished compiling it is going to tell you to run a command. That command is what flashed the firmware. you will need to change the “PORT” in the command so it points to the absolute path to the serial port the ESP32 shows up as.

I am having you test with that library just to make sure the display is functioning properly touch and all.

HI , thank you for you reply . I am completely new to this . I have installed WSL for windows and i got a Ubuntu terminal. can you tell me how and what exactly to compile. thank you in advance

You are going to need to be able to redirect USB devices to your WSL installation. To do this I recommend using a program called WSL USB Manager. It makes it easier to manage the devices by providing a GUI to do so. You can download the program from here.

You are also going to need to know where the device “file” is in WSL. The easiest way to do that is to map a network drive to your WSL installation.

Open up Windows/File Explorer on the left side bottom pane you will see “This PC”. right click on that and click on “map network drive”. The path you enter is \\wsl.localhost. set the drive letter to something that is not being used… Once you do that a new drive will be added to that left hand lower pane.

Now you need to install the binaries that are needed to compile.

In the WSL terminal key in the following command…

sudo apt-get install build-essential cmake ninja-build libusb-1.0-0-dev

It is going to prompt you for the root password. Go ahead an enter that and press enter. When entering the password you are not going to see anything on the screen. If it asks for the password again you entered it incorrectly.

The steps above only need to be done a single time.

When you are done with the above steps you are ready to compile.

In a WSL terminal key in the following commands.

git clone https://github.com/lvgl-micropython/lvgl_micropython
cd lvgl_micropython
python3 make.py esp32 BOARD=ESP32_GENERIC_S3 BOARD_VARIANT=SPIRAM_OCT --flash-size=8 DISPLAY=rgb_display INDEV=gt911

Depending on your system it may take a bit to compile. If it looks like it has stalled just wait it is still working so don’t cancel it.

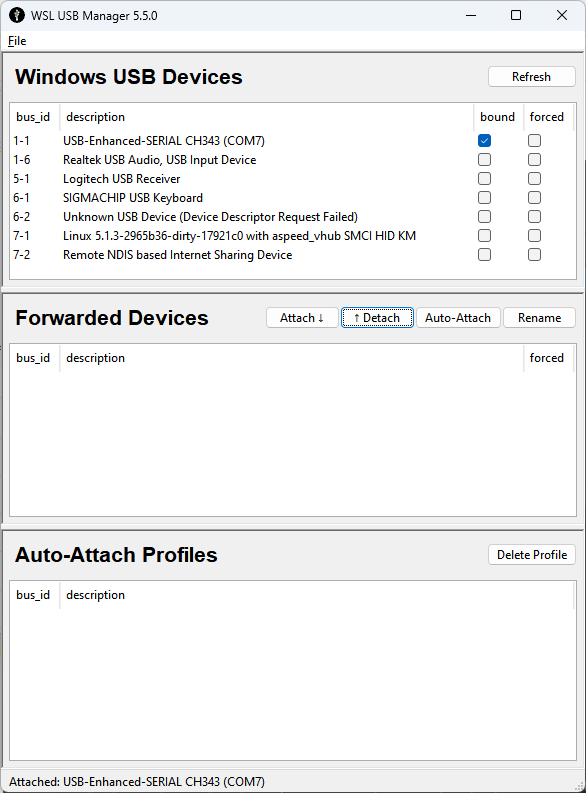
When it has finished compiling it will tell you the command you have to enter to flash the ESP32. That command needs to have the “(PORT)” replaced in it with the unix file for the ESP32 serial port. To get that filename you will need to open up the USB Manager. Look at the list of devices in the top section. Now connect the ESP32 to you computer and click the “Refresh” button in the USB Manager. You will see a new device get added to the list at the top. It is not going to say “ESP32” it is going to appear something along the lines of what is seen in the image below.

Select the device and then click the “Attach” button and then press the “Refresh” button. When it is connected to WSL it will be listed in the “Forwarded Devices”. Forwarded devices cannot be shared between Windows and WSL so when it is forwarded it is not going to be available in Windows. If the device is in use on Windows it is going to throw an error if you try to attach it to WSL. If you get an error you will need to close whatever application is accessing the device. If you want to connect to the device using a native windows application like Putty or some other terminal program then you need to select the device in the “Forwarded Devices” section and click on the “Detach” button. Only do that once the flashing has finished.

To collect the path to the serial port in WSL you need to open up that mapped network drive. Navigate to “dev\serial\by-id” folder. You should see a single file listed in that folder, right click on that file and click on “copy as path”.

If you always plug the ESP32 into the same USB port on the computer this path/file will always get created having the same name. So this path/file can be used over and over again without any problems.

You will need to adjust the path so it is in unix syntax. so in a text editor past the path. It will appear similar to the following.

"Z:\dev\serial\by-id\usb-1a86_USB_Single_Serial_56E1012191-if00"

you will need to change it so it reads

/dev/serial/by-id/usb-1a86_USB_Single_Serial_56E1012191-if00

The now changed path is what you are going to use to replace “(PORT)” in the flash command.

The flash command that is output will be something along the lines of the following.

/home/****/.espressif/python_env/idf5.2_py3.10_env/bin/python -m esptool --chip esp32s3 -p (PORT) -b 460800 --before default_reset --after hard_reset write_flash --flash_mode dio --flash_size 8MB --flash_freq 80m --erase-all 0x0 /home/****/rgb_test/lvgl_micropython/build/lvgl_micropy_ESP32_GENERIC_S3-SPIRAM_OCT-8.bin

Once you replace the “(PORT)” you end up with

/home/****/.espressif/python_env/idf5.2_py3.10_env/bin/python -m esptool --chip esp32s3 -p /dev/serial/by-id/usb-1a86_USB_Single_Serial_56E1012191-if00 -b 460800 --before default_reset --after hard_reset write_flash --flash_mode dio --flash_size 8MB --flash_freq 80m --erase-all 0x0 /home/****/rgb_test/lvgl_micropython/build/lvgl_micropy_ESP32_GENERIC_S3-SPIRAM_OCT-8.bin

if you want you can increase the speed it flashes with. Most ESP32 boards can be flashed using 921600 To do that change the flash command to read

/home/****/.espressif/python_env/idf5.2_py3.10_env/bin/python -m esptool --chip esp32s3 -p /dev/serial/by-id/usb-1a86_USB_Single_Serial_56E1012191-if00 -b 921600 --before default_reset --after hard_reset write_flash --flash_mode dio --flash_size 8MB --flash_freq 80m --erase-all 0x0 /home/****/rgb_test/lvgl_micropython/build/lvgl_micropy_ESP32_GENERIC_S3-SPIRAM_OCT-8.bin

Depending on how your WSL installation is done you may have to run the flash command as root. to do that simply add "sudo " to the beginning of the flash command.

while this does deem to be complicated it really isn’t. A lot of it are things that only need to be done a single time. If you want to update the code being used when compiling the firmware then you will need to do a recursive delete of the lvgl_micropython folder. It is faster to do this from a wsl terminal than if you use the Windows File Explorer. to do the recursive delete make sure you are in the parent folder of lvgl_micropython and enter rm -rf lvgl_micropython into the WSL terminal and that will erase the repo and you will need to clone it again using git clone https://github.com/lvgl-micropython/lvgl_micropython and then you can build it again. You can flash the ESP32 with the compiled firmware as many times as you like. If you need to adjust the firmware at all you can do so by using the build command again, you do not have to clone the repo over and over again. The second time you run the build command it is going to compile a lot faster because it is not going to have to collect all of the requirements again. It will clean the last build and then do a fresh build.

Once you get the ESP32 running ask me about running MicroPython and LVGL on your desktop without needing to use the ESP32.

Have a look here -
https://github.com/Westcott1/Waveshare-ESP32-S3-Touch-LCD-4.3-and-Arduino

1 Like

Hi, thank you for your help. Your example code works perfectly with my display, but there’s an issue: touch doesn’t work with the LVGL example. I tested the LovyanGFX example, and touch works there. Could you help identify the problem in the LVGL example? Thank you!

Hi Mustafa,
Glad some of it works!
Odd, because the TouchInit() is the same for both.
In the Serial Monitor, what do you see for Touch sensor type =
Sorry I can’t compile this code any more, I’m now on LGVL9
Regards,
Hamish

Touch sensor type = GT911. i am getting the correct sensor type on the serial monitor. to test whether my touch was working through bb_captouch. i used the following code and i was able to see that the touch was working.

//#include <Wire.h>
#include <bb_captouch.h>

// Define touch controller pins
#define TOUCH_SDA 8
#define TOUCH_SCL 9
#define TOUCH_INT 4
#define TOUCH_RST 0

// Touch controller object
BBCapTouch bbct;

// Names of supported sensors
const char* szNames = { “Unknown”, “FT6x36”, “GT911”, “CST820” };

void setup() {
Serial.begin(115200);
while (!Serial) {
// Wait for Serial Monitor to open
};

Serial.println(“Starting Touch Test…”);

// Initialize touch
bbct.init(TOUCH_SDA, TOUCH_SCL, TOUCH_RST, TOUCH_INT);
int iType = bbct.sensorType();
if (iType >= 0 && iType < (int)(sizeof(szNames) / sizeof(szNames[0]))) {
Serial.printf(“Touch sensor type: %s\n”, szNames[iType]);
} else {
Serial.println(“Touch sensor type: Unknown or unsupported.”);
}
}

void loop() {
TOUCHINFO ti;

// Read touch samples
if (bbct.getSamples(&ti)) {
// For each touch point detected
for (int i = 0; i < ti.count; i++) {
Serial.printf(“Touch #%d → X: %d, Y: %d, Size: %d\n”, i + 1, ti.x[i], ti.y[i], ti.area[i]);
}
Serial.println();
}
//delay(100); // Short delay to prevent spamming the Serial Monitor

to further test i added a button using lvgl to test it. it doesnt work . would you know where the issue might be?

@Westcott There is another thing that i forgot to mention. As i am currently using arduino IDE I also had to change the expander IO code slightly becuase of the following error that i was getting
Compilation error: invalid conversion from ‘int’ to ‘i2c_port_t’ [-fpermissive]

I was able to resolve this issue by getting in touch with the wavshare support. they provided me with the a new demo code that does all the initilizations correctly and i am not facing those issues anymore.

https://files.waveshare.com/wiki/ESP32-S3-Touch-LCD-4.3/demo/ESP32-S3-Touch-LCD-4.3_Code.zip

the above is the link to the new demo files for anyone who is facing a similar issue

kdschlosser - thank you so much for this awesome guide!

I am getting stuck on one part - mapping the network drive. When I select a drive letter, then enter \\wsl.localhost for the path, I get an error: “The network path \\wsl.localhost could not be found.”

I have tried a variety of things like restarts, attaching and detaching the device in the USB Manager, trying with WSL running or not… I can’t seem to figure out what I’m doing wrong.
Any help is greatly appreciated!

what version of WSL are you using?

C:\Users\hudsonmd>wsl -l -v
NAME STATE VERSION
Ubuntu Running 2

C:\Users\hudsonmd>wsl -v
WSL version: 2.3.26.0
Kernel version: 5.15.167.4-1
WSLg version: 1.0.65
MSRDC version: 1.2.5620
Direct3D version: 1.611.1-81528511
DXCore version: 10.0.26100.1-240331-1435.ge-release
Windows version: 10.0.26100.2894

Is my version older (or newer) than the steps described? Any thoughts on what steps might change with a different version of WSL? Thanks again for your help on this.

Nevermind - I found the answer in another thread - the path I needed was \\wsl$\Ubuntu versus \\wsl.localhost.
Thanks again!