Create buffers in psram esp32s3

Important: unclear posts may not receive useful answers.

Before posting

  • Get familiar with Markdown to format and structure your post
  • Be sure to update lvgl from the latest version from the master branch.
  • Be sure you have checked the FAQ and read the relevant part of the documentation.
  • If applicable use the Simulator to eliminate hardware related issues.

Delete this section if you read and applied the mentioned points.

Description

Recently I’ve been working with my GC90A1 display, to get a better fps, I create 2 whole-screen size buffers in my project and it takes almost 90% of board’s sram,so i want to create buffers in psram.

Platform : Platform io with Arduino framework

What MCU/Processor/Board and compiler are you using?

esp32s3 n16r8

What LVGL version are you using?

V8.3

What do you want to achieve?

Create frame buffers in psram

What have you tried so far?

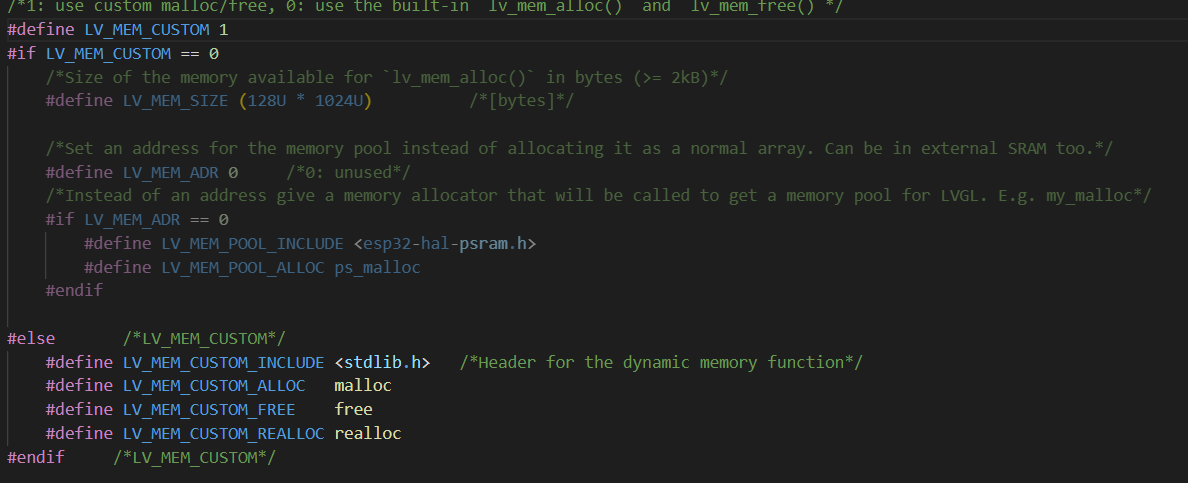
I’ve tried to modify lv_conf.h like this:

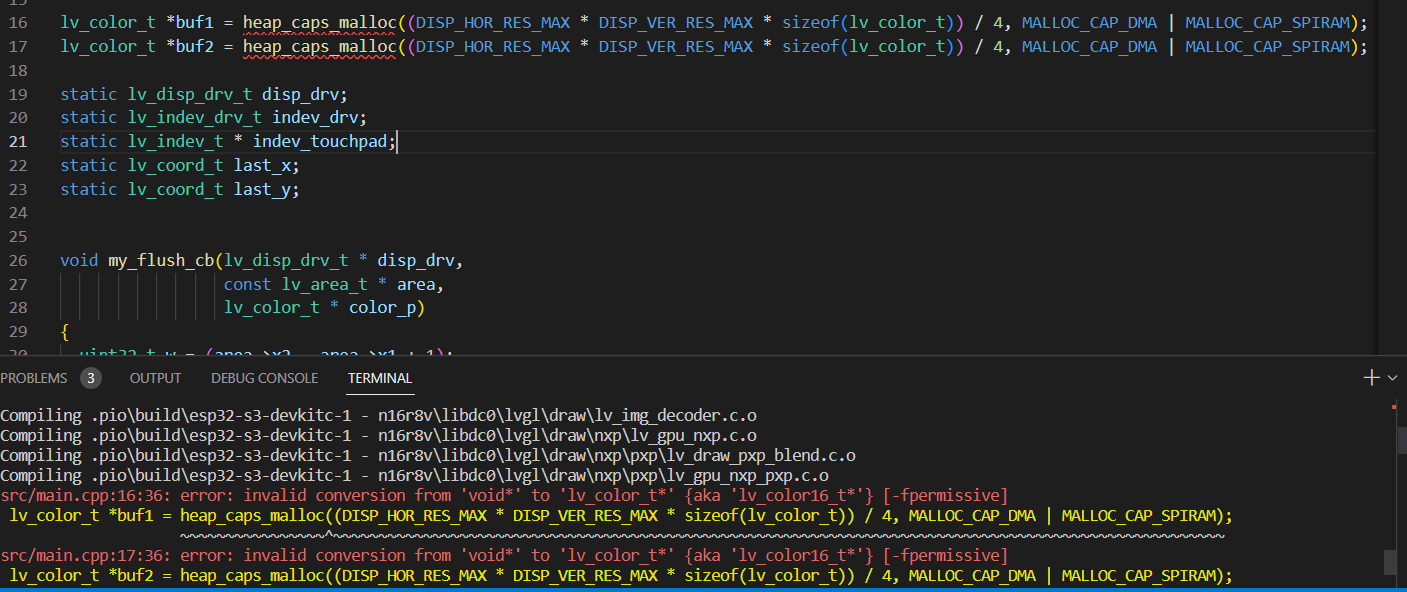
And in main.cpp, I create 2 buffers in this way:

Though I can flash code in my board, but it keeps rebooting:
rst:0xc (RTC_SW_CPU_RST),
boot:0x8 (SPI_FAST_FLASH_BOOT)
Saved PC:0x403776e0
SPIWP:0xee
mode:DIO, clock div:1
load:0x3fce3808,len:0x44c load:0x403c9700,len:0xbe4 load:0x403cc700,len:0x2a38
entry 0x403c98d4

Code to reproduce

Add a code snippet which can run in the simulator. It should contain only the relevant code that compiles without errors when separated from your main code base.

The code block(s) should be formatted like:

/*You code here*/

Screenshot and/or video

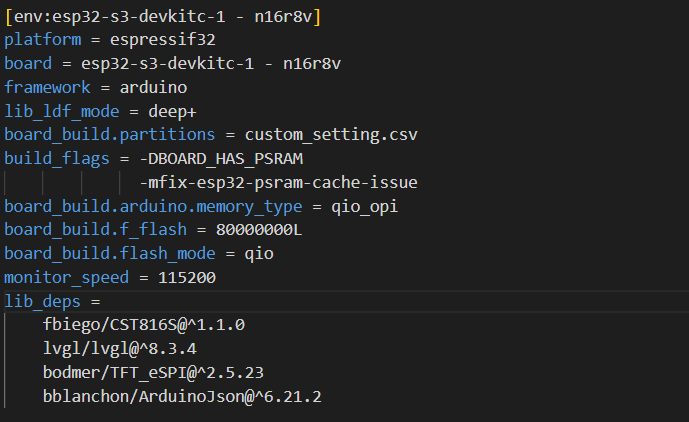
here is my settings in platformio.ini
image

not the best thing to create frame buffers that take up the entire screen. 1/8 to 1/4 of the size. If the buffer is to large it is going to cause a lot of lag.

Since you also have the ESP32 S3 I suggest you use the DMA memory that is available in the SPIRAM.

Let LVGL handle its own thing with memory allocation. I would leave the LV_MEM_CUSTOM to use the builtin functions for LVGL.

To get better performance when writing the data to the display smaller frame buffers. You are also not creating the frame buffers properly.

lv_color_t *buf1 = heap_caps_malloc((DISP_HOR_RES_MAX * DISP_VER_RES_MAX * sizeof(lv_color_t)) / 4, MALLOC_CAP_DMA | MALLOC_CAP_SPIRAM);

lv_color_t *buf2 = heap_caps_malloc((DISP_HOR_RES_MAX * DISP_VER_RES_MAX * sizeof(lv_color_t)) / 4, MALLOC_CAP_DMA | MALLOC_CAP_SPIRAM);

One thing when using DMA memory is you have to make a callback function to notify LVGL that the frame buffer has been written. Because transferring from DMA does not need to interrupt the CPU while one buffer is being written to the display LVGL can be off filling the other buffer. You don’t want LVGL to send the second buffer if the first one has not finished sending.

static bool example_notify_lvgl_flush_ready(esp_lcd_panel_io_handle_t panel_io, esp_lcd_panel_io_event_data_t *edata, void *user_ctx)
{
    lv_disp_drv_t *disp_driver = (lv_disp_drv_t *)user_ctx;
    lv_disp_flush_ready(disp_driver);
    return false;
}

IDK what you are using for a display driver. If you are using the esp_lcd drivers that are built into the espidf then you can set the above callback to the on_color_trans_done field in the io config structure you are using for your display.

If you are using some other driver package like tft_eSPI then you will have to research how to set up that callback.

There is no real purpose to running a double buffer if you are not using DMA memory. This is because LVGL has to sit there and wait until the buffer gets emptied before it can continue. So a second buffer doesn’t increase performance at all. It just consumes your memory and ends up sitting there unused.

1 Like

Thanks for your immediate reply!
I’m new to esp32 and lvgl :smiling_face_with_tear:
after trying your code and method it looks like this:


I tried to convert heap_caps_malloc into a lv_color_t* ptr and flash code into my board, but this time the display stops showing images.
I’m using tft_espi library as my display driver, further help plz!

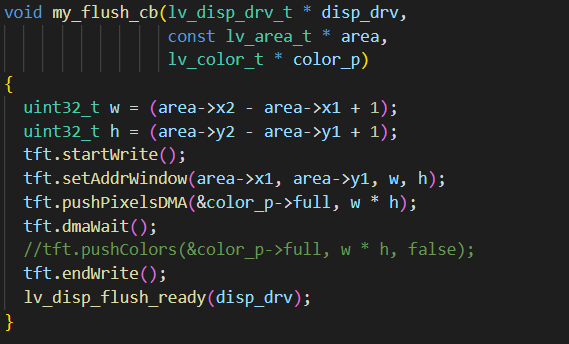
besides, the callback functions you metioned, is that something like this?
image

My thanks again!!!

That callback is the flush callback. You would need another callback. that is intended to let LVGL know when the buffer has been emptied. Right know that is being done inside the flush callback you have above…

and sorry about that I goofed with the buffers as well. You need to add (lv_color_t *) right after the equals sign.

I need to see all of the code you have before the buffers are made in order to know how you have things set up and what needs to be done in order to get the DMA working properly. Right now if the code ran you would end up with data corruption of the buffers… lets get it working with out the DMA first and then we can tinker with that once we get the display running for ya.

I want you to remove the MALLOC_CAP_DMA | from the buffer lines. You still need to add the (lv_color_t *) after the equals in the buffer lines.

I am going to look into the mechanics of the TFT_eSPI library and see if we can get a proper running DMA. That tft.dmawait function removes any of the performance gains you would get from using DMA memory. So it makes it pointless. You don’t want to stall the program while the display data is being written. that is the purpose of using the DMA memory is so the program doesn’t have to wait.

Above those code just some variable definitions, there’s nothing to do with dma.
I try to run my code with only one buffer in SRAM and it works great. But once I switched to two buffers, data will corrupt because there’s Nullptr in register.
I also post a QA in TFT _espi forum but not getting any answer yet. It seems like every dma functions in TFT library have dmawait inside and it’s working in a blocking way. Maybe I have to modify the espi library or switch to another driver :smiling_face_with_tear:.
I’ll let you know if I make any progress.

What is the display you are using? There could already be a driver built into the espidf for your display. I need to know the driver IC model number specifically. If there isn’t a driver included or available as a component for the espidf I am sure I could put one together for ya.

LCD’s IC is GC9A01 and touch IC is CST816S.

stop using TFT_eSPI aand use the esp_lcd component in conjunction with the component in the link instead.

Let me see what I can find for your touch screen.

there is a component for that as well.

here is the GitHub page for it

Here is another one for the display. This one is registered with the espidf component library

Thanks a lot for your sharing!
But right now I’m doing with Arduino framework and I’m not ready to switch to idf yet. :pensive:
I’ve found a library called esp32dmaspi and I’ll try to see if I can combine two things together to achieve my goal. In the end, if nothing works,I’ll try your method.
Thanks for your support again! I really appreciate it.

Sorry @kdschlosser I have to trouble you again. This time I could create two buffers in psram use heap_caps_malloc, but once I flash into my board and everything goes wrong again. Here is the backtrace I decode:
0x420d44c4: lv_obj_get_event_dsc at D:\esp32s3_watch\esp32s3_watch/.pio/libdeps/esp32-s3-devkitc-1-n16r8v/lvgl/src/core/lv_event.c:420
0x420027f1: event_send_core at D:\esp32s3_watch\esp32s3_watch/.pio/libdeps/esp32-s3-devkitc-1-n16r8v/lvgl/src/core/lv_event.c:439
0x42002941: lv_event_send at D:\esp32s3_watch\esp32s3_watch/.pio/libdeps/esp32-s3-devkitc-1-n16r8v/lvgl/src/core/lv_event.c:75
0x4200521f: lv_obj_draw at D:\esp32s3_watch\esp32s3_watch/.pio/libdeps/esp32-s3-devkitc-1-n16r8v/lvgl/src/core/lv_obj.c:558
0x42005958: lv_obj_event at D:\esp32s3_watch\esp32s3_watch/.pio/libdeps/esp32-s3-devkitc-1-n16r8v/lvgl/src/core/lv_obj.c:846
0x420d4512: lv_obj_event_base at D:\esp32s3_watch\esp32s3_watch/.pio/libdeps/esp32-s3-devkitc-1-n16r8v/lvgl/src/core/lv_event.c:98
0x42002851: event_send_core at D:\esp32s3_watch\esp32s3_watch/.pio/libdeps/esp32-s3-devkitc-1-n16r8v/lvgl/src/core/lv_event.c:458
0x42002941: lv_event_send at D:\esp32s3_watch\esp32s3_watch/.pio/libdeps/esp32-s3-devkitc-1-n16r8v/lvgl/src/core/lv_event.c:75
0x4200be44: lv_obj_redraw at D:\esp32s3_watch\esp32s3_watch/.pio/libdeps/esp32-s3-devkitc-1-n16r8v/lvgl/src/core/lv_refr.c:147
0x4200beb9: refr_obj at D:\esp32s3_watch\esp32s3_watch/.pio/libdeps/esp32-s3-devkitc-1-n16r8v/lvgl/src/core/lv_refr.c:885
0x4200c1b3: refr_obj_and_children at D:\esp32s3_watch\esp32s3_watch/.pio/libdeps/esp32-s3-devkitc-1-n16r8v/lvgl/src/core/lv_refr.c:767
0x4200c3fe: refr_area_part at D:\esp32s3_watch\esp32s3_watch/.pio/libdeps/esp32-s3-devkitc-1-n16r8v/lvgl/src/core/lv_refr.c:702
0x4200c4fd: refr_area at D:\esp32s3_watch\esp32s3_watch/.pio/libdeps/esp32-s3-devkitc-1-n16r8v/lvgl/src/core/lv_refr.c:560
0x4200c6bd: refr_invalid_areas at D:\esp32s3_watch\esp32s3_watch/.pio/libdeps/esp32-s3-devkitc-1-n16r8v/lvgl/src/core/lv_refr.c:532
0x4200c8e7: _lv_disp_refr_timer at D:\esp32s3_watch\esp32s3_watch/.pio/libdeps/esp32-s3-devkitc-1-n16r8v/lvgl/src/core/lv_refr.c:324
0x4201e30e: lv_timer_exec at D:\esp32s3_watch\esp32s3_watch/.pio/libdeps/esp32-s3-devkitc-1-n16r8v/lvgl/src/misc/lv_timer.c:313 (discriminator 2)
0x4201e3ca: lv_timer_handler at D:\esp32s3_watch\esp32s3_watch/.pio/libdeps/esp32-s3-devkitc-1-n16r8v/lvgl/src/misc/lv_timer.c:109
0x420016cf: loop() at D:\esp32s3_watch\esp32s3_watch/.pio/libdeps/esp32-s3-devkitc-1-n16r8v/lvgl/src/lv_api_map.h:37
(inlined by) loop() at D:\esp32s3_watch\esp32s3_watch/src/main.cpp:119
0x420411dc: loopTask(void*) at C:/Users/Mashiro-Suki/.platformio/packages/framework-arduinoespressif32/cores/esp32/main.cpp:50

Here is my source code:

#include <lvgl.h>
#include <TFT_eSPI.h>
#include "wificonnect.h"
#include "ui.h"
#include "CST816S.h"
#include<Arduino.h>
CST816S mytouch(8, 9, 6, 21);
TFT_eSPI tft = TFT_eSPI(240,240);
extern weathercondition weather;

static lv_disp_draw_buf_t disp_buf;

//static lv_color_t buf1[DISP_HOR_RES_MAX * DISP_VER_RES_MAX];
//static lv_color_t buf2[DISP_HOR_RES_MAX * DISP_VER_RES_MAX];

lv_color_t *buf1 = (lv_color_t*) heap_caps_malloc(DISP_HOR_RES_MAX * DISP_VER_RES_MAX, MALLOC_CAP_SPIRAM);
lv_color_t *buf2 = (lv_color_t*) heap_caps_malloc(DISP_HOR_RES_MAX * DISP_VER_RES_MAX, MALLOC_CAP_SPIRAM);

//void* buf1 = ps_malloc(DISP_HOR_RES_MAX * DISP_VER_RES_MAX);
//void* buf2 = ps_malloc(DISP_HOR_RES_MAX * DISP_VER_RES_MAX);

static lv_disp_drv_t disp_drv;
static lv_indev_drv_t indev_drv;
static lv_indev_t * indev_touchpad;
static lv_coord_t last_x;
static lv_coord_t last_y;

/*void DMA_SPI(dma_callback * dmacb){

}*/

void my_flush_cb(lv_disp_drv_t * disp_drv, 
                 const lv_area_t * area, 
                 lv_color_t * color_p)
{
  uint32_t w = (area->x2 - area->x1 + 1);
  uint32_t h = (area->y2 - area->y1 + 1);
  tft.startWrite();
  tft.setAddrWindow(area->x1, area->y1, w, h);
  //tft.initDMA();
  //tft.pushPixelsDMA(&color_p->full, w * h);
  //tft.dmaWait();
  tft.pushColors(&color_p->full, w * h, false);
  tft.endWrite();
  lv_disp_flush_ready(disp_drv);
}

void touchpad_read(lv_indev_drv_t * indev_drv, lv_indev_data_t * data)
{
    last_x = 0;
    last_y = 0;
    if(mytouch.available()) {
        last_x = mytouch.data.x;
        last_y = mytouch.data.y;
        data->state = LV_INDEV_STATE_PR;
    }
    else {
        data->state = LV_INDEV_STATE_REL;
    }
    data->point.x = last_x;
    data->point.y = last_y;
}


void lv_port_indev_init(void)
{
    static lv_indev_drv_t indev_drv;

    /*Register a touchpad input device*/
    lv_indev_drv_init(&indev_drv);
    indev_drv.type = LV_INDEV_TYPE_POINTER;
    indev_drv.read_cb = touchpad_read;
    indev_touchpad = lv_indev_drv_register(&indev_drv);
}

void lvgl_TFT_Init(void){
  /*Initialize LVGL Core*/
  lv_init();
  
  /*Initialize TFT drivers*/
  tft.begin();
  tft.setRotation(0);

  /*Initialize buffer*/
  lv_disp_draw_buf_init(&disp_buf,buf1,buf2,DISP_HOR_RES_MAX * DISP_VER_RES_MAX);

  /*Initialize drivers*/
  lv_disp_drv_init(&disp_drv);
  disp_drv.draw_buf = &disp_buf;
  disp_drv.flush_cb = my_flush_cb;
  disp_drv.full_refresh = 1;
  disp_drv.hor_res = DISP_HOR_RES_MAX;
  disp_drv.ver_res = DISP_VER_RES_MAX;
  lv_disp_drv_register(&disp_drv);
  
  tft.fillScreen(TFT_BLACK);
}


void setup() {
  Serial.begin(9600);
  Serial.println("funtioning");
  mytouch.begin();
  lvgl_TFT_Init();
  Serial.println("lvgl_init Done");
  lv_port_indev_init();
  Serial.println("activating touchpad");
  WiFi_connect();
  time_init();  
  ui_init();
  Serial.printf("Deafult free size: %d\n", heap_caps_get_free_size(MALLOC_CAP_DEFAULT));
  Serial.printf("PSRAM free size: %d\n", heap_caps_get_free_size(MALLOC_CAP_SPIRAM));
  Serial.printf("%d",weather.weather_code);
}

void loop() { 
  lv_task_handler(); 
}

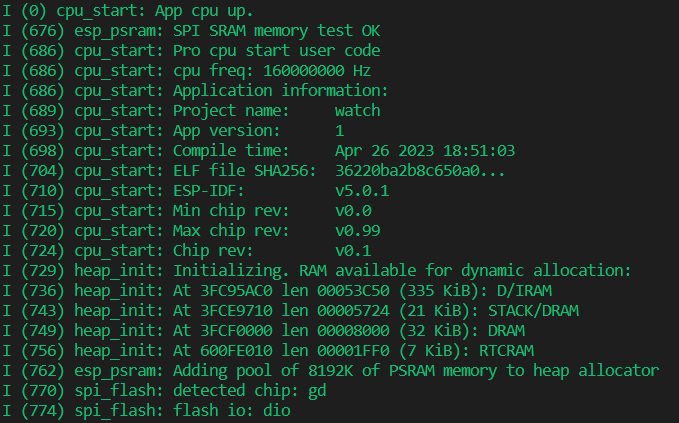
From the serial output, some of the space has been taken in psram and it seems like buffers has been successfully created in psram but something goes wrong during lvgl drawing the whole screen.
image

And for the core dump:


It may imply that a ptr to access data is uninitialized.

Any help plz?

OK so I have a couple of questions.

why are you doing full display updates? You don’t need to do that. change

  disp_drv.full_refresh = 1;

to a 0.

The other thing is if you are not using DMA there is no need to use 2 buffers. The second buffer is not going to get used. So remove it.

Lets make the code a little less complex.

I have not used tft_eSPI all that much and I am not that familiar with it. Have you checked to see what
DISP_HOR_RES_MAX and DISP_VER_RES_MAX actually are? need to know if they have the width and height set properly to them. I honestly would define my own macros for width and height and use those instead.

what does the user_setup.h file look like?

it should look something like this

//                            USER DEFINED SETTINGS
//   Set driver type, fonts to be loaded, pins used and SPI control method etc
//
//   See the User_Setup_Select.h file if you wish to be able to define multiple
//   setups and then easily select which setup file is used by the compiler.
//
//   If this file is edited correctly then all the library example sketches should
//   run without the need to make any more changes for a particular hardware setup!
//   Note that some sketches are designed for a particular TFT pixel width/height

// User defined information reported by "Read_User_Setup" test & diagnostics example
#define USER_SETUP_INFO "User_Setup"

// Define to disable all #warnings in library (can be put in User_Setup_Select.h)
//#define DISABLE_ALL_LIBRARY_WARNINGS

// ##################################################################################
//
// Section 1. Call up the right driver file and any options for it
//
// ##################################################################################

// Define STM32 to invoke optimised processor support (only for STM32)
//#define STM32

// Defining the STM32 board allows the library to optimise the performance
// for UNO compatible "MCUfriend" style shields
//#define NUCLEO_64_TFT
//#define NUCLEO_144_TFT

// STM32 8 bit parallel only:
// If STN32 Port A or B pins 0-7 are used for 8 bit parallel data bus bits 0-7
// then this will improve rendering performance by a factor of ~8x
//#define STM_PORTA_DATA_BUS
//#define STM_PORTB_DATA_BUS

// Tell the library to use parallel mode (otherwise SPI is assumed)
//#define TFT_PARALLEL_8_BIT
//#defined TFT_PARALLEL_16_BIT // **** 16 bit parallel ONLY for RP2040 processor ****

// Display type -  only define if RPi display
//#define RPI_DISPLAY_TYPE // 20MHz maximum SPI

// Only define one driver, the other ones must be commented out
//#define ILI9341_DRIVER       // Generic driver for common displays
//#define ILI9341_2_DRIVER     // Alternative ILI9341 driver, see https://github.com/Bodmer/TFT_eSPI/issues/1172
//#define ST7735_DRIVER      // Define additional parameters below for this display
//#define ILI9163_DRIVER     // Define additional parameters below for this display
//#define S6D02A1_DRIVER
//#define RPI_ILI9486_DRIVER // 20MHz maximum SPI
//#define HX8357D_DRIVER
//#define ILI9481_DRIVER
//#define ILI9486_DRIVER
//#define ILI9488_DRIVER     // WARNING: Do not connect ILI9488 display SDO to MISO if other devices share the SPI bus (TFT SDO does NOT tristate when CS is high)
//#define ST7789_DRIVER      // Full configuration option, define additional parameters below for this display
//#define ST7789_2_DRIVER    // Minimal configuration option, define additional parameters below for this display
//#define R61581_DRIVER
//#define RM68140_DRIVER
//#define ST7796_DRIVER
//#define SSD1351_DRIVER
//#define SSD1963_480_DRIVER
//#define SSD1963_800_DRIVER
//#define SSD1963_800ALT_DRIVER
//#define ILI9225_DRIVER
#define GC9A01_DRIVER

// Some displays support SPI reads via the MISO pin, other displays have a single
// bi-directional SDA pin and the library will try to read this via the MOSI line.
// To use the SDA line for reading data from the TFT uncomment the following line:

// #define TFT_SDA_READ      // This option is for ESP32 ONLY, tested with ST7789 and GC9A01 display only

// For ST7735, ST7789 and ILI9341 ONLY, define the colour order IF the blue and red are swapped on your display
// Try ONE option at a time to find the correct colour order for your display

//  #define TFT_RGB_ORDER TFT_RGB  // Colour order Red-Green-Blue
//  #define TFT_RGB_ORDER TFT_BGR  // Colour order Blue-Green-Red

// For M5Stack ESP32 module with integrated ILI9341 display ONLY, remove // in line below

// #define M5STACK

// For ST7789, ST7735, ILI9163 and GC9A01 ONLY, define the pixel width and height in portrait orientation
// #define TFT_WIDTH  80
// #define TFT_WIDTH  128
// #define TFT_WIDTH  172 // ST7789 172 x 320
#define TFT_WIDTH  240 // ST7789 240 x 240 and 240 x 320
// #define TFT_HEIGHT 160
// #define TFT_HEIGHT 128
// #define TFT_HEIGHT 240 // ST7789 240 x 240
// #define TFT_HEIGHT 320 // ST7789 240 x 320
#define TFT_HEIGHT 240 // GC9A01 240 x 240

// For ST7735 ONLY, define the type of display, originally this was based on the
// colour of the tab on the screen protector film but this is not always true, so try
// out the different options below if the screen does not display graphics correctly,
// e.g. colours wrong, mirror images, or stray pixels at the edges.
// Comment out ALL BUT ONE of these options for a ST7735 display driver, save this
// this User_Setup file, then rebuild and upload the sketch to the board again:

// #define ST7735_INITB
// #define ST7735_GREENTAB
// #define ST7735_GREENTAB2
// #define ST7735_GREENTAB3
// #define ST7735_GREENTAB128    // For 128 x 128 display
// #define ST7735_GREENTAB160x80 // For 160 x 80 display (BGR, inverted, 26 offset)
// #define ST7735_ROBOTLCD       // For some RobotLCD arduino shields (128x160, BGR, https://docs.arduino.cc/retired/getting-started-guides/TFT)
// #define ST7735_REDTAB
// #define ST7735_BLACKTAB
// #define ST7735_REDTAB160x80   // For 160 x 80 display with 24 pixel offset

// If colours are inverted (white shows as black) then uncomment one of the next
// 2 lines try both options, one of the options should correct the inversion.

// #define TFT_INVERSION_ON
// #define TFT_INVERSION_OFF


// ##################################################################################
//
// Section 2. Define the pins that are used to interface with the display here
//
// ##################################################################################

// If a backlight control signal is available then define the TFT_BL pin in Section 2
// below. The backlight will be turned ON when tft.begin() is called, but the library
// needs to know if the LEDs are ON with the pin HIGH or LOW. If the LEDs are to be
// driven with a PWM signal or turned OFF/ON then this must be handled by the user
// sketch. e.g. with digitalWrite(TFT_BL, LOW);

// #define TFT_BL   32            // LED back-light control pin
// #define TFT_BACKLIGHT_ON HIGH  // Level to turn ON back-light (HIGH or LOW)


// We must use hardware SPI, a minimum of 3 GPIO pins is needed.
// Typical setup for ESP8266 NodeMCU ESP-12 is :
//
// Display SDO/MISO  to NodeMCU pin D6 (or leave disconnected if not reading TFT)
// Display LED       to NodeMCU pin VIN (or 5V, see below)
// Display SCK       to NodeMCU pin D5
// Display SDI/MOSI  to NodeMCU pin D7
// Display DC (RS/AO)to NodeMCU pin D3
// Display RESET     to NodeMCU pin D4 (or RST, see below)
// Display CS        to NodeMCU pin D8 (or GND, see below)
// Display GND       to NodeMCU pin GND (0V)
// Display VCC       to NodeMCU 5V or 3.3V
//
// The TFT RESET pin can be connected to the NodeMCU RST pin or 3.3V to free up a control pin
//
// The DC (Data Command) pin may be labelled AO or RS (Register Select)
//
// With some displays such as the ILI9341 the TFT CS pin can be connected to GND if no more
// SPI devices (e.g. an SD Card) are connected, in this case comment out the #define TFT_CS
// line below so it is NOT defined. Other displays such at the ST7735 require the TFT CS pin
// to be toggled during setup, so in these cases the TFT_CS line must be defined and connected.
//
// The NodeMCU D0 pin can be used for RST
//
//
// Note: only some versions of the NodeMCU provide the USB 5V on the VIN pin
// If 5V is not available at a pin you can use 3.3V but backlight brightness
// will be lower.


// ###### EDIT THE PIN NUMBERS IN THE LINES FOLLOWING TO SUIT YOUR ESP8266 SETUP ######

// For NodeMCU - use pin numbers in the form PIN_Dx where Dx is the NodeMCU pin designation
//#define TFT_CS   PIN_D8  // Chip select control pin D8
//#define TFT_DC   PIN_D3  // Data Command control pin
//#define TFT_RST  PIN_D4  // Reset pin (could connect to NodeMCU RST, see next line)
//#define TFT_RST  -1    // Set TFT_RST to -1 if the display RESET is connected to NodeMCU RST or 3.3V

//#define TFT_BL PIN_D1  // LED back-light (only for ST7789 with backlight control pin)

//#define TOUCH_CS PIN_D2     // Chip select pin (T_CS) of touch screen

//#define TFT_WR PIN_D2       // Write strobe for modified Raspberry Pi TFT only


// ######  FOR ESP8266 OVERLAP MODE EDIT THE PIN NUMBERS IN THE FOLLOWING LINES  ######

// Overlap mode shares the ESP8266 FLASH SPI bus with the TFT so has a performance impact
// but saves pins for other functions. It is best not to connect MISO as some displays
// do not tristate that line when chip select is high!
// Note: Only one SPI device can share the FLASH SPI lines, so a SPI touch controller
// cannot be connected as well to the same SPI signals.
// On NodeMCU 1.0 SD0=MISO, SD1=MOSI, CLK=SCLK to connect to TFT in overlap mode
// On NodeMCU V3  S0 =MISO, S1 =MOSI, S2 =SCLK
// In ESP8266 overlap mode the following must be defined

//#define TFT_SPI_OVERLAP

// In ESP8266 overlap mode the TFT chip select MUST connect to pin D3
//#define TFT_CS   PIN_D3
//#define TFT_DC   PIN_D5  // Data Command control pin
//#define TFT_RST  PIN_D4  // Reset pin (could connect to NodeMCU RST, see next line)
//#define TFT_RST  -1  // Set TFT_RST to -1 if the display RESET is connected to NodeMCU RST or 3.3V


// ###### EDIT THE PIN NUMBERS IN THE LINES FOLLOWING TO SUIT YOUR ESP32 SETUP   ######

// For ESP32 Dev board (only tested with ILI9341 display)
// The hardware SPI can be mapped to any pins

//#define TFT_MISO 19
//#define TFT_MOSI 23
//#define TFT_SCLK 18
//#define TFT_CS   15  // Chip select control pin
//#define TFT_DC    2  // Data Command control pin
//#define TFT_RST   4  // Reset pin (could connect to RST pin)
//#define TFT_RST  -1  // Set TFT_RST to -1 if display RESET is connected to ESP32 board RST

// For ESP32 Dev board (only tested with GC9A01 display)
// The hardware SPI can be mapped to any pins

#define TFT_MOSI 15 // In some display driver board, it might be written as "SDA" and so on.
#define TFT_SCLK 14
#define TFT_CS   5  // Chip select control pin
#define TFT_DC   27  // Data Command control pin
#define TFT_RST  33  // Reset pin (could connect to Arduino RESET pin)
#define TFT_BL   22  // LED back-light

//#define TOUCH_CS 21     // Chip select pin (T_CS) of touch screen

//#define TFT_WR 22    // Write strobe for modified Raspberry Pi TFT only

// For the M5Stack module use these #define lines
//#define TFT_MISO 19
//#define TFT_MOSI 23
//#define TFT_SCLK 18
//#define TFT_CS   14  // Chip select control pin
//#define TFT_DC   27  // Data Command control pin
//#define TFT_RST  33  // Reset pin (could connect to Arduino RESET pin)
//#define TFT_BL   32  // LED back-light (required for M5Stack)

// ######       EDIT THE PINs BELOW TO SUIT YOUR ESP32 PARALLEL TFT SETUP        ######

// The library supports 8 bit parallel TFTs with the ESP32, the pin
// selection below is compatible with ESP32 boards in UNO format.
// Wemos D32 boards need to be modified, see diagram in Tools folder.
// Only ILI9481 and ILI9341 based displays have been tested!

// Parallel bus is only supported for the STM32 and ESP32
// Example below is for ESP32 Parallel interface with UNO displays

// Tell the library to use 8 bit parallel mode (otherwise SPI is assumed)
//#define TFT_PARALLEL_8_BIT

// The ESP32 and TFT the pins used for testing are:
//#define TFT_CS   33  // Chip select control pin (library pulls permanently low
//#define TFT_DC   15  // Data Command control pin - must use a pin in the range 0-31
//#define TFT_RST  32  // Reset pin, toggles on startup

//#define TFT_WR    4  // Write strobe control pin - must use a pin in the range 0-31
//#define TFT_RD    2  // Read strobe control pin

//#define TFT_D0   12  // Must use pins in the range 0-31 for the data bus
//#define TFT_D1   13  // so a single register write sets/clears all bits.
//#define TFT_D2   26  // Pins can be randomly assigned, this does not affect
//#define TFT_D3   25  // TFT screen update performance.
//#define TFT_D4   17
//#define TFT_D5   16
//#define TFT_D6   27
//#define TFT_D7   14

// ######       EDIT THE PINs BELOW TO SUIT YOUR STM32 SPI TFT SETUP        ######

// The TFT can be connected to SPI port 1 or 2
//#define TFT_SPI_PORT 1 // SPI port 1 maximum clock rate is 55MHz
//#define TFT_MOSI PA7
//#define TFT_MISO PA6
//#define TFT_SCLK PA5

//#define TFT_SPI_PORT 2 // SPI port 2 maximum clock rate is 27MHz
//#define TFT_MOSI PB15
//#define TFT_MISO PB14
//#define TFT_SCLK PB13

// Can use Ardiuno pin references, arbitrary allocation, TFT_eSPI controls chip select
//#define TFT_CS   D5 // Chip select control pin to TFT CS
//#define TFT_DC   D6 // Data Command control pin to TFT DC (may be labelled RS = Register Select)
//#define TFT_RST  D7 // Reset pin to TFT RST (or RESET)
// OR alternatively, we can use STM32 port reference names PXnn
//#define TFT_CS   PE11 // Nucleo-F767ZI equivalent of D5
//#define TFT_DC   PE9  // Nucleo-F767ZI equivalent of D6
//#define TFT_RST  PF13 // Nucleo-F767ZI equivalent of D7

//#define TFT_RST  -1   // Set TFT_RST to -1 if the display RESET is connected to processor reset
                        // Use an Arduino pin for initial testing as connecting to processor reset
                        // may not work (pulse too short at power up?)

// ##################################################################################
//
// Section 3. Define the fonts that are to be used here
//
// ##################################################################################

// Comment out the #defines below with // to stop that font being loaded
// The ESP8366 and ESP32 have plenty of memory so commenting out fonts is not
// normally necessary. If all fonts are loaded the extra FLASH space required is
// about 17Kbytes. To save FLASH space only enable the fonts you need!

#define LOAD_GLCD   // Font 1. Original Adafruit 8 pixel font needs ~1820 bytes in FLASH
#define LOAD_FONT2  // Font 2. Small 16 pixel high font, needs ~3534 bytes in FLASH, 96 characters
#define LOAD_FONT4  // Font 4. Medium 26 pixel high font, needs ~5848 bytes in FLASH, 96 characters
#define LOAD_FONT6  // Font 6. Large 48 pixel font, needs ~2666 bytes in FLASH, only characters 1234567890:-.apm
#define LOAD_FONT7  // Font 7. 7 segment 48 pixel font, needs ~2438 bytes in FLASH, only characters 1234567890:-.
#define LOAD_FONT8  // Font 8. Large 75 pixel font needs ~3256 bytes in FLASH, only characters 1234567890:-.
//#define LOAD_FONT8N // Font 8. Alternative to Font 8 above, slightly narrower, so 3 digits fit a 160 pixel TFT
#define LOAD_GFXFF  // FreeFonts. Include access to the 48 Adafruit_GFX free fonts FF1 to FF48 and custom fonts

// Comment out the #define below to stop the SPIFFS filing system and smooth font code being loaded
// this will save ~20kbytes of FLASH
#define SMOOTH_FONT


// ##################################################################################
//
// Section 4. Other options
//
// ##################################################################################

// For RP2040 processor and SPI displays, uncomment the following line to use the PIO interface.
//#define RP2040_PIO_SPI // Leave commented out to use standard RP2040 SPI port interface

// For RP2040 processor and 8 or 16 bit parallel displays:
// The parallel interface write cycle period is derived from a division of the CPU clock
// speed so scales with the processor clock. This means that the divider ratio may need
// to be increased when overclocking. I may also need to be adjusted dependant on the
// display controller type (ILI94341, HX8357C etc). If RP2040_PIO_CLK_DIV is not defined
// the library will set default values which may not suit your display.
// The display controller data sheet will specify the minimum write cycle period. The
// controllers often work reliably for shorter periods, however if the period is too short
// the display may not initialise or graphics will become corrupted.
// PIO write cycle frequency = (CPU clock/(4 * RP2040_PIO_CLK_DIV))
//#define RP2040_PIO_CLK_DIV 1 // 32ns write cycle at 125MHz CPU clock
//#define RP2040_PIO_CLK_DIV 2 // 64ns write cycle at 125MHz CPU clock
//#define RP2040_PIO_CLK_DIV 3 // 96ns write cycle at 125MHz CPU clock

// For the RP2040 processor define the SPI port channel used (default 0 if undefined)
//#define TFT_SPI_PORT 1 // Set to 0 if SPI0 pins are used, or 1 if spi1 pins used

// For the STM32 processor define the SPI port channel used (default 1 if undefined)
//#define TFT_SPI_PORT 2 // Set to 1 for SPI port 1, or 2 for SPI port 2

// Define the SPI clock frequency, this affects the graphics rendering speed. Too
// fast and the TFT driver will not keep up and display corruption appears.
// With an ILI9341 display 40MHz works OK, 80MHz sometimes fails
// With a ST7735 display more than 27MHz may not work (spurious pixels and lines)
// With an ILI9163 display 27 MHz works OK.

// #define SPI_FREQUENCY   1000000
// #define SPI_FREQUENCY   5000000
// #define SPI_FREQUENCY  10000000
#define SPI_FREQUENCY  20000000
// #define SPI_FREQUENCY  27000000
// #define SPI_FREQUENCY  40000000
// #define SPI_FREQUENCY  55000000 // STM32 SPI1 only (SPI2 maximum is 27MHz)
// #define SPI_FREQUENCY  80000000

// Optional reduced SPI frequency for reading TFT
//#define SPI_READ_FREQUENCY  20000000

// The XPT2046 requires a lower SPI clock rate of 2.5MHz so we define that here:
//#define SPI_TOUCH_FREQUENCY  2500000

// The ESP32 has 2 free SPI ports i.e. VSPI and HSPI, the VSPI is the default.
// If the VSPI port is in use and pins are not accessible (e.g. TTGO T-Beam)
// then uncomment the following line:
//#define USE_HSPI_PORT

// Comment out the following #define if "SPI Transactions" do not need to be
// supported. When commented out the code size will be smaller and sketches will
// run slightly faster, so leave it commented out unless you need it!

// Transaction support is needed to work with SD library but not needed with TFT_SdFat
// Transaction support is required if other SPI devices are connected.

// Transactions are automatically enabled by the library for an ESP32 (to use HAL mutex)
// so changing it here has no effect

// #define SUPPORT_TRANSACTIONS


what is CST816S.h?? it’s a local include and there is no information on what it is.
Perhaps I don’t make myself clear. I assume that despite I haven’t enabled DMA transfer, two buffers will work cause the second buffer is not involved at all,just like using a single buffer.But right now it doesn’t work properly…
As you suggested,I switch to single buffer and set full-fresh to 0 like this:


but results are the same:

It seems like if I use heap_caps_malloc to announce a buf in psram instead of using static buf in sram, the programme will crash.
image

As for the DISP_HOR_RES_MAX and DISP_VER_RES_MAX, that my display resolution and defined in lv_conf.h
image

Here’s my user_setup.h:

//                            USER DEFINED SETTINGS
//   Set driver type, fonts to be loaded, pins used and SPI control method etc
//
//   See the User_Setup_Select.h file if you wish to be able to define multiple
//   setups and then easily select which setup file is used by the compiler.
//
//   If this file is edited correctly then all the library example sketches should
//   run without the need to make any more changes for a particular hardware setup!
//   Note that some sketches are designed for a particular TFT pixel width/height

// User defined information reported by "Read_User_Setup" test & diagnostics example
#define USER_SETUP_INFO "User_Setup"

// Define to disable all #warnings in library (can be put in User_Setup_Select.h)
//#define DISABLE_ALL_LIBRARY_WARNINGS

// ##################################################################################
//
// Section 1. Call up the right driver file and any options for it
//
// ##################################################################################

// Define STM32 to invoke optimised processor support (only for STM32)
//#define STM32

// Defining the STM32 board allows the library to optimise the performance
// for UNO compatible "MCUfriend" style shields
//#define NUCLEO_64_TFT
//#define NUCLEO_144_TFT

// STM32 8 bit parallel only:
// If STN32 Port A or B pins 0-7 are used for 8 bit parallel data bus bits 0-7
// then this will improve rendering performance by a factor of ~8x
//#define STM_PORTA_DATA_BUS
//#define STM_PORTB_DATA_BUS

// Tell the library to use parallel mode (otherwise SPI is assumed)
//#define TFT_PARALLEL_8_BIT
//#defined TFT_PARALLEL_16_BIT // **** 16 bit parallel ONLY for RP2040 processor ****

// Display type -  only define if RPi display
//#define RPI_DISPLAY_TYPE // 20MHz maximum SPI

// Only define one driver, the other ones must be commented out
//#define ILI9341_DRIVER       // Generic driver for common displays
//#define ILI9341_2_DRIVER     // Alternative ILI9341 driver, see https://github.com/Bodmer/TFT_eSPI/issues/1172
//#define ST7735_DRIVER      // Define additional parameters below for this display
//#define ILI9163_DRIVER     // Define additional parameters below for this display
//#define S6D02A1_DRIVER
//#define RPI_ILI9486_DRIVER // 20MHz maximum SPI
//#define HX8357D_DRIVER
//#define ILI9481_DRIVER
//#define ILI9486_DRIVER
//#define ILI9488_DRIVER     // WARNING: Do not connect ILI9488 display SDO to MISO if other devices share the SPI bus (TFT SDO does NOT tristate when CS is high)
//#define ST7789_DRIVER      // Full configuration option, define additional parameters below for this display
//#define ST7789_2_DRIVER    // Minimal configuration option, define additional parameters below for this display
//#define R61581_DRIVER
//#define RM68140_DRIVER
//#define ST7796_DRIVER
//#define SSD1351_DRIVER
//#define SSD1963_480_DRIVER
//#define SSD1963_800_DRIVER
//#define SSD1963_800ALT_DRIVER
//#define ILI9225_DRIVER
#define GC9A01_DRIVER

// Some displays support SPI reads via the MISO pin, other displays have a single
// bi-directional SDA pin and the library will try to read this via the MOSI line.
// To use the SDA line for reading data from the TFT uncomment the following line:

//#define TFT_SDA_READ      // This option is for ESP32 ONLY, tested with ST7789 and GC9A01 display only

// For ST7735, ST7789 and ILI9341 ONLY, define the colour order IF the blue and red are swapped on your display
// Try ONE option at a time to find the correct colour order for your display

//  #define TFT_RGB_ORDER TFT_RGB  // Colour order Red-Green-Blue
//  #define TFT_RGB_ORDER TFT_BGR  // Colour order Blue-Green-Red

// For M5Stack ESP32 module with integrated ILI9341 display ONLY, remove // in line below

// #define M5STACK

// For ST7789, ST7735, ILI9163 and GC9A01 ONLY, define the pixel width and height in portrait orientation
// #define TFT_WIDTH  80
// #define TFT_WIDTH  128
// #define TFT_WIDTH  172 // ST7789 172 x 320
// #define TFT_WIDTH  240 // ST7789 240 x 240 and 240 x 320
// #define TFT_HEIGHT 160
// #define TFT_HEIGHT 128
// #define TFT_HEIGHT 240 // ST7789 240 x 240
// #define TFT_HEIGHT 320 // ST7789 240 x 320
#define TFT_HEIGHT 240 //GC9A01 240 x 240

// For ST7735 ONLY, define the type of display, originally this was based on the
// colour of the tab on the screen protector film but this is not always true, so try
// out the different options below if the screen does not display graphics correctly,
// e.g. colours wrong, mirror images, or stray pixels at the edges.
// Comment out ALL BUT ONE of these options for a ST7735 display driver, save this
// this User_Setup file, then rebuild and upload the sketch to the board again:

// #define ST7735_INITB
// #define ST7735_GREENTAB
// #define ST7735_GREENTAB2
// #define ST7735_GREENTAB3
// #define ST7735_GREENTAB128    // For 128 x 128 display
// #define ST7735_GREENTAB160x80 // For 160 x 80 display (BGR, inverted, 26 offset)
// #define ST7735_ROBOTLCD       // For some RobotLCD arduino shields (128x160, BGR, https://docs.arduino.cc/retired/getting-started-guides/TFT)
// #define ST7735_REDTAB
// #define ST7735_BLACKTAB
// #define ST7735_REDTAB160x80   // For 160 x 80 display with 24 pixel offset

// If colours are inverted (white shows as black) then uncomment one of the next
// 2 lines try both options, one of the options should correct the inversion.

// #define TFT_INVERSION_ON
// #define TFT_INVERSION_OFF


// ##################################################################################
//
// Section 2. Define the pins that are used to interface with the display here
//
// ##################################################################################

// If a backlight control signal is available then define the TFT_BL pin in Section 2
// below. The backlight will be turned ON when tft.begin() is called, but the library
// needs to know if the LEDs are ON with the pin HIGH or LOW. If the LEDs are to be
// driven with a PWM signal or turned OFF/ON then this must be handled by the user
// sketch. e.g. with digitalWrite(TFT_BL, LOW);

// #define TFT_BL   32            // LED back-light control pin
// #define TFT_BACKLIGHT_ON HIGH  // Level to turn ON back-light (HIGH or LOW)


// We must use hardware SPI, a minimum of 3 GPIO pins is needed.
// Typical setup for ESP8266 NodeMCU ESP-12 is :
//
// Display SDO/MISO  to NodeMCU pin D6 (or leave disconnected if not reading TFT)
// Display LED       to NodeMCU pin VIN (or 5V, see below)
// Display SCK       to NodeMCU pin D5
// Display SDI/MOSI  to NodeMCU pin D7
// Display DC (RS/AO)to NodeMCU pin D3
// Display RESET     to NodeMCU pin D4 (or RST, see below)
// Display CS        to NodeMCU pin D8 (or GND, see below)
// Display GND       to NodeMCU pin GND (0V)
// Display VCC       to NodeMCU 5V or 3.3V
//
// The TFT RESET pin can be connected to the NodeMCU RST pin or 3.3V to free up a control pin
//
// The DC (Data Command) pin may be labelled AO or RS (Register Select)
//
// With some displays such as the ILI9341 the TFT CS pin can be connected to GND if no more
// SPI devices (e.g. an SD Card) are connected, in this case comment out the #define TFT_CS
// line below so it is NOT defined. Other displays such at the ST7735 require the TFT CS pin
// to be toggled during setup, so in these cases the TFT_CS line must be defined and connected.
//
// The NodeMCU D0 pin can be used for RST
//
//
// Note: only some versions of the NodeMCU provide the USB 5V on the VIN pin
// If 5V is not available at a pin you can use 3.3V but backlight brightness
// will be lower.


// ###### EDIT THE PIN NUMBERS IN THE LINES FOLLOWING TO SUIT YOUR ESP8266 SETUP ######

// For NodeMCU - use pin numbers in the form PIN_Dx where Dx is the NodeMCU pin designation
//#define TFT_CS   PIN_D8  // Chip select control pin D8
//#define TFT_DC   PIN_D3  // Data Command control pin
//#define TFT_RST  PIN_D4  // Reset pin (could connect to NodeMCU RST, see next line)
//#define TFT_RST  -1    // Set TFT_RST to -1 if the display RESET is connected to NodeMCU RST or 3.3V

//#define TFT_BL PIN_D1  // LED back-light (only for ST7789 with backlight control pin)

//#define TOUCH_CS PIN_D2     // Chip select pin (T_CS) of touch screen

//#define TFT_WR PIN_D2       // Write strobe for modified Raspberry Pi TFT only


// ######  FOR ESP8266 OVERLAP MODE EDIT THE PIN NUMBERS IN THE FOLLOWING LINES  ######

// Overlap mode shares the ESP8266 FLASH SPI bus with the TFT so has a performance impact
// but saves pins for other functions. It is best not to connect MISO as some displays
// do not tristate that line when chip select is high!
// Note: Only one SPI device can share the FLASH SPI lines, so a SPI touch controller
// cannot be connected as well to the same SPI signals.
// On NodeMCU 1.0 SD0=MISO, SD1=MOSI, CLK=SCLK to connect to TFT in overlap mode
// On NodeMCU V3  S0 =MISO, S1 =MOSI, S2 =SCLK
// In ESP8266 overlap mode the following must be defined

//#define TFT_SPI_OVERLAP

// In ESP8266 overlap mode the TFT chip select MUST connect to pin D3
//#define TFT_CS   PIN_D3
//#define TFT_DC   PIN_D5  // Data Command control pin
//#define TFT_RST  PIN_D4  // Reset pin (could connect to NodeMCU RST, see next line)
//#define TFT_RST  -1  // Set TFT_RST to -1 if the display RESET is connected to NodeMCU RST or 3.3V


// ###### EDIT THE PIN NUMBERS IN THE LINES FOLLOWING TO SUIT YOUR ESP32 SETUP   ######

// For ESP32 Dev board (only tested with ILI9341 display)
// The hardware SPI can be mapped to any pins

//#define TFT_MISO 19
//#define TFT_MOSI 23
//#define TFT_SCLK 18
//#define TFT_CS   15  // Chip select control pin
//#define TFT_DC    2  // Data Command control pin
//#define TFT_RST   4  // Reset pin (could connect to RST pin)
//#define TFT_RST  -1  // Set TFT_RST to -1 if display RESET is connected to ESP32 board RST

// For ESP32 Dev board (only tested with GC9A01 display)
// The hardware SPI can be mapped to any pins

#define TFT_MOSI 11 // In some display driver board, it might be written as "SDA" and so on.
#define TFT_SCLK 12
#define TFT_CS   10  // Chip select control pin
#define TFT_DC   5  // Data Command control pin
#define TFT_RST  6  // Reset pin (could connect to Arduino RESET pin)
#define TFT_BL   -1  // LED back-light
#define TFT_MISO 13

#define TOUCH_CS 5     // Chip select pin (T_CS) of touch screen

//#define TFT_WR 22    // Write strobe for modified Raspberry Pi TFT only

// For the M5Stack module use these #define lines
//#define TFT_MISO 19
//#define TFT_MOSI 23
//#define TFT_SCLK 18
//#define TFT_CS   14  // Chip select control pin
//#define TFT_DC   27  // Data Command control pin
//#define TFT_RST  33  // Reset pin (could connect to Arduino RESET pin)
//#define TFT_BL   32  // LED back-light (required for M5Stack)

// ######       EDIT THE PINs BELOW TO SUIT YOUR ESP32 PARALLEL TFT SETUP        ######

// The library supports 8 bit parallel TFTs with the ESP32, the pin
// selection below is compatible with ESP32 boards in UNO format.
// Wemos D32 boards need to be modified, see diagram in Tools folder.
// Only ILI9481 and ILI9341 based displays have been tested!

// Parallel bus is only supported for the STM32 and ESP32
// Example below is for ESP32 Parallel interface with UNO displays

// Tell the library to use 8 bit parallel mode (otherwise SPI is assumed)
//#define TFT_PARALLEL_8_BIT

// The ESP32 and TFT the pins used for testing are:
//#define TFT_CS   33  // Chip select control pin (library pulls permanently low
//#define TFT_DC   15  // Data Command control pin - must use a pin in the range 0-31
//#define TFT_RST  32  // Reset pin, toggles on startup

//#define TFT_WR    4  // Write strobe control pin - must use a pin in the range 0-31
//#define TFT_RD    2  // Read strobe control pin

//#define TFT_D0   12  // Must use pins in the range 0-31 for the data bus
//#define TFT_D1   13  // so a single register write sets/clears all bits.
//#define TFT_D2   26  // Pins can be randomly assigned, this does not affect
//#define TFT_D3   25  // TFT screen update performance.
//#define TFT_D4   17
//#define TFT_D5   16
//#define TFT_D6   27
//#define TFT_D7   14

// ######       EDIT THE PINs BELOW TO SUIT YOUR STM32 SPI TFT SETUP        ######

// The TFT can be connected to SPI port 1 or 2
//#define TFT_SPI_PORT 1 // SPI port 1 maximum clock rate is 55MHz
//#define TFT_MOSI PA7
//#define TFT_MISO PA6
//#define TFT_SCLK PA5

//#define TFT_SPI_PORT 2 // SPI port 2 maximum clock rate is 27MHz
//#define TFT_MOSI PB15
//#define TFT_MISO PB14
//#define TFT_SCLK PB13

// Can use Ardiuno pin references, arbitrary allocation, TFT_eSPI controls chip select
//#define TFT_CS   D5 // Chip select control pin to TFT CS
//#define TFT_DC   D6 // Data Command control pin to TFT DC (may be labelled RS = Register Select)
//#define TFT_RST  D7 // Reset pin to TFT RST (or RESET)
// OR alternatively, we can use STM32 port reference names PXnn
//#define TFT_CS   PE11 // Nucleo-F767ZI equivalent of D5
//#define TFT_DC   PE9  // Nucleo-F767ZI equivalent of D6
//#define TFT_RST  PF13 // Nucleo-F767ZI equivalent of D7

//#define TFT_RST  -1   // Set TFT_RST to -1 if the display RESET is connected to processor reset
                        // Use an Arduino pin for initial testing as connecting to processor reset
                        // may not work (pulse too short at power up?)

// ##################################################################################
//
// Section 3. Define the fonts that are to be used here
//
// ##################################################################################

// Comment out the #defines below with // to stop that font being loaded
// The ESP8366 and ESP32 have plenty of memory so commenting out fonts is not
// normally necessary. If all fonts are loaded the extra FLASH space required is
// about 17Kbytes. To save FLASH space only enable the fonts you need!

#define LOAD_GLCD   // Font 1. Original Adafruit 8 pixel font needs ~1820 bytes in FLASH
#define LOAD_FONT2  // Font 2. Small 16 pixel high font, needs ~3534 bytes in FLASH, 96 characters
#define LOAD_FONT4  // Font 4. Medium 26 pixel high font, needs ~5848 bytes in FLASH, 96 characters
#define LOAD_FONT6  // Font 6. Large 48 pixel font, needs ~2666 bytes in FLASH, only characters 1234567890:-.apm
#define LOAD_FONT7  // Font 7. 7 segment 48 pixel font, needs ~2438 bytes in FLASH, only characters 1234567890:-.
#define LOAD_FONT8  // Font 8. Large 75 pixel font needs ~3256 bytes in FLASH, only characters 1234567890:-.
#define LOAD_FONT8N // Font 8. Alternative to Font 8 above, slightly narrower, so 3 digits fit a 160 pixel TFT
#define LOAD_GFXFF  // FreeFonts. Include access to the 48 Adafruit_GFX free fonts FF1 to FF48 and custom fonts

// Comment out the #define below to stop the SPIFFS filing system and smooth font code being loaded
// this will save ~20kbytes of FLASH
#define SMOOTH_FONT


// ##################################################################################
//
// Section 4. Other options
//
// ##################################################################################

// For RP2040 processor and SPI displays, uncomment the following line to use the PIO interface.
//#define RP2040_PIO_SPI // Leave commented out to use standard RP2040 SPI port interface

// For RP2040 processor and 8 or 16 bit parallel displays:
// The parallel interface write cycle period is derived from a division of the CPU clock
// speed so scales with the processor clock. This means that the divider ratio may need
// to be increased when overclocking. I may also need to be adjusted dependant on the
// display controller type (ILI94341, HX8357C etc). If RP2040_PIO_CLK_DIV is not defined
// the library will set default values which may not suit your display.
// The display controller data sheet will specify the minimum write cycle period. The
// controllers often work reliably for shorter periods, however if the period is too short
// the display may not initialise or graphics will become corrupted.
// PIO write cycle frequency = (CPU clock/(4 * RP2040_PIO_CLK_DIV))
//#define RP2040_PIO_CLK_DIV 1 // 32ns write cycle at 125MHz CPU clock
//#define RP2040_PIO_CLK_DIV 2 // 64ns write cycle at 125MHz CPU clock
//#define RP2040_PIO_CLK_DIV 3 // 96ns write cycle at 125MHz CPU clock

// For the RP2040 processor define the SPI port channel used (default 0 if undefined)
//#define TFT_SPI_PORT 1 // Set to 0 if SPI0 pins are used, or 1 if spi1 pins used

// For the STM32 processor define the SPI port channel used (default 1 if undefined)
//#define TFT_SPI_PORT 2 // Set to 1 for SPI port 1, or 2 for SPI port 2

// Define the SPI clock frequency, this affects the graphics rendering speed. Too
// fast and the TFT driver will not keep up and display corruption appears.
// With an ILI9341 display 40MHz works OK, 80MHz sometimes fails
// With a ST7735 display more than 27MHz may not work (spurious pixels and lines)
// With an ILI9163 display 27 MHz works OK.

// #define SPI_FREQUENCY   1000000
// #define SPI_FREQUENCY   5000000
// #define SPI_FREQUENCY  10000000
// #define SPI_FREQUENCY  20000000
// #define SPI_FREQUENCY  27000000(default)
 #define SPI_FREQUENCY  40000000
// #define SPI_FREQUENCY  55000000 // STM32 SPI1 only (SPI2 maximum is 27MHz)
// #define SPI_FREQUENCY  80000000

// Optional reduced SPI frequency for reading TFT
#define SPI_READ_FREQUENCY  20000000 //(default 20000000)

// The XPT2046 requires a lower SPI clock rate of 2.5MHz so we define that here:
#define SPI_TOUCH_FREQUENCY  2500000

// The ESP32 has 2 free SPI ports i.e. VSPI and HSPI, the VSPI is the default.
// If the VSPI port is in use and pins are not accessible (e.g. TTGO T-Beam)
// then uncomment the following line:
#define USE_HSPI_PORT

// Comment out the following #define if "SPI Transactions" do not need to be
// supported. When commented out the code size will be smaller and sketches will
// run slightly faster, so leave it commented out unless you need it!

// Transaction support is needed to work with SD library but not needed with TFT_SdFat
// Transaction support is required if other SPI devices are connected.

// Transactions are automatically enabled by the library for an ESP32 (to use HAL mutex)
// so changing it here has no effect

// #define SUPPORT_TRANSACTIONS

CST816S is my display’s touch IC’s driver, it’s used in indev_drv.read_cb to inform lvgl what gesture has been made. Link below:

I understood what you were doing but we needed to narrow down where the issue is.

If you are sure the problem is when you are setting the buffer to psram are you 100% sure of the model of the ESP32-S3 you have. I have 2 here sitting on my desk where they were not the ones that I ordered and the ESP32-S3 had 8mb of flash and no additional memory. Even tho they used the model number for one that had 8mb of ram and 8mb of flash.

if you use esptool you will be able to identify the exact model number of the ESP32 to make sure you actually got what you paid for. It sucks when this kind of a thing happens but it has happened to me and I was pulling my hair out trying to figure out why I was having memory problems.

The other thing is you have to be careful of what GPIO pins you are connected to. depending on how much PSRAM there is is going to use more or less GPIO pins.

On the S3-WROOM2 there is no worry because the pins should not be broken out. But on the WROOM1 they are probably broken out. There are 3 pins you have to make sure you are not connected to. I am saying this because the problem will now show up until you try and use that SPI memory.

Here is a list of the model numbers and what the chips have for flash and for spiram. The models that have use of the additional pins have the GPIOs marked. You cannot connect anything to those pins if you have any of those model numbers.

ESP32-S3-WROOM-1-N4 4 MB flash
ESP32-S3-WROOM-1-N8 8 MB flash
ESP32-S3-WROOM-1-N16 16 MB flash
ESP32-S3-WROOM-1-H4 4 MB flash
ESP32-S3-WROOM-1-N4R2 4 MB flash 2 MB spiram (Quad SPI) -
ESP32-S3-WROOM-1-N8R2 8 MB flash 2 MB spiram (Quad SPI) -
ESP32-S3-WROOM-1-N16R2 16 MB flash 2 MB spiram (Quad SPI) -
ESP32-S3-WROOM-1-N4R8 4 MB flash 8 MB spiram (Octal SPI) - GPIO35, GPIO36, GPIO37
ESP32-S3-WROOM-1-N8R8 8 MB flash 8 MB spiram (Octal SPI) - GPIO35, GPIO36, GPIO37
ESP32-S3-WROOM-1-N16R8 16 MB flash 8 MB spiram (Octal SPI) - GPIO35, GPIO36, GPIO37

I had ordered ESP32-S3-WROOM-1-N8R8 devkits and what I got was ESP32-S3-WROOM-1-N8. The company refunded me my money and told me to keep the ones that I had gotten but the time lost trying to figure out what in the world was wrong is something I will never get back. It took me a long while to figure it out.

My board is ESP32-S3-WROOM-1-N16R8 16 MB flash 8 MB spiram (Octal SPI) and
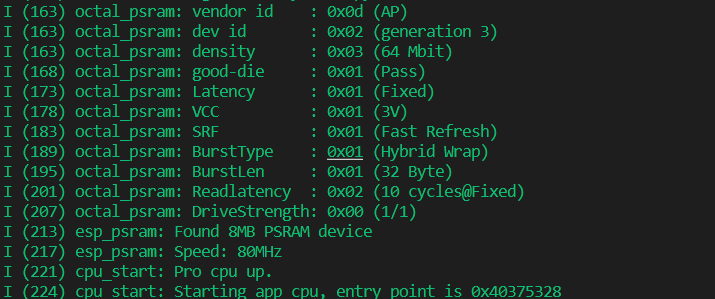
I check my board with esptool and the result is it did have 8MB psram

image
As for the attached GPIO pins, I’m using SPI2 channel (GPIO 9-13) to connect my display.
Maybe my pio’s setting is incorrect? As far as I know, psram could be affected by spi_flash mode or Mode (QUAD/OCT) of SPI RAM chip in use or etc. Such thing is really annoying.

Anyway, thanks for your suggestion.