Simple and stupid. I would like to add a full screen image as a intro page, but do not get a picture. If I switch to a other screen with some text eveything works fine. In my case this is done by CLI for test use.
What LVGL version are you using?
V7.10.1
What do you want to achieve?
full size image on a new screen for a intro page.
What have you tried so far?
creat a new screen for the intro ( scr_intro = lv_obj_create(NULL, NULL); )
.c file copied to the project folder (next to the folder “LVGL”) and added the .c file to the project structure. (our project is organised with virtual folders, so does not represent 100% the real folder structure)
Code to reproduce
Add a code snippet which can run in the simulator. It should contain only the relevant code that compiles without errors when separated from your main code base.
If you don’t set the image source, do you see “No data” appearing on the screen? If not it sounds like the image is either not being created or being covered by another widget.
You could confirm that img_intro is not NULL. Normally it would crash in that case, but some platforms have valid, writable memory at 0x0.
Another thing you can try is converting the JPEG with my new converter, which uses a different implementation under the hood. The old converter chokes on some less common image formats, whereas the new converter should work with every image your browser can display.
Also I converted the picture again with your new converter and added the file to the project. After that I included the file again and did a combile with a complete clean.
Still black with the now added text on top of the image.
Today I tryed it also with a complet other image, but still no luck.
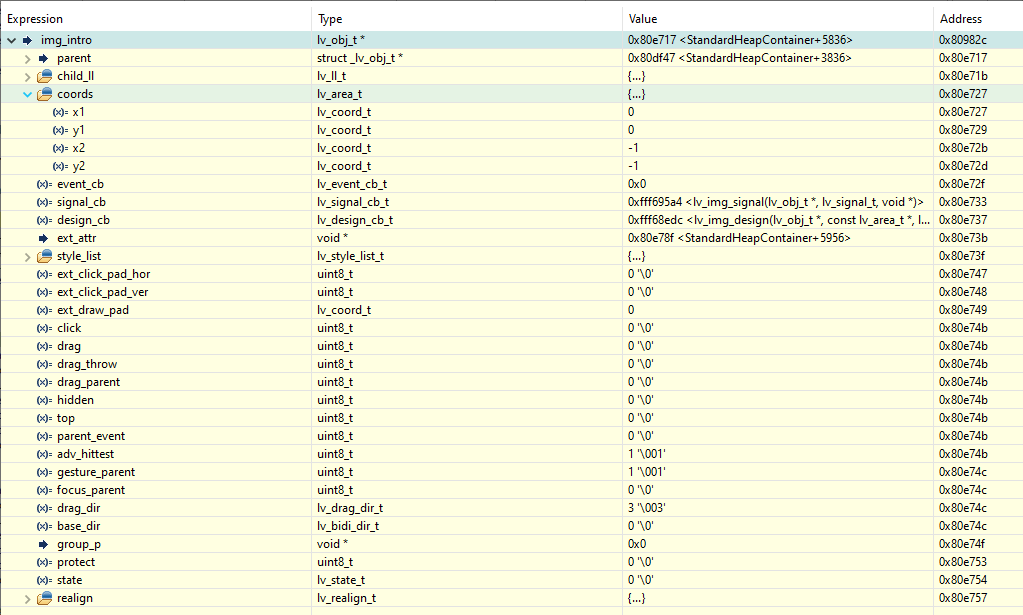
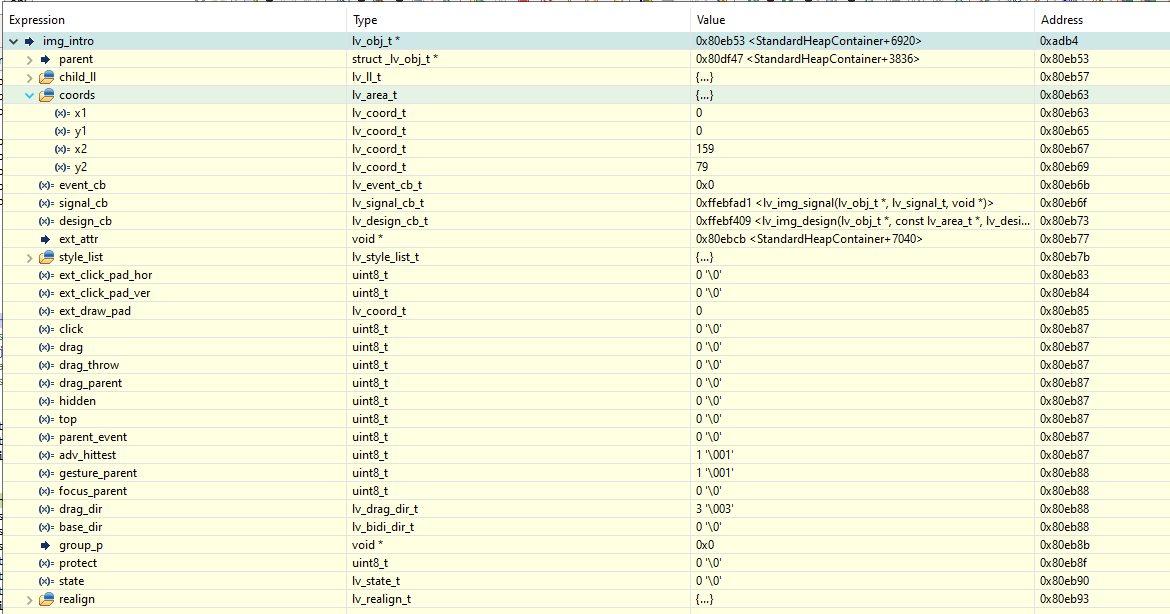
This time the cords are more logic. Maybe is there something wrong on my side?
LV_IMG_DECLARE(test_img);

static void gui_init(void)
{
  scr_intro = lv_obj_create(NULL, NULL);

  // some other things done in this place that is not connected with the image

  img_intro = lv_img_create(scr_intro, NULL);
  lv_img_set_src(img_intro, &test_img);
  lv_obj_set_size(img_intro, 160, 80);
  lv_obj_align(img_intro, NULL, LV_ALIGN_CENTER, 0, 0);

  // here is code for the labels that are visible

  lv_scr_load(scr_intro);
}
This is very puzzling. I don’t see anything wrong with your code. Have you noticed any other artifacts or things being cut off (that would suggest a driver issue)?
I have 4 other screens with mainly text that works totaly fine over our DMA based driver. I guess the driver that takes pixels does not care if I render text or a image?
Right now I tried my code in the simulator (in CodeBlocks). There it works fine with both pictures. So I conclude that the LVGL code and the image conversion is correct as you allready proved.
The MCU project structure is made with virtual folders, and the test_img.c file is also linked virtual next to the lvgl folder. Could it be that I have a problem there?
How could I make sure that the picture is not placed fare out of the display?
@dronecz
Please post the original image.
Do you use the same color depth in the simulator and real hardware? If not please make them the same. Be sure LV_COLOR_16_SWAP is also set to the same value.
However, I would expect it to fail on both the simulator and the real hardware if this were the case, especially if the color depths and SWAP values match.
It might be worth trying this image with the JS converter just to rule out the converter as the source of the problem, although this didn’t seem to help @Night.