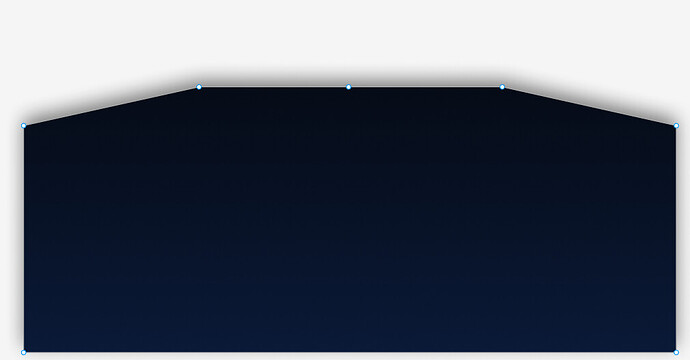
While perusing the LVGL documentation, I couldn’t locate more detailed information regarding the lv_draw_polygon function beyond the provided summary:
lv_draw_polygon: Draw a polygon on the canvas
Here are the parameters for this function:
canvas: A pointer to a canvas object.points: An array of points defining the polygon.point_cnt: The number of points in the polygon.draw_dsc: A pointer to an initialized lv_draw_rect_dsc_t variable.
I endeavored to comprehend its workings independently, but unfortunately, I couldn’t arrive at a solution. I would greatly appreciate it if someone could provide an explanation here. Additionally, it would be beneficial to have a detailed polygon example included in the LVGL documentation for better understanding and usage guidance.
Is it on the master branch, right?
1 Like
I am using 8.2 On ESP-IDF
Theres some code i have tryed but everytime i put more than 4 points the program crashes
void Load_Background() {
    Background_Canvas = lv_canvas_create(Screen);
    lv_obj_set_size(Background_Canvas, LV_HOR_RES, 720 * LV_VER_RES / 1000);
    lv_obj_align(Background_Canvas, LV_ALIGN_BOTTOM_MID, 0, 0);

    // Allocate memory for the canvas buffer
    lv_color_t cbuf[LV_CANVAS_BUF_SIZE_TRUE_COLOR(LV_HOR_RES, LV_VER_RES)];
    lv_canvas_set_buffer(Background_Canvas, cbuf, LV_HOR_RES, LV_VER_RES, LV_IMG_CF_TRUE_COLOR);

    lv_canvas_fill_bg(Background_Canvas, lv_palette_lighten(LV_PALETTE_GREY, 3), LV_OPA_COVER);

    lv_draw_rect_dsc_t draw_dsc;
    lv_draw_rect_dsc_init(&draw_dsc);
    draw_dsc.bg_opa = LV_OPA_COVER;
    draw_dsc.bg_grad.dir = LV_GRAD_DIR_VER;
    draw_dsc.bg_grad.stops[0].color = lv_color_hex(0x060C16);
    draw_dsc.bg_grad.stops[1].color = lv_color_hex(0x0A1A37);
    draw_dsc.border_width = 0;
    draw_dsc.shadow_width = 0;

    // Define the points of the polygon
    lv_point_t points[] = {
        {28, 0},
        {63, 28},
        {129, 0},
        {352, 0},
        {418, 28},
        {480, 28},
        {480, 272},
        {0, 272}
    };

    // Draw the polygon
    lv_canvas_draw_polygon(Background_Canvas, points, 4, &draw_dsc);

}```
Update:
I have made it work but the points arent been selected properly, its suposed to form a this object:
But instead is forming a object like this:
void Load_Background() {
    // Create a canvas and set its size and alignment
    Background_Canvas = lv_canvas_create(Screen);
    lv_obj_set_size(Background_Canvas, LV_HOR_RES, 720 * LV_VER_RES / 1000);
    lv_obj_align(Background_Canvas, LV_ALIGN_BOTTOM_MID, 0, 0);

    // Allocate memory for the canvas buffer (use dynamic allocation)
    lv_color_t *cbuf = (lv_color_t *)lv_mem_alloc(LV_CANVAS_BUF_SIZE_TRUE_COLOR(LV_HOR_RES, 720 * LV_VER_RES / 1000));
    lv_canvas_set_buffer(Background_Canvas, cbuf, LV_HOR_RES, 720 * LV_VER_RES / 1000, LV_IMG_CF_TRUE_COLOR);

    // Check if memory allocation was successful
    if (!cbuf) {
        // Handle memory allocation failure
        return;
    }

    // Fill the canvas background with a gradient
    lv_draw_rect_dsc_t draw_dsc;
    lv_draw_rect_dsc_init(&draw_dsc);
    draw_dsc.bg_opa = LV_OPA_COVER;
    draw_dsc.bg_grad.dir = LV_GRAD_DIR_VER;
    draw_dsc.bg_grad.stops[0].color = lv_color_hex(0x060C16);
    draw_dsc.bg_grad.stops[1].color = lv_color_hex(0x0A1A37);
    draw_dsc.border_width = 1;
    draw_dsc.shadow_width = 0;
    lv_canvas_fill_bg(Background_Canvas, lv_color_hex(0xDBDBDB), LV_OPA_COVER);

    // Define the points of the polygon
    lv_point_t points[8] = {
    {.x=0, .y=28},
    {.x=0, .y=272},
    {.x=480, .y=272},
    {.x=480, .y=28},
    {.x=418, .y=28},
    {.x=352, .y=0},
    {.x=129, .y=0},
    {.x=63, .y=28},
    };

    // Draw the polygon
    lv_canvas_draw_polygon(Background_Canvas, points, 8, &draw_dsc);
}
It should be due the limitations of a the current polygon draw algorithm. Unfortunately, it can draw only convex polygons.
What you can do is creating the left and right horizontal part from two rectangles and use polygon for the central part.
I know it’s not ideal, but unfortunately, that’s what we have now 
Thats Okay i endedup doing exacly that and works fine.
1 Like

