I’m working on a gauge that is currently being developed on an ESP32-S3 development board driving a 480x480 display using LVGL 9.6.
I am operating in partial draw mode with a double buffer in the internal SRAM.
When I generate scales on the screen the performance tanks as it seems that the scale needs to be recalculated when an overlapping object changes and forces that section of the screen to be redrawn.
What have you tried so far?
To confirm my suspicion of what was happening I tested my gauge with 3 different configurations and monitored the average frame rate:
No scales on.
Scales on.
Scales off but a test 480x480 RGBA5658 image stored in PSRAM used as an overlay.
Configuration 2 had a massive drop in performance over configuration 1, while configuration 3 only had a minor drop in performance.
What do you want to achieve?
The scales in my gauge are going to be static but I would still like them to be dynamically generated at runtime so that they could be generated from the gauge parameters.
Looking into the code for the scales I see that they just use “lv_draw_arc”, “lv_draw_line”, and “lv_draw_label” functions which could also be used to draw to a “lv_canvas” which I could use as a full screen buffer in the PSRAM.
Short of cloning the draw scales functions and modifying them to draw to a canvas layer is there an easy way to render any lv_obj to a canvas layer?
are you sure that you have double buffering set up properly. Ideally you want to use partial buffers for the LVGL frame buffer if possible. The double buffering is a bit tricky to use because not only do you need to specifically allocate the buffers in DMA’able memory you also need to make sure that whatever connection type (bus) that is used to connect to the display is set up properly handle DMA transfers. Then you also need to register a callback function to that bus in order to know when a DMA transfer has completed. This way you can signal LVGL that a buffer is available to write to. DMA transfers are non blocking calls which is the reason why they boost performance by quite a bit. So instead o your code sitting there and waiting until the transfer completes it is able to continue along doing other things like rendering to that second buffer while the first buffer is transmitting.
Pretty confident the double buffer is setup properly, I had previously put some print statements in after the buffers are allocated and confirmed that there memory addresses are in the internal SRAM. I’ll have to do some debugging in the call back function to confirm that it is working properly.
Frame rates under dynamic conditions was pretty high until I had turned on the scales though. After doing what I had done listed above my frame rate was the same as it was before I turned on the scales.
What type of connection is being used to the display? That doesn’t seem like it is running on an ESP32-S3. The updating looks to be awfully fast for that MCU.
I would love to see the code for the RGB display. That’s pretty impressive performance you are getting out of it… what is the display resolution and color depth? are you using 16 lanes? are you using both cores for rendering and transmitting??..
I wrote what is possibly one of the fastest RGB drivers for the ESP32-S3. It is used with MicroPython and LVGL and the performance is pretty good. I have not measured to see what the frame rate is.
It’s 480x480 16bpp.
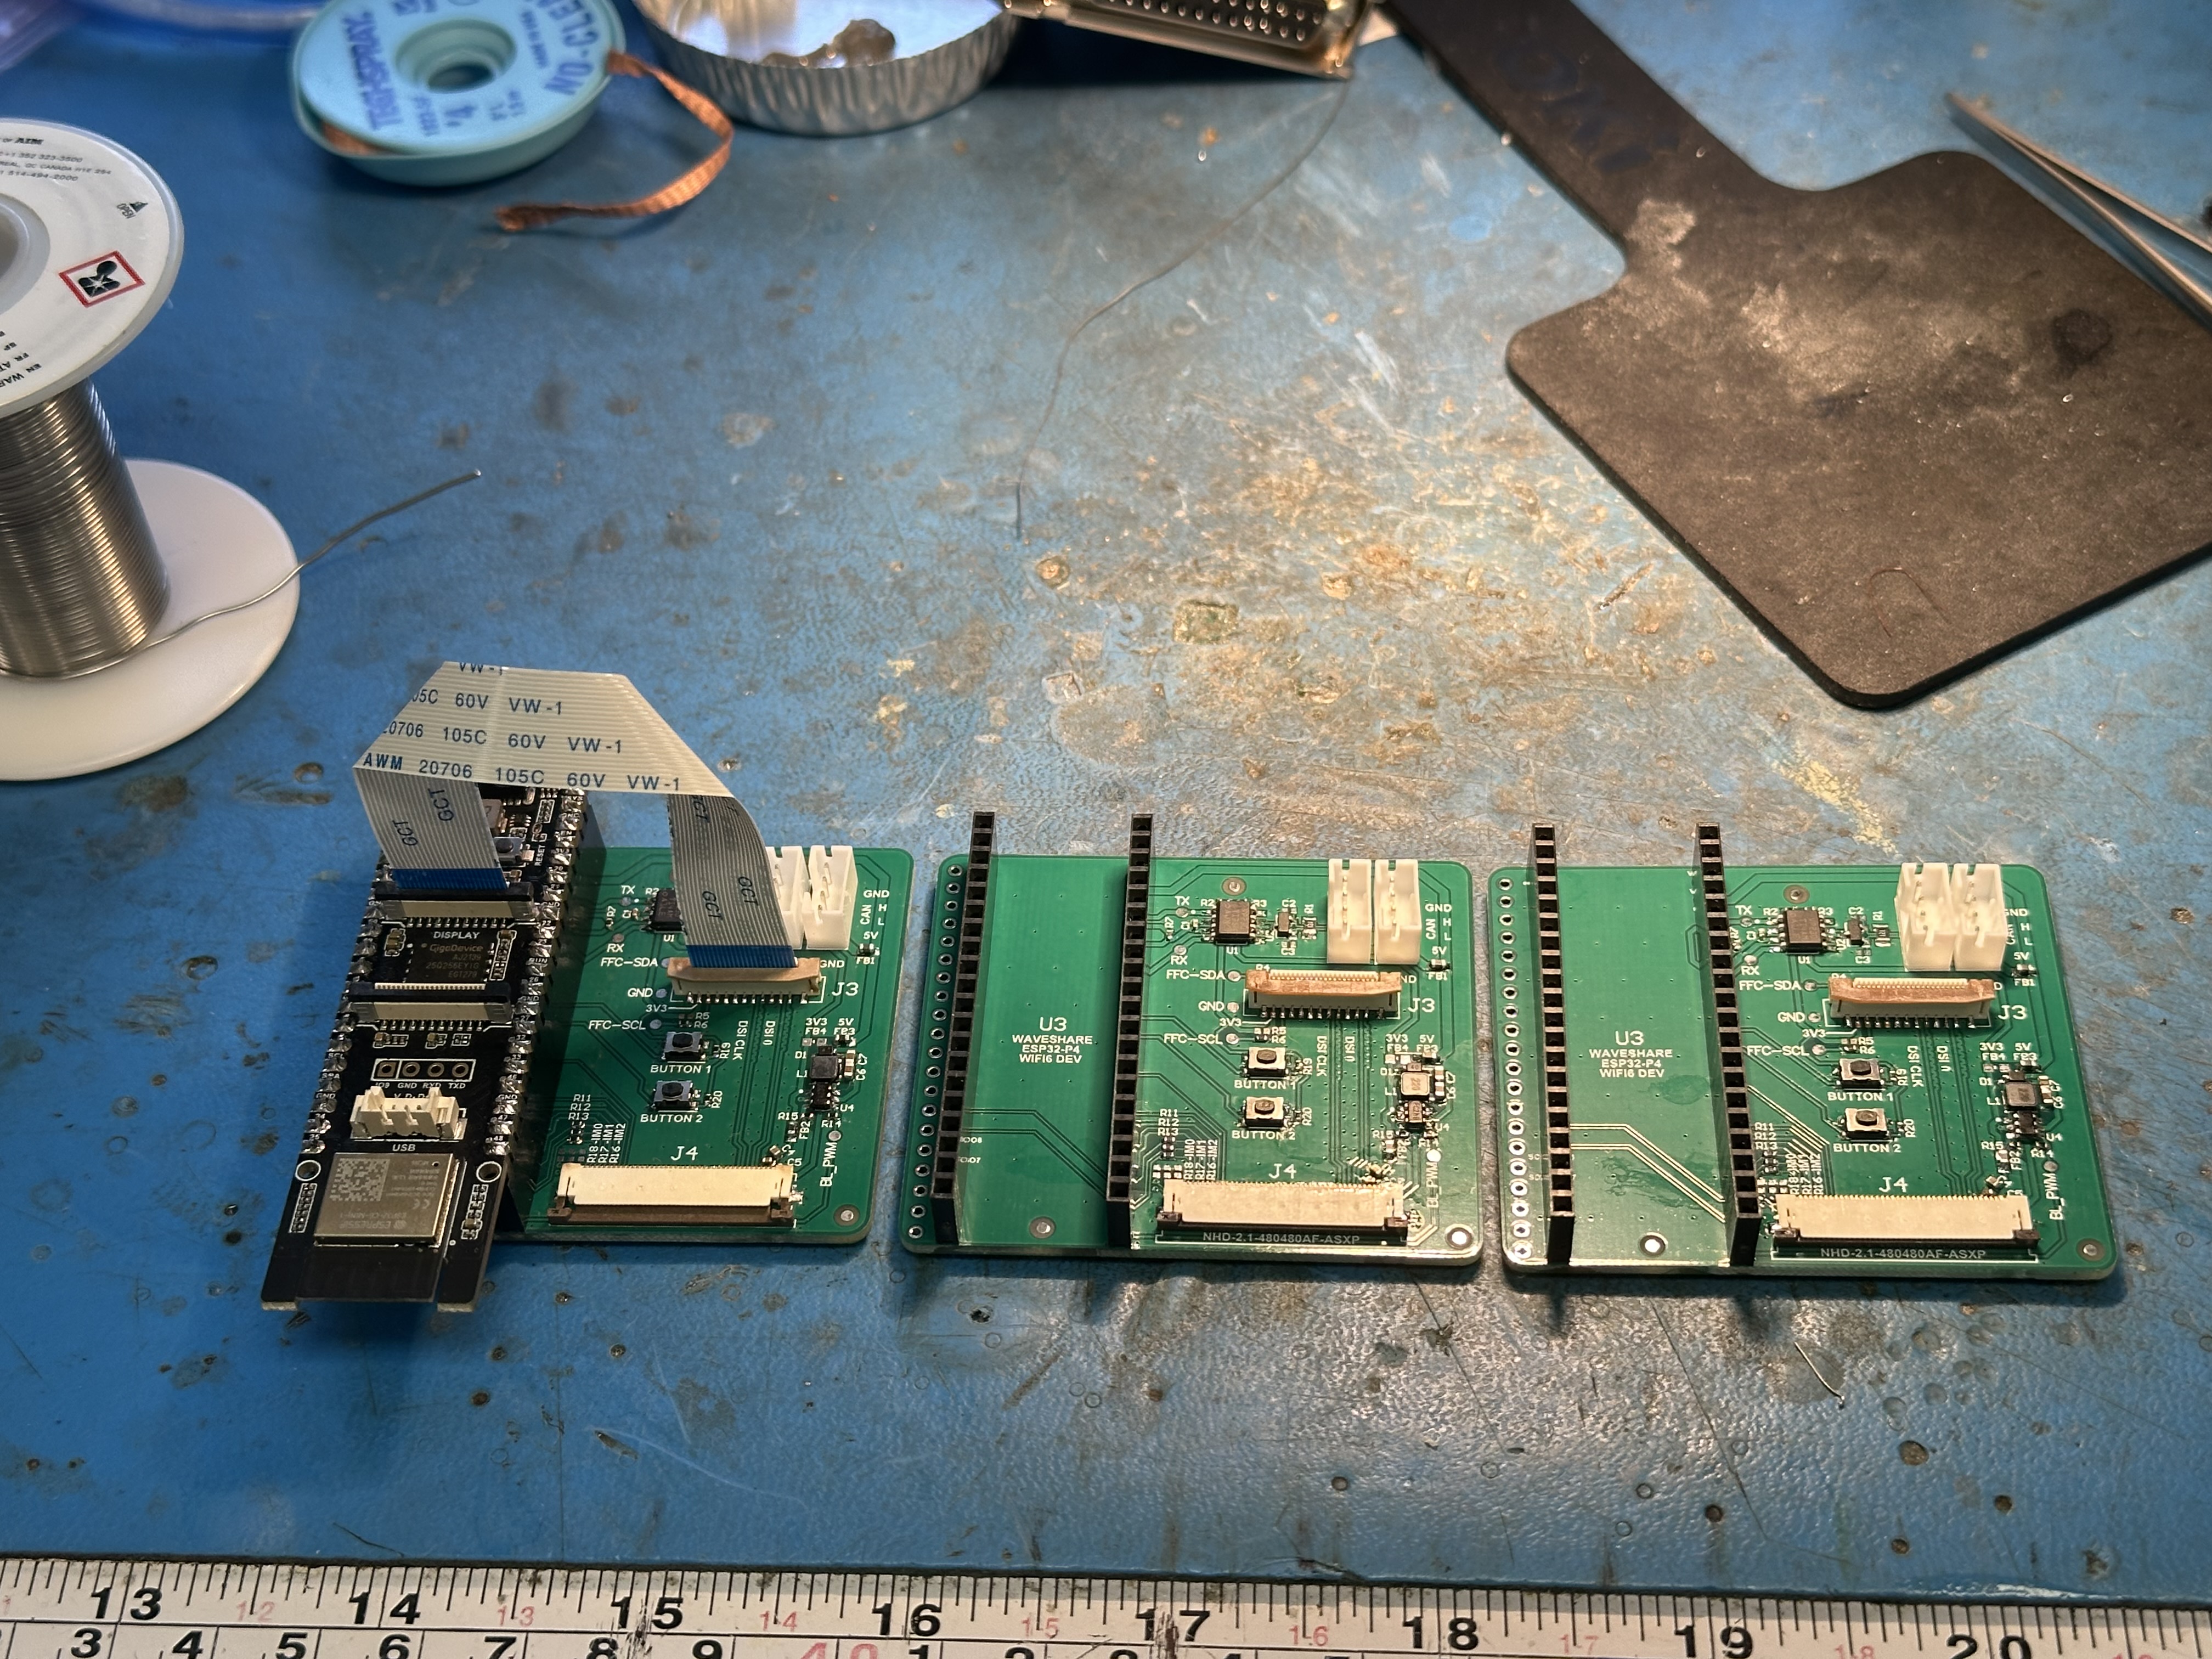
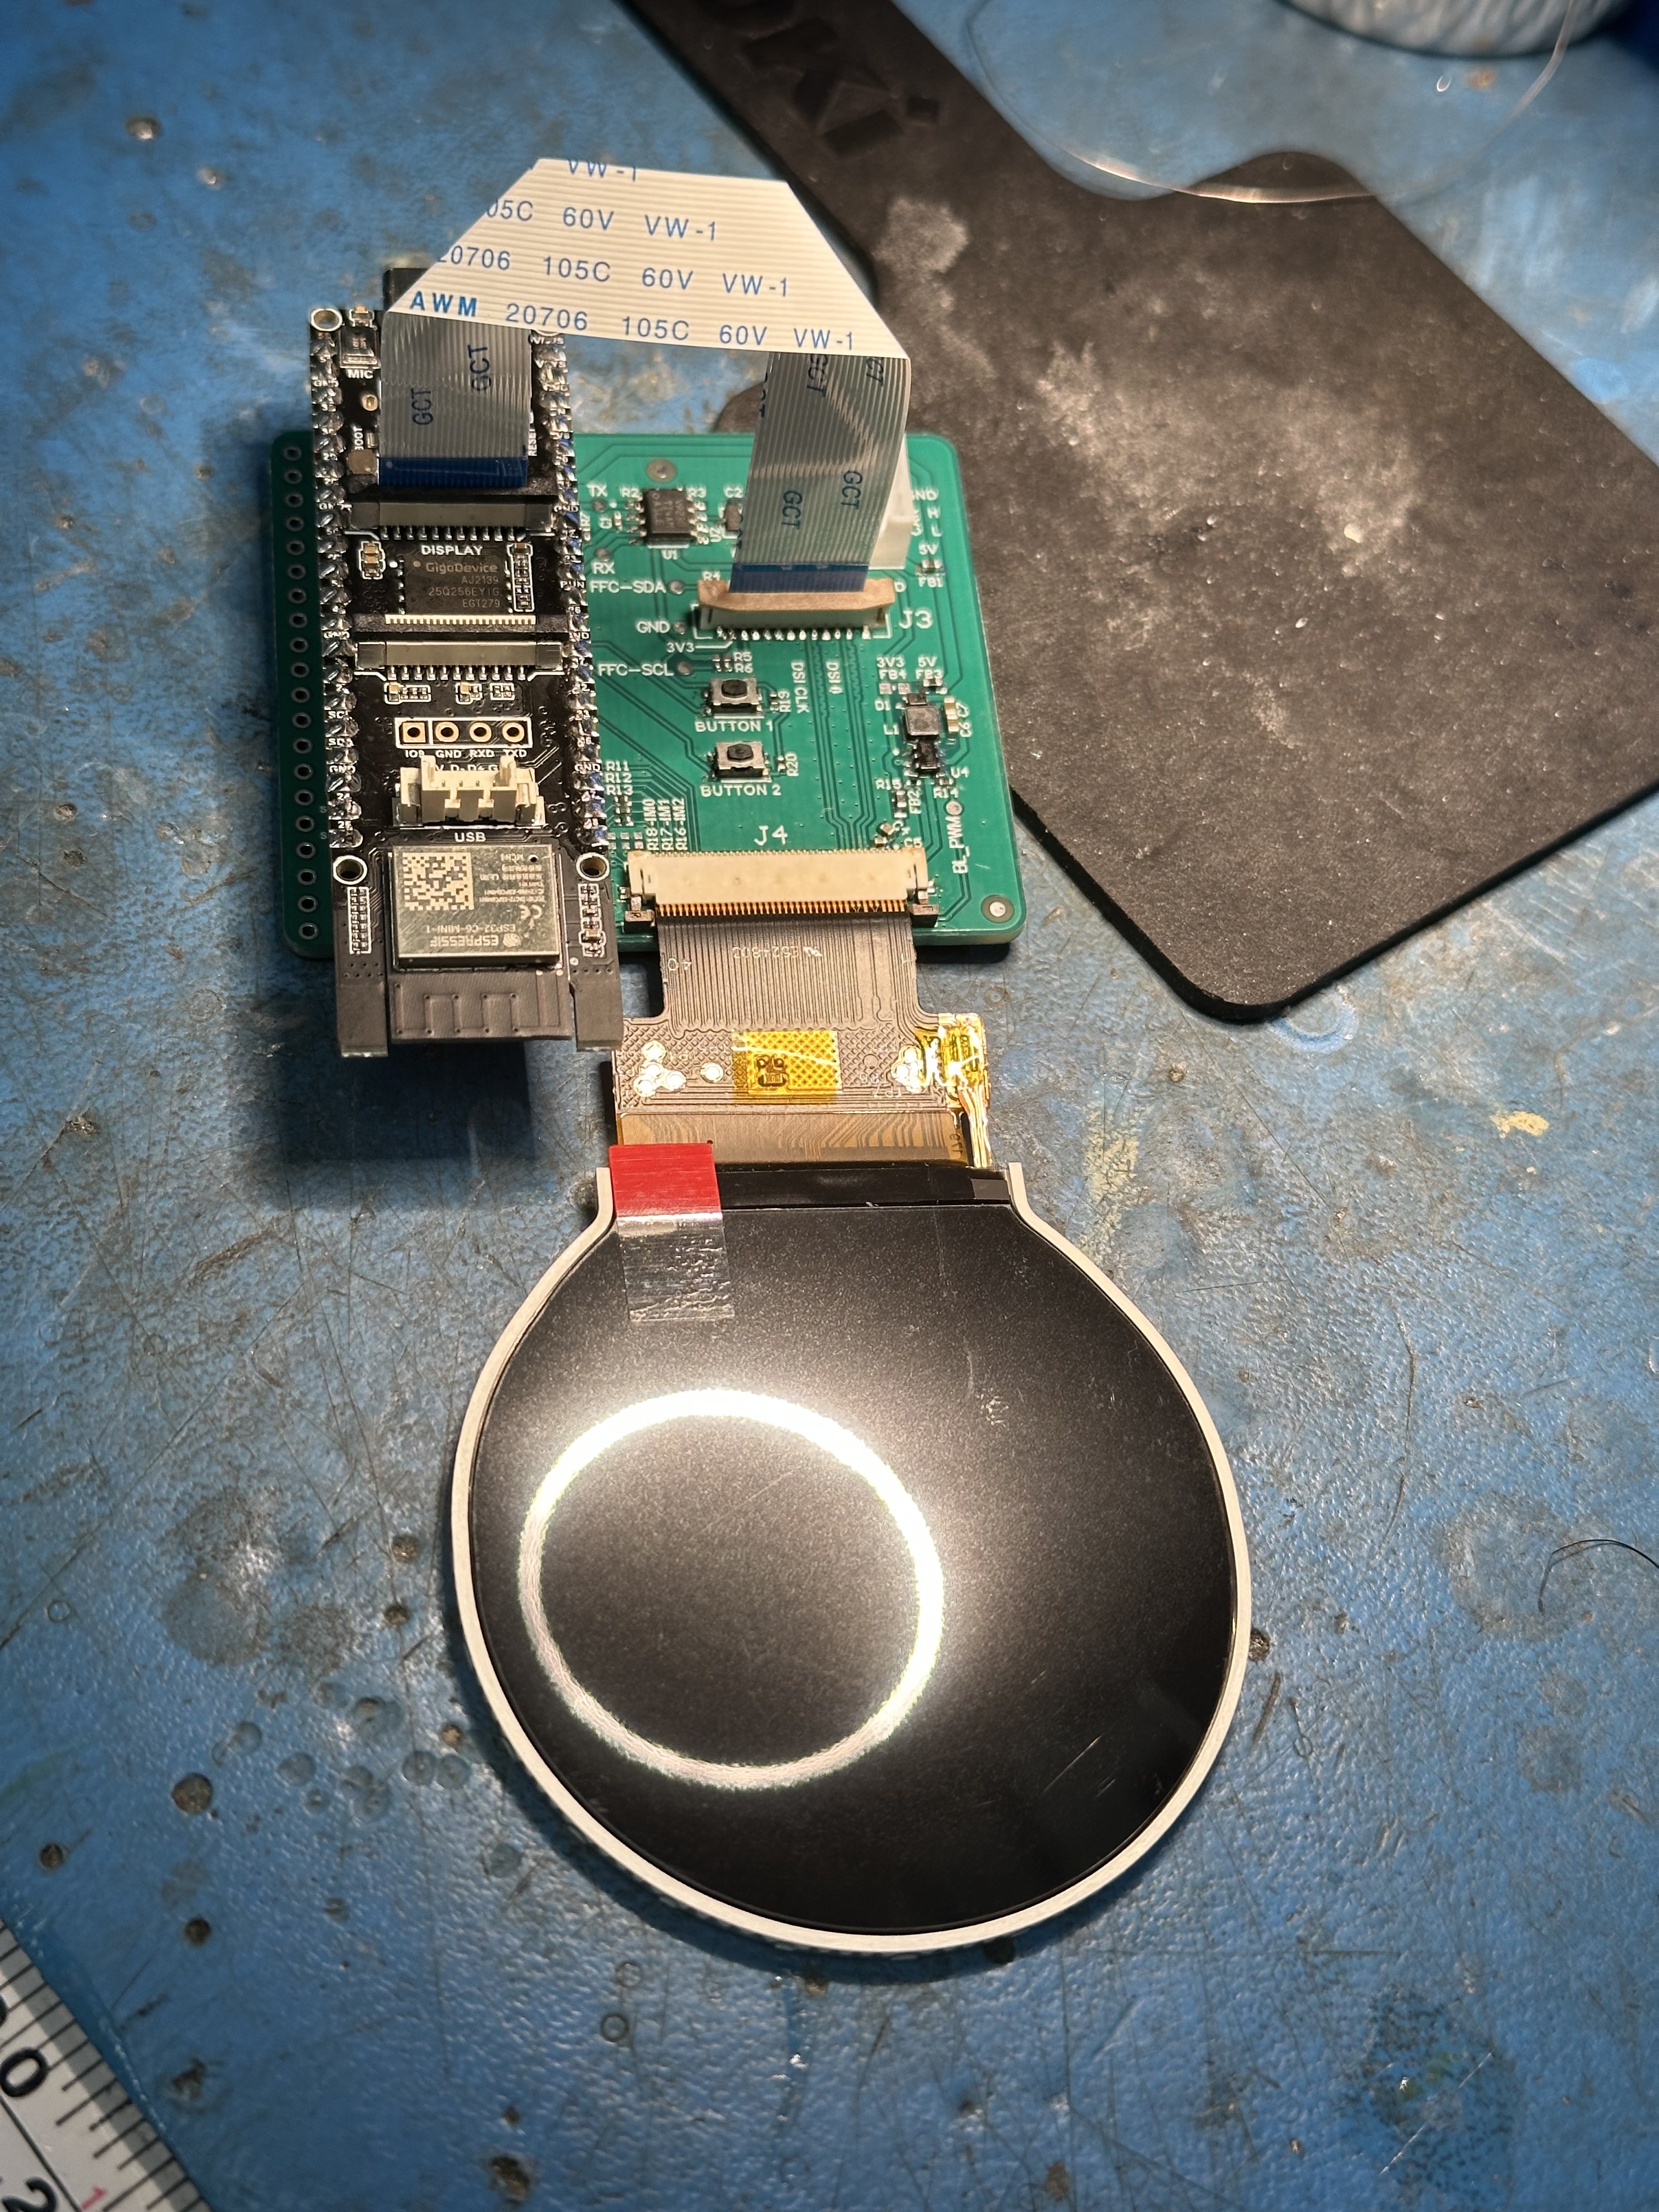
Right now it’s running on a Garage Tinkering Ultimate display board.
I started with his platformIO code base and went from there. I think I made a few tweaks to the LVGL configuration but it’s mostly the same. I’m mostly a hardware guy by profession and recently started getting into coding on this project. Started with making a ESP32-P4 based data concentrator to interface to my Hondata Kpro ECU.
The plan is to wirelessly broadcast the data to the gauges and offload all that overhead to the ESP32-C6 coprocessor.
The ESP32-P4 board is a Waveshare WiFi6 development board.
Older version of the board but I plan on having the gauge board look something like this.
(Heavily inspired by the Garage Tinkering board)
I’d probably be embarrassed to share my code as my programming practices are atrocious and evolving.
I think most of my performance is coming from implementing update rate limits on things like the labels as well as checks to make sure the displayed values are different to limit the draw calls.
Similarly to what I did with the scales I was considering trying to render the off state of all the objects to the same background and just toggle the hidden flag for the on state on and off (wouldn’t have to compute the color mixing and rotation transform when updating the dirty area for the off state).
Next step after that would be rendering an on state image and using alpha channel objects to blend between the two images.
After that the only other thing I could think to try would be to render each transformed alpha object to its own buffer to remove the need to have to compute rotation transform on updates.
That said I don’t think I’ll need to go that far to get solid performance on the ESP32-P4.
Have you ever done in programming in Python? It’s an easier language and you don’t have to deal with allocation and garbage collection and things of that nature… There is some additional overhead with running Python but the majority is in C code in LVGL and the drivers and with the flavor of Python that runs on an MCU you also have to ability to code functions in a manner that would be compiled as machine code having performance that is comparable to C code. The nice thing is you don’t have to keep on compiling the firmware and flashing the ESP32. You make a change to your code and upload the python source files to the MCU and press the reset button. You only need to compile a single time.
I would be curious to see how things would perform for you with your project.
I set the RGB driver up so it uses both cores to do the work and you don’t pass LVGL full frame buffers. The benefit with that is LVGL only needs to render only what has changed which will be a heck of a lot faster. Once a partial buffer has been rendered to it then gets passed to the second core where the data from that partial buffer gets copied into the full buffer that is used for updating the display. Once a series of updates has finished then the full buffer gets swapped out with the one that is currently transmitting the data then gets copied from the now transmitting buffer to the idle buffer to keep the buffer data in sync and the process starts over again. The partial buffers get allocated in internal memory which is a lot faster than PSRAM this way LVGL is going to be able to run as fast as possible when rendering. The copying takes place on the second core so the first core is able to render to a second partial buffer at the same time the copying is being done. The transfers to the display occur using the DMA controller so both cores are able to do the work while the transmitting is going on. It’s a really crafty way I am able to squeeze out as much performance as possible. The best part is my code also handles rotation and optionally dithering of the RGB565 pixel data. The dithering is what removes the banding that is seen if you use any gradients. The rotation and the dithering both take place when the partial gets copied to the full frame buffer so there is no performance hit for doing a software rotation or doing the dithering.
On another note… Since it appears that you like working with cars, specifically the electronics aspect of them… I am working on a project that might peak your interest…
It’s not runnable as of yet and I am coding it on a daily basis. Something you may want to keep an eye on as you might have a use for it…
Just wanted to close things out with this.
I did get around to implementing all my proposed optimizations and am getting great performance now.
(Still the ESP32-S3)
have you looked into the rotary encoders that have a built in touch display. They are a knob style control. This may be useful for change what is being displayed on the gauge. Simply turn the knob to alter what it is showing. That could click through different information as “cluster” gauges where you are showing multiple things at a time. Then if you use the touch and touch one of the gauges it would blow it up so it fills the display. It would also be nicer when navigating a setup menu. when you get into the smaller displays it can gt hard to click on smaller items.
You should take look to see who makes the, there are a few companies that do and they range in price from I believe like 35 bucks up to 250 a piece. The 250 dollar ones are all machined aluminum and are very well built.