Drawing with primitives and the functionality of the LvGL library

I need help understanding the process of how LvGL draws primitives (lines, triangles, rectangles, circles, sprites). This is necessary to match the LvGL function in conjunction with the TFT_eSPI, LovyanGFX and Arduino_GFX libraries.

Previously, I actively used the TFT_eSPI library in my work.
There, the drawing principles were embedded in the library functions and drawing was done with primitives that could be folded into Sprites (this is analog to drawing in a double buffer in LvGL).

TFT_eSPI Lcd = TFT_eSPI();
TFT_eSprite gdraw = TFT_eSprite(&Lcd);

gdraw.fillSprite(TFT_BLUE);
gdraw.pushSprite(0, 0);

    float xRotate = (2.0f * (float)SCREEN_X) * cos (roll * DEG_TO_RAD); 
    float yRotate = (2.0f * (float)SCREEN_X) * sin (roll * DEG_TO_RAD); 

  /*
  Adjust it for roll and pitch
  */
    float pxc = px0 + pitch * SCREEN_Y/80 * sin (roll * DEG_TO_RAD ); 
    float pyc = py0 + pitch * SCREEN_Y/80 * cos (roll * DEG_TO_RAD ); 

    float px1 = pxc - xRotate;
    float py1 = pyc + yRotate;
    
    float px2 = pxc + xRotate;
    float py2 = pyc - yRotate;

  /*  
   Compute offset parallel line segment to establish a wide bar
  */
    float px3 = px1 + 3 * SCREEN_Y * cos(roll * DEG_TO_RAD - HALF_PI);
    float py3 = py1 - 3 * SCREEN_Y * sin(-roll * DEG_TO_RAD - HALF_PI);
                      
    float px4 = px2 - 3 * SCREEN_Y * cos(roll * DEG_TO_RAD + HALF_PI);
    float py4 = py2 + 3 * SCREEN_Y * sin(roll * DEG_TO_RAD + HALF_PI);

gdraw.drawLine (px1, py1, px2, py2, TFT_BLACK);
gdraw.fillTriangle (px1, py1, px2, py2, px3, py3, TFT_BROWN);
gdraw.fillCircle (pxc, pyc, 3, TFT_BLACK);

This code draws a line, triangle and circle in a double buffer.
The code works for TFT_eSPI and with minor changes and for LovyanGFX.

But with the advent of LvGL, abstraction appeared, and drawing with primitives became less obvious.
Is there any possibility, using LvGLas a drawing library, and as a display driver TFT_eSPI or LovyanGFX to draw graphics with primitives and use Sprites?

I understand that the description of the desire to draw in LvGL using a Sprite analogue and primitives is conditional.

The structure of the LvGL library is much more advanced and powerful, but I still want to draw some interfaces with familiar lines, squares and, preferably, with the preservation of the syntax of old libraries.

Simple comparison, to draw a line using the library LovyanGFX you need to write 8 lines of code

#include <LovyanGFX.hpp>

static LGFX lcd;
static LGFX_Sprite canvas(&lcd);  
static LGFX_Sprite tft_display(&canvas);

tft_display.setColorDepth(lgfx::palette_4bit);
tft_display.createSprite(9, 119);

tft_display.fillScreen(transpalette);

tft_display.drawFastVLine(1, 0, 119, 1);

Of course, a function is also used here, but it is not very large in code

void LGFXBase::drawFastVLine(int32_t x, int32_t y, int32_t h)
{
  _adjust_abs(y, h);
  startWrite();
  writeFastVLine(x, y, h);
  endWrite();
}

Drawing a line in LvGL requires a lot more code

Examples - LVGL 9.3 documentation

I understand that I am comparing different things, but I would also like to see LvGL being easier to use.
Or are there no other options than using the TFT_eSPI and LovyanGFX libraries directly, without configuring them for LvGL?

To draw primitives you would use the canvas widget and create “layers” to render to.

Example…

// display setup code above

#define CANVAS_WIDTH   (480)
#define CANVAS_HEIGHT   (320)

lv_obj_t *screen = lv_screen_active();

// create the canvas object
lv_obj_t *canvas = lv_canvas_create(screen);

// create the buffer to render to
lv_draw_buf_t *draw_buf = lv_draw_buf_create(CANVAS_WIDTH, CANVAS_HEIGHT, LV_COLOR_FORMAT_ARGB8888, 0);

// set the buffer to the canvas
lv_canvas_set_draw_buf(canvas, draw_buf);

// fill the canvas so it is all black
lv_canvas_fill_bg(canvas, lv_color_hex(0x000000), 255);

// create the line descriptor
lv_draw_line_dsc_t line_desc = { 0 };

// initialize the line descriptor
lv_draw_line_dsc_init(&line_desc);

// set the starting point of the line
line_desc.p1.x = 0;
line_desc.p1.y = CANVAS_HEIGHT / 2;

// set the ending point of the line
line_desc.p2.x = CANVAS_WIDTH;
line_desc.p2.y = CANVAS_HEIGHT / 2;

// set the color and the width of the line
line_desc.color = lv_color_hex(0xFF0000);
line_desc.width = 5;

// create the layer to render to
lv_layer_t canvas_layer = { 0 };

// init the layer in the canvas
lv_canvas_init_layer(canvas, &canvas_layer);

// draw the line
lv_draw_line(&canvas_layer, &line_desc);

// finalize the rendering 
lv_canvas_finish_layer(canvas, &canvas_layer);
1 Like

as you have said it does require more code if doing super simple things, but a lot of the code is able to be used more than once.

There is greater flexibility with it because you have use of layers and each layer you can render to it at a different opacity and LVGL will blend the layers together mixing the color properly. This is something that TFT_eSPI and LovyanGFX are not able to do.

The reason why the system was designed like this in LVGL is because LVGL supports 2D graphics accelerators that some MCU’s have built into them. That is another area that both TFT_eSPI and LovyanGFX fall short. You also have the ability to render gradients using LVGL which enables you to create shadows and lighting effects which adds depth so whatever is being rendered.

The amount of code you actually end up having to write ends up being smaller than using TFT_eSPI and LovyanGFX. Take this for example. Draw a rectangle that has 2 borders that are different colors with a 3rd color filling the rectangle and also add a shadow for that rectangle. Then create a second rectangle that partially overlaps the first rectangle and the fill has an opacity of 70 and it is a completely different color than the fill color of the first rectangle.

How much code do you think would be needed to achieve that using TFT_eSPI or LovyanGFX?? I am willing to bet you it is going to be a sizeable amount more than you would need for LVGL.

1 Like

You are right, is quite a powerful tool.
Could you tell me how to add a border around the drawn triangle with the desired color?

lv_draw_triangle_dsc_t tri_dsc;
lv_draw_triangle_dsc_init(&tri_dsc);

409302345-df2c6c18-2c57-4889-a416-d988cc783b77

To do an outline for the triangle you would need to draw the individual lines using the points you used to create the triangle.

lv_draw_line_dsc_t line1 = {
    .p1 = triangle.p[1],
    .p2 = triangle.p[2],
    .width=2,
    .round_start=1,
    .round_end=1,
    .color=lv_color_hex(0xFF0000),
    .opa=255
}

lv_draw_line_dsc_t line2 = {
    .p1 = triangle.p[1],
    .p2 = triangle.p[0],
    .width=2
    .round_start=1,
    .round_end=1,
    .color=lv_color_hex(0xFF0000),
    .opa=255
}

lv_draw_line_dsc_t line3 = {
    .p1 = triangle.p[0],
    .p2 = triangle.p[2],
    .width=2
    .round_start=1,
    .round_end=1,
    .color=lv_color_hex(0xFF0000),
    .opa=255
}

the round start and end will produce a better triangle.

triangle is the triangle descriptor that you created to render the triangle.

1 Like

Thank you for helping :grinning:

You have a very unusual style of writing code.

I have this form of declaring the settings array and it gives me an error:

error: designator order for field ‘lv_draw_line_dsc_t::color’ does not match declaration order in ‘lv_draw_line_dsc_t’

No matter how I declare the line descriptor.

lv_draw_line_dsc_t line1 = {
  .p1 = tri_dsc_2.p[1],
  .p2 = tri_dsc_2.p[2],
  .width=2,
  .round_start=1,
  .round_end=1,
  .color=lv_color_hex(0xFF0000),
  //.color=lv_palette_main(LV_PALETTE_RED),
  .opa=255
}
lv_draw_line_dsc_init(&line1);
lv_draw_line(&layer, &line1);

or

lv_draw_line_dsc_t line1 = {
      .p1 = tri_dsc_2.p[1],
      .p2 = tri_dsc_2.p[2],
      .width=2,
      .round_start=1,
      .round_end=1,
      // .color=lv_color_hex(0xFF0000),
      .color=lv_palette_main(LV_PALETTE_RED),
      .opa=255
}
lv_draw_line_dsc_init(&line1);
lv_draw_line(&layer, &line1);

For me, only this code works:

    lv_draw_line_dsc_t line1;
    lv_draw_line_dsc_init(&line1);
    line1.color = lv_palette_main(LV_PALETTE_RED);
    line1.width = 4;
    line1.round_end = 1;
    line1.round_start = 1;
    line1.p1.x = 15;
    line1.p1.y = 15;
    line1.p2.x = 35;
    line1.p2.y = 10;

It’s based on an example taken from here

Examples - LVGL 9.3 documentation

I was wondering where you got this style and what version of LVGL are you compiling the code for?

But overall I got the idea, thank you again! :slightly_smiling_face:

However, the functionality and power of the LVGL library has been swallowed up by ease of use, comparable to tft_eSPI or lovyanGFX.
I draw triangles on the canvas with primitives, and make the border with lines.
The code for this is:

// Function for drawing triangles and rendering them on a canvas with rotation capability
void draw_triangle(void)
{

    #define CANVAS_WIDTH  210  // Define the width of the canvas
    #define CANVAS_HEIGHT  60   // Define the height of the canvas

    #define PLANE_HEIGH  50     // Define the height for the triangle base

    /* Create a buffer for the canvas */
    LV_DRAW_BUF_DEFINE_STATIC(draw_buf, CANVAS_WIDTH, CANVAS_HEIGHT, LV_COLOR_FORMAT_ARGB8888);
    // Alternative formats commented out due to limitations
    LV_DRAW_BUF_INIT_STATIC(draw_buf); // Initialize the drawing buffer

    /* Create a canvas and initialize its palette */
    lv_obj_t * canvas = lv_canvas_create(lv_screen_active()); // Create canvas object
    lv_canvas_set_draw_buf(canvas, &draw_buf); // Attach drawing buffer to the canvas
    // Uncomment to set a background color; currently transparent
    lv_canvas_fill_bg(canvas, lv_color_hex3(0xccc), LV_OPA_TRANSP); // Fill canvas background
    lv_obj_center(canvas); // Center the canvas in the active screen

    // Create a layer for drawing on the canvas
    lv_layer_t layer;
    lv_canvas_init_layer(canvas, &layer);

    // Create an additional layer on the canvas that renders everything as an image and allows rotation
    lv_image_dsc_t img; // Image descriptor for the drawn content
    lv_draw_buf_to_image(&draw_buf, &img); // Convert draw buffer to image
    lv_draw_image_dsc_t img_dsc; // Image description structure
    lv_draw_image_dsc_init(&img_dsc); // Initialize image description
    img_dsc.rotation = 200; // Set rotation angle (20 degrees)
    img_dsc.src = &img; // Source of the image
    img_dsc.pivot.x = CANVAS_WIDTH / 2; // Set pivot point for rotation
    img_dsc.pivot.y = CANVAS_HEIGHT / 2;

    // Define the left light triangle
    lv_draw_triangle_dsc_t tri_dsc_1; 
    lv_draw_triangle_dsc_init(&tri_dsc_1); // Initialize triangle description
    
    // Set vertices of the triangle
    tri_dsc_1.p[0].x = 10;
    tri_dsc_1.p[0].y = PLANE_HEIGH;
    tri_dsc_1.p[1].x = 30;
    tri_dsc_1.p[1].y = PLANE_HEIGH;
    tri_dsc_1.p[2].x = CANVAS_WIDTH / 2;
    tri_dsc_1.p[2].y = 10;

    // Setting color and opacity for the triangle
    tri_dsc_1.color = lv_palette_main(LV_PALETTE_YELLOW);
    tri_dsc_1.opa = 255;  // Set the overall opacity to 100%

    // Define the left dark triangle
    lv_draw_triangle_dsc_t tri_dsc_2; 
    lv_draw_triangle_dsc_init(&tri_dsc_2); // Initialize triangle description
    
    // Set vertices of the triangle
    tri_dsc_2.p[0].x = 30;
    tri_dsc_2.p[0].y = PLANE_HEIGH;
    tri_dsc_2.p[1].x = CANVAS_WIDTH / 2;
    tri_dsc_2.p[1].y = 10;
    tri_dsc_2.p[2].x = 45;
    tri_dsc_2.p[2].y = PLANE_HEIGH;

    // Setting color and opacity for the triangle
    tri_dsc_2.color = lv_palette_main(LV_PALETTE_GREY);
    tri_dsc_2.opa = 255;  // Set the overall opacity to 100%
    
    // Define the right dark triangle
    lv_draw_triangle_dsc_t tri_dsc_3; 
    lv_draw_triangle_dsc_init(&tri_dsc_3); // Initialize triangle description

    // Set vertices of the triangle
    tri_dsc_3.p[0].x = 180;
    tri_dsc_3.p[0].y = 50;
    tri_dsc_3.p[1].x = CANVAS_WIDTH / 2;
    tri_dsc_3.p[1].y = 10;
    tri_dsc_3.p[2].x = 165;
    tri_dsc_3.p[2].y = PLANE_HEIGH;

    // Setting color and opacity for the triangle
    tri_dsc_3.color = lv_palette_main(LV_PALETTE_GREY);
    tri_dsc_3.opa = 255;  // Set the overall opacity to 100%

// Right light triangle
lv_draw_triangle_dsc_t tri_dsc_4;
lv_draw_triangle_dsc_init(&tri_dsc_4);

tri_dsc_4.p[0].x = CANVAS_WIDTH / 2;
tri_dsc_4.p[0].y = 10;
tri_dsc_4.p[1].x = 200;
tri_dsc_4.p[1].y = PLANE_HEIGH;
tri_dsc_4.p[2].x = 180;
tri_dsc_4.p[2].y = PLANE_HEIGH;

// tri_dsc_4.color = lv_color_hex(0xFFFF00);
tri_dsc_4.color = lv_palette_main(LV_PALETTE_YELLOW);
// Triangle transparency, canvas transparency is set above in the code
tri_dsc_4.opa = 255;  /* Set the overall opacity to 50% */

/*     // Border, currently only around the canvas
static lv_style_t style_plane_g5;
lv_style_init(&style_plane_g5);
// Outline
lv_style_set_outline_width(&style_plane_g5, 2);
// lv_style_set_outline_color(&style_plane_g5, lv_palette_main(LV_PALETTE_GREY));
lv_style_set_outline_color(&style_plane_g5, lv_color_hex(0x000000));
lv_style_set_outline_pad(&style_plane_g5, 4);
lv_obj_add_style(canvas, &style_plane_g5, 0); */

// Drawing lines on the canvas for outlining the airplane
lv_draw_line_dsc_t line1; // Lower left line
lv_draw_line_dsc_init(&line1);
// line1.color = lv_palette_main(LV_PALETTE_RED);
line1.color = lv_color_hex(0x000000);
line1.width = 1;
line1.round_end = 1;
line1.round_start = 1;
line1.p1.x = tri_dsc_1.p[0].x;
line1.p1.y = tri_dsc_1.p[0].y;
line1.p2.x = tri_dsc_2.p[2].x;
line1.p2.y = tri_dsc_2.p[2].y;

lv_draw_line_dsc_t line2; // Diagonal left line
lv_draw_line_dsc_init(&line2);
// line1.color = lv_palette_main(LV_PALETTE_RED);
line2.color = lv_color_hex(0x000000);
line2.width = 1;
line2.round_end = 1;
line2.round_start = 1;
line2.p1.x = tri_dsc_2.p[2].x;
line2.p1.y = tri_dsc_2.p[2].y;
line2.p2.x = tri_dsc_1.p[2].x;
line2.p2.y = tri_dsc_1.p[2].y;

lv_draw_line_dsc_t line3; // Diagonal right line
lv_draw_line_dsc_init(&line3);
// line1.color = lv_palette_main(LV_PALETTE_RED);
line3.color = lv_color_hex(0x000000);
line3.width = 1;
line3.round_end = 1;
line3.round_start = 1;
line3.p1.x = tri_dsc_3.p[2].x;
line3.p1.y = tri_dsc_3.p[2].y;
line3.p2.x = tri_dsc_4.p[0].x;
line3.p2.y = tri_dsc_4.p[0].y;

lv_draw_line_dsc_t line4; // Lower right line
lv_draw_line_dsc_init(&line4);
// line1.color = lv_palette_main(LV_PALETTE_RED);
line4.color = lv_color_hex(0x000000);
line4.width = 1;
line4.round_end = 1;
line4.round_start = 1;
line4.p1.x = tri_dsc_3.p[2].x;
line4.p1.y = tri_dsc_3.p[2].y;
line4.p2.x = tri_dsc_4.p[1].x;
line4.p2.y = tri_dsc_4.p[1].y;

/*     lv_draw_line_dsc_t line1 = {
        .p1 = tri_dsc_2.p[1],
        .p2 = tri_dsc_2.p[2],
        .width=2,
        .round_start=1,
        .round_end=1,
        .color=lv_color_hex(0xFF0000),
        // .color=lv_palette_main(LV_PALETTE_RED),
        .opa=255
    }
    lv_draw_line_dsc_init(&line1); */
    
// Rendering triangles on the canvas as images
lv_draw_triangle(&layer, &tri_dsc_1);
lv_draw_triangle(&layer, &tri_dsc_2);
lv_draw_triangle(&layer, &tri_dsc_3);
lv_draw_triangle(&layer, &tri_dsc_4);

// Rendering lines on the canvas as images
lv_draw_line(&layer, &line1);
lv_draw_line(&layer, &line2);
lv_draw_line(&layer, &line3);
lv_draw_line(&layer, &line4);

// This part sets the coordinates for the image and essentially outputs everything to the canvas as an image - maybe?
lv_area_t coords_img = {0, 0, CANVAS_WIDTH - 1, CANVAS_HEIGHT - 1};
// lv_area_t coords_img = {CANVAS_WIDTH / 2, CANVAS_HEIGHT / 2, CANVAS_WIDTH - 1, CANVAS_HEIGHT - 1};
// Generates the image
// lv_draw_image(&layer, &img_dsc, &coords_img);

lv_canvas_finish_layer(canvas, &layer);
}

Everything is fine if I don’t rotate the canvas

But everything is bad when I rotate it

My hopes of creating something serious based on LVGL are fading with each passing week :roll_eyes:

tft_eSPI allowed drawing with primitives on Sprite (analog of canvas) with 50 FPS without much effort :grinning:

Unfortunately, the problem remains for several years…

Lightweight drawing of primitive objects

1 Like

You are going to want to use double buffering when dealing with the canvas widget if you are going to be updating it. You need to blank the canvas buffer then redraw it in the rotated position.

Your FPS is going to depend on a lot of external things like the display driver. I also don’t know if any of the other libraries are calculating the FPS properly or not. There are a lot fo factors that play into the speed that would need to be looked at…

what hardware are you using?

1 Like

For now I’m checking everything on the simulator:

Win 10 + LVGL + SDL2

The buffer settings there are like this:

-D LV_MEM_SIZE=“(128U * 1024U)”

OK that is not setting the buffer size. The buffer when using SDL is also going to be a full frame buffer. and I am not sure as to why you have such a low frame rate. See video below…

LVGL is only going to report a frame rate when actual frames have been updated. if nothing is being rendered then the frame rate is going to be a zero. The frame rate is also a measurement of number of complete frames over one second. so if only 1 frame gets rendered you are going to have a frame rate of 1 because only a single frame was rendered in that second. In order to get an accurate measurement of the frame rate you would need to constantly be updating what is being rendered through the entire second.

The issue you are seeing with the rotation is an easy thing to fix. it is simply because of not blanking the canvas buffer before rendering the rotated data.

Using LVGL in what you are attempting to do is going to easier to do because of layering. You have the ability to layer widgets on top of each other because of having the ability to set capacities

don’t try and put everything onto a single canvas. At first look I would say that you should have at a minimum is 5 canvas widgets and each is responsible for rendering different pieces of the flight control you are wanting to make.

1 Like

I have a real physical device, it is based on:

esp32s3 with 512 kB SDRAM + 480*480 display with RGB MIPI interface + Arduino_ESP32RGBPanel by GitHub - moononournation/Arduino_GFX: Arduino GFX developing for various color displays and various data bus interfaces

and there I set and draw in a double buffer:

drawBufSize = screenWidth * screenHeight;
disp = lv_display_create(screenWidth, screenHeight);
lv_display_set_flush_cb(disp, my_disp_flush);
static void* buf1 = (lv_color_t*)heap_caps_malloc(drawBufSize, MALLOC_CAP_DMA);
static void* buf2 = (lv_color_t*)heap_caps_malloc(drawBufSize, MALLOC_CAP_DMA);
lv_display_set_buffers(disp, buf1, buf2, drawBufSize, LV_DISPLAY_RENDER_MODE_PARTIAL);

I just want to output a rotated image once, it’s not a series of rotations, that’s the weird thing.
I don’t need to clear anything, because I just output the function :grinning:

draw_triangle();

the code for which I wrote above in the section:

int main(void)
{
    lv_init();
    hal_setup();

    draw_triangle();

    hal_loop();
}

Why the simulator gives 26 FPS maximum I don’t know, it gives such FPS even when it displays a blank screen.
Perhaps this is a feature of the simulator

Even the benchmark works at 26 FPS and that’s the maximum :rofl:

But, real hardware gives 26-29 FPS and no more :roll_eyes:

On real hardware it works only with the image format

LV_COLOR_FORMAT_RGB565

which does not allow you to set the transparency of the canvas.

This means that you can’t use the canvas on a real hardware device :roll_eyes:

Without rotation

With rotation it breaks the same way as in the simulator.

Memory value for real hardware

-D LV_MEM_SIZE=“(58U * 1024U)”

With a larger memory allocation, LVGL no longer loads on ESP32.

don’t set LV_COLOR_FORMAT_RGB565 for the canvas. set the one I have in the example It will work that way trust me. This is because you are doing all rendering on the canvas in ARGB8888 and when it copies the canvas to the frame buffer it will go the conversion from ARGB8888 to RGB565

How are you doing the rotating? Are you rotating the canvas widget or are you rotating the buffer on the canvas? You want to be rotating the canvas widget not the buffer.

lv_obj_set_style_transform_pivot_x(canvas, lv_obj_get_style_width(canvas) / 2, LV_PART_MAIN);
lv_obj_set_style_transform_pivot_y(canvas,  lv_obj_get_style_height(canvas) / 2, LV_PART_MAIN);
// 90 degrees
lv_obj_set_style_transform_rotation(canvas, 900, LV_PART_MAIN);
1 Like

In general, it was a small discovery for me, the difference between the work of the simulator and real hardware, a small but still a discovery :grinning:

I tested all these flags for image formats on simulated and real hardware, the comments speak for themselves.

// LV_DRAW_BUF_DEFINE_STATIC(draw_buf, CANVAS_WIDTH, CANVAS_HEIGHT, LV_COLOR_FORMAT_ARGB8888); // does not load at all on a real device

// LV_DRAW_BUF_DEFINE_STATIC(draw_buf, CANVAS_WIDTH, CANVAS_HEIGHT, LV_COLOR_FORMAT_RGB565); // no way to set transparency

LV_DRAW_BUF_DEFINE_STATIC(draw_buf, CANVAS_WIDTH, CANVAS_HEIGHT, LV_COLOR_FORMAT_AL88); // black and white image

// LV_DRAW_BUF_DEFINE_STATIC(draw_buf, CANVAS_WIDTH, CANVAS_HEIGHT, LV_COLOR_FORMAT_ARGB8565); // not displayed at all on a real device

// LV_DRAW_BUF_DEFINE_STATIC(draw_buf, CANVAS_WIDTH, CANVAS_HEIGHT, LV_COLOR_FORMAT_RGB565A8); // the image falls apart

That is, in simple words, the flag

LV_COLOR_FORMAT_ARGB8888

works for the simulator
For a real device

LV_COLOR_FORMAT_RGB565

But this makes little sense, because there is no host transparency and the whole idea is lost.

It is easier for me to insert a regular image as a bitmap and rotate it 360 degrees.

Well, it turns out I didn’t quite understand how I rotate the canvas, but it turns out I rotate the image, here’s the code:

    lv_image_dsc_t img;
    lv_draw_buf_to_image(&draw_buf, &img);
    lv_draw_image_dsc_t img_dsc;
    lv_draw_image_dsc_init(&img_dsc);
    img_dsc.rotation = 200; // 20 degrees
    img_dsc.src = &img;
    img_dsc.pivot.x = CANVAS_WIDTH / 2;
    img_dsc.pivot.y = CANVAS_HEIGHT / 2;

    lv_draw_image(&layer, &img_dsc, &coords_img);
    lv_canvas_finish_layer(canvas, &layer);

I took it from the example:

Examples - LVGL 9.3 documentation

You allowed me to move on :grinning:

    lv_obj_set_style_transform_pivot_x(canvas, CANVAS_WIDTH / 2, LV_PART_MAIN);
    lv_obj_set_style_transform_pivot_y(canvas,  CANVAS_HEIGHT / 2, LV_PART_MAIN);
    // 90 degrees
    lv_obj_set_style_transform_rotation(canvas, 900, LV_PART_MAIN);

    lv_canvas_finish_layer(canvas, &layer);

I seem to have caught a strange LVGL error.
When I draw a line on the canvas using code, everything is fine:

// the canvas layer itself is created
lv_layer_t layer_line;
lv_canvas_init_layer(canvas_line, &layer_line);

// draw lines on the canvas
lv_draw_line_dsc_t line_2_5; // lower left line
lv_draw_line_dsc_init(&line_2_5);
line_2_5.color = lv_palette_main(LV_PALETTE_RED);
// line_2_5.color = lv_color_hex(0x000000);
line_2_5.width = 2;
line_2_5.round_end = 1;
line_2_5.round_start = 1;
line_2_5.p1.x = 25;
line_2_5.p1.y = 100;
line_2_5.p2.x = 75;
line_2_5.p2.y = 100;
// forming the drawing of lines on the canvas in the form of a picture
lv_draw_line(&layer_line, &line_2_5);

When I use the written function to draw a line, with this code:

void create_line_v3(lv_draw_line_dsc_t *line_dsc_t, int line_thickness) { 
  // draw lines on the canvas
  /lv_draw_line_dsc_init(&line_dsc_t); 
  // line_dsc_t->color = lv_palette_main(LV_PALETTE_RED); 
  line_dsc_t->color = lv_color_hex(0x00FF00);  // GREEN
  line_dsc_t->width = line_thickness; 
  line_dsc_t->round_end = 1; 
  line_dsc_t->round_start = 1; 
  line_dsc_t->p1.x = 25; 
  line_dsc_t->p1.y = 100; 
  line_dsc_t->p2.x = 75; 
  line_dsc_t->p2.y = 100;
}

lv_draw_line_dsc_t line_2_5;
create_line_v3(&line_2_5, 2);

// forming the drawing of lines on the canvas in the form of a picture
lv_draw_line(&layer_pitch_line, &line_2_5);

Code loads once, but the line has a clearly low contrast.
Subsequent loads - the simulator just freezes :roll_eyes:

At first the code wouldn’t compile at all until I replaced “.” with “->”.

I’ve drawn lines in a different way before, using a point array:

void create_line_v2(lv_obj_t **line_obj, lv_point_precise_t *line_points, int pos_y) {
*line_obj = lv_line_create(lv_scr_act());
lv_obj_center(*line_obj); // Center the line
lv_obj_set_pos(*line_obj, 0, pos_y); // Set the Y position

lv_line_set_points(*line_obj, line_points, 2); /* Set the points */

static lv_style_t style_line;
lv_style_init(&style_line);
lv_style_set_line_width(&style_line, 2); // Set the thickness
lv_style_set_line_color(&style_line, lv_color_hex(0xFFFFFF)); // Set line color to white
lv_obj_add_style(*line_obj, &style_line, 0);

lv_obj_set_style_transform_pivot_x(*line_obj, line_points[1].x / 2, 0); // Set X-axis offset
// lv_obj_set_style_transform_pivot_y(*line_obj, line_points[1].x / 2, 0); // Set Y-axis offset
lv_obj_set_style_transform_rotation(*line_obj, -roll_deg * 10, 0); // Set rotation angle
}
// arrays of lines of different lengths
static lv_point_precise_t line_2_5[] = { {0, 0}, {30, 0}}; // 2.5
// Create lines
lv_obj_t *line_2_5;
create_line_v2(&line_2_5, line_2_5, -120);

Rewrote the function, now it draws without problems :grinning:

// new function for drawing lines to place them on canvas
void create_line_v5(lv_obj_t *canvas, int x1, int y1, int x2, int y2, lv_color_t color, int thickness) {
  // Create a line description
  lv_draw_line_dsc_t line_dsc;
  lv_draw_line_dsc_init(&line_dsc);
  
  line_dsc.color = color; // Set the line color
  line_dsc.width = thickness; // Set the line thickness
  line_dsc.round_end = 1; // Round the end of the line
  line_dsc.round_start = 1; // Round the beginning of the line
  
  // Set the start and end points of the line
  line_dsc.p1.x = x1; // Start point along the X axis
  line_dsc.p1.y = y1; // Start point on Y axis
  line_dsc.p2.x = x2; // End point on X axis
  line_dsc.p2.y = y2; // End point on Y axis
  
  // Initialize canvas layer
  lv_layer_t layer;
  lv_canvas_init_layer(canvas, &layer);
  
  // Draw line on canvas
  lv_draw_line(&layer, &line_dsc);
  
  // Finish working with canvas layer
  lv_canvas_finish_layer(canvas, &layer);
}
// new function for drawing scale
void pitch_scale_v5(void)
{
  // Define canvas dimensions and line thickness
  #define CANVAS_PITCH_SCALE_WIDTH 100
  #define CANVAS_PITCH_SCALE_HEIGHT 200
  #define PITCH_LINE_THICKNESS 2
  #define PITCH_LINE_CENTER CANVAS_PITCH_SCALE_HEIGHT / 2
  
  /*Create a buffer for canvas*/
  LV_DRAW_BUF_DEFINE_STATIC(draw_pitch_scale_buf, CANVAS_PITCH_SCALE_WIDTH, CANVAS_PITCH_SCALE_HEIGHT, LV_COLOR_FORMAT_ARGB8888); // does not load at all on a real device
  
  // LV_DRAW_BUF_DEFINE_STATIC(draw_buf, CANVAS_WIDTH, CANVAS_HEIGHT, LV_COLOR_FORMAT_RGB565); // no way to set transparency
  
  // LV_DRAW_BUF_DEFINE_STATIC(draw_buf, CANVAS_WIDTH, CANVAS_HEIGHT, LV_COLOR_FORMAT_AL88); // black and white image
  
  // LV_DRAW_BUF_DEFINE_STATIC(draw_buf, CANVAS_WIDTH, CANVAS_HEIGHT, LV_COLOR_FORMAT_ARGB8565); // not displayed at all on a real device
  
  // LV_DRAW_BUF_DEFINE_STATIC(draw_buf, CANVAS_WIDTH, CANVAS_HEIGHT, LV_COLOR_FORMAT_RGB565A8); // the picture falls apart
  LV_DRAW_BUF_INIT_STATIC(draw_pitch_scale_buf);
  
  /*Create a canvas and initialize its palette*/
  lv_obj_t * canvas_pitch_line = lv_canvas_create(lv_screen_active());
  lv_canvas_set_draw_buf(canvas_pitch_line, &draw_pitch_scale_buf);
  // the canvas is visible
  // lv_canvas_fill_bg(canvas_pitch_line, lv_color_hex3(0xccc), LV_OPA_COVER);
  // makes canvas layer transparent
  lv_canvas_fill_bg(canvas_pitch_line, lv_color_hex3(0xccc), LV_OPA_TRANSP);
  // centers the entire canvas in the center of the display
  lv_obj_center(canvas_pitch_line);
  lv_obj_set_pos(canvas_pitch_line, 0, 0); // X->, Y-⌄
  
  // Draw lines with the new function
  // Positive
  create_line_v5(canvas_pitch_line, 25, PITCH_LINE_CENTER - 120, 75, PITCH_LINE_CENTER - 120, lv_color_hex(0xFFFFFF), PITCH_LINE_THICKNESS); // 15 
  create_line_v5(canvas_pitch_line, 0, PITCH_LINE_CENTER - 100, 100, PITCH_LINE_CENTER - 100, lv_color_hex(0xFFFFFF), PITCH_LINE_THICKNESS); // 12_5 
  create_line_v5(canvas_pitch_line, 25, PITCH_LINE_CENTER - 80, 75, PITCH_LINE_CENTER - 80, lv_color_hex(0xFFFFFF), PITCH_LINE_THICKNESS); // 10 
  create_line_v5(canvas_pitch_line, 35, PITCH_LINE_CENTER - 60, 65, PITCH_LINE_CENTER - 60, lv_color_hex(0xFFFFFF), PITCH_LINE_THICKNESS); // 7_5 
  create_line_v5(canvas_pitch_line, 25, PITCH_LINE_CENTER - 40, 75, PITCH_LINE_CENTER - 40, lv_color_hex(0xFFFFFF), PITCH_LINE_THICKNESS); // 5 
  create_line_v5(canvas_pitch_line, 35, PITCH_LINE_CENTER - 20, 65, PITCH_LINE_CENTER - 20, lv_color_hex(0xFFFFFF), PITCH_LINE_THICKNESS); // 2_5 
  // Negative 
  create_line_v5(canvas_pitch_line, 35, PITCH_LINE_CENTER + 20, 65, PITCH_LINE_CENTER + 20, lv_color_hex(0xFFFFFF), PITCH_LINE_THICKNESS); // 2_5 
  create_line_v5(canvas_pitch_line, 25, PITCH_LINE_CENTER + 40, 75, PITCH_LINE_CENTER + 40, lv_color_hex(0xFFFFFF), PITCH_LINE_THICKNESS); // 5 
  create_line_v5(canvas_pitch_line, 35, PITCH_LINE_CENTER + 60, 65, PITCH_LINE_CENTER + 60, lv_color_hex(0xFFFFFF), PITCH_LINE_THICKNESS); // 7_5 
  create_line_v5(canvas_pitch_line, 25, PITCH_LINE_CENTER + 80, 75, PITCH_LINE_CENTER + 80, lv_color_hex(0xFFFFFF), PITCH_LINE_THICKNESS); // 10 
  create_line_v5(canvas_pitch_line, 0, PITCH_LINE_CENTER + 100, 100, PITCH_LINE_CENTER + 100, lv_color_hex(0xFFFFFF), PITCH_LINE_THICKNESS); // 12_5 
  create_line_v5(canvas_pitch_line, 25, PITCH_LINE_CENTER + 120, 75, PITCH_LINE_CENTER + 120, lv_color_hex(0xFFFFFF), PITCH_LINE_THICKNESS); // 15 
  
  lv_obj_set_style_transform_pivot_x(canvas_pitch_line, CANVAS_PITCH_SCALE_WIDTH / 2, LV_PART_MAIN); 
  lv_obj_set_style_transform_pivot_y(canvas_pitch_line, (CANVAS_PITCH_SCALE_HEIGHT / 2), LV_PART_MAIN); 
  lv_obj_set_style_transform_rotation(canvas_pitch_line, 45 * 10, LV_PART_MAIN);
}

Result

It remains unclear and unclear why it is impossible to draw lines, earlier above using the function by

lv_draw_line_dsc_t

setting the fields in the lv_draw_line_dsc_t structure is NOT drawing the lines. It is simply setting the parameters that are used when drawing the lines.

I can also tell you are not 100% familiar with how to use pointers. This is an over simplified expatiation of it.

When you see code like this…

void *some_pointer;

The * in that indicates that what is to be stored is a pointer. A pointer is simply a location in memory to where the object is. The actual object is not stored in that variable.

If you leave the * out then the object is what gets stored in the variable. If you want to get the memory address to where an object is stored then you prefix the variable name with &.

in order to access the fields in a structure or union that gets passed as a pointer you cannot use the dotted notation. You need to use -> instead. This is how the compiler is told that what it is accessing is a pointer.

In your code example you have this…

void create_line_v3(lv_draw_line_dsc_t *line_dsc_t, int line_thickness) { 
  // draw lines on the canvas
  /lv_draw_line_dsc_init(&line_dsc_t); 
  // line_dsc_t->color = lv_palette_main(LV_PALETTE_RED); 
  line_dsc_t->color = lv_color_hex(0x00FF00);  // GREEN
  line_dsc_t->width = line_thickness; 
  line_dsc_t->round_end = 1; 
  line_dsc_t->round_start = 1; 
  line_dsc_t->p1.x = 25; 
  line_dsc_t->p1.y = 100; 
  line_dsc_t->p2.x = 75; 
  line_dsc_t->p2.y = 100;
}

This line

/lv_draw_line_dsc_init(&line_dsc_t); 

for off should not have the preceding / to it. The other issue is you have the & in there. So now you are passing a pointer to a pointer by adding that. It’s not going to work with that there. You need to remove that &. The reason why you would need to remove it is because what is being passed to the containing function is already a pointer. So you only need to hand that pointer to the init method.

As a suggestion… don’t name a variable or a parameter with a trailing _t. That is typically reserved to to describe a “type”.

1 Like

Unfortunately, I am not familiar with it to the required extent, I am learning programming in C/C++ through practical experience :grinning:

Your explanation of the pointers and links is very clear, thank you for the clarification.

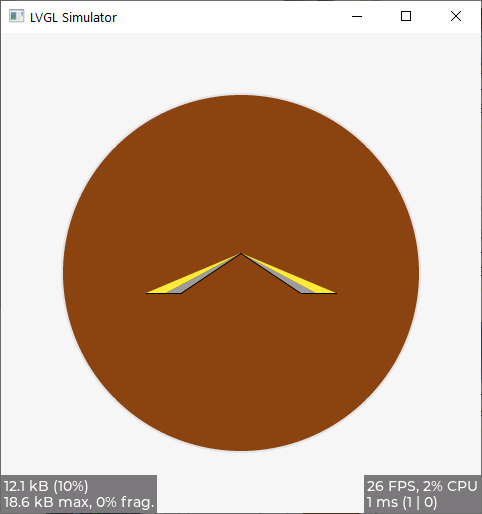
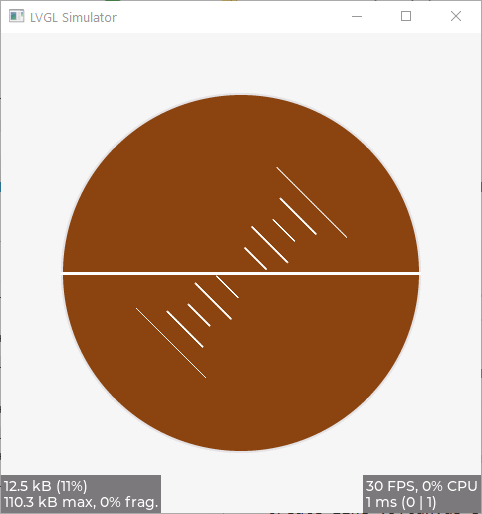
In the end, in a few hours I wrote a function for drawing lines and text:

void create_line_v5(lv_obj_t *canvas, int x1, int y1, int x2, int y2, lv_color_t color, int thickness, bool text_label = false) {
// Create a line description
lv_draw_line_dsc_t line_dsc;
lv_draw_line_dsc_init(&line_dsc);

line_dsc.color = color; // Set the line color
line_dsc.width = thickness; // Set the line thickness
line_dsc.round_end = 1; // Round the end of the line
line_dsc.round_start = 1; // Round the beginning of the line

// Set the start and end points of the line
line_dsc.p1.x = x1; // Start point on X axis
line_dsc.p1.y = y1; // Start point on Y axis
line_dsc.p2.x = x2; // End point on X axis
line_dsc.p2.y = y2; // End point on Y axis

lv_draw_label_dsc_t label_dsc_left;
lv_draw_label_dsc_init(&label_dsc_left);
lv_area_t coords_left = {x1 - 22, y1 - 10, x2 - 22, y2 - 10};

lv_draw_label_dsc_t label_dsc_right;
lv_draw_label_dsc_init(&label_dsc_right);
lv_area_t coords_right = {x1 + 82, y1 - 10, x2 + 82, y2 - 10};

if (text_label == true) {
// label_dsc_left.color = lv_color_hex(0xFFFFFF); // Set text color to white
label_dsc_left.color = color;
label_dsc_left.font = &lv_font_montserrat_18;
label_dsc_left.decor = LV_TEXT_DECOR_NONE;
label_dsc_left.text = "10";

// label_dsc_left.color = lv_color_hex(0xFFFFFF); // Set text color to white
label_dsc_right.color = color;
label_dsc_right.font = &lv_font_montserrat_18;
label_dsc_right.decor = LV_TEXT_DECOR_NONE;
label_dsc_right.text = "10";
}

// Initialize the canvas layer
lv_layer_t layer;
lv_canvas_init_layer(canvas, &layer);

// Draw a line on the canvas
lv_draw_line(&layer, &line_dsc);
if (text_label == true) {
// Draw text/label on the canvas
lv_draw_label(&layer, &label_dsc_left, &coords_left);
lv_draw_label(&layer, &label_dsc_right, &coords_right);
}

// Finish working with the canvas layer
lv_canvas_finish_layer(canvas, &layer);
}

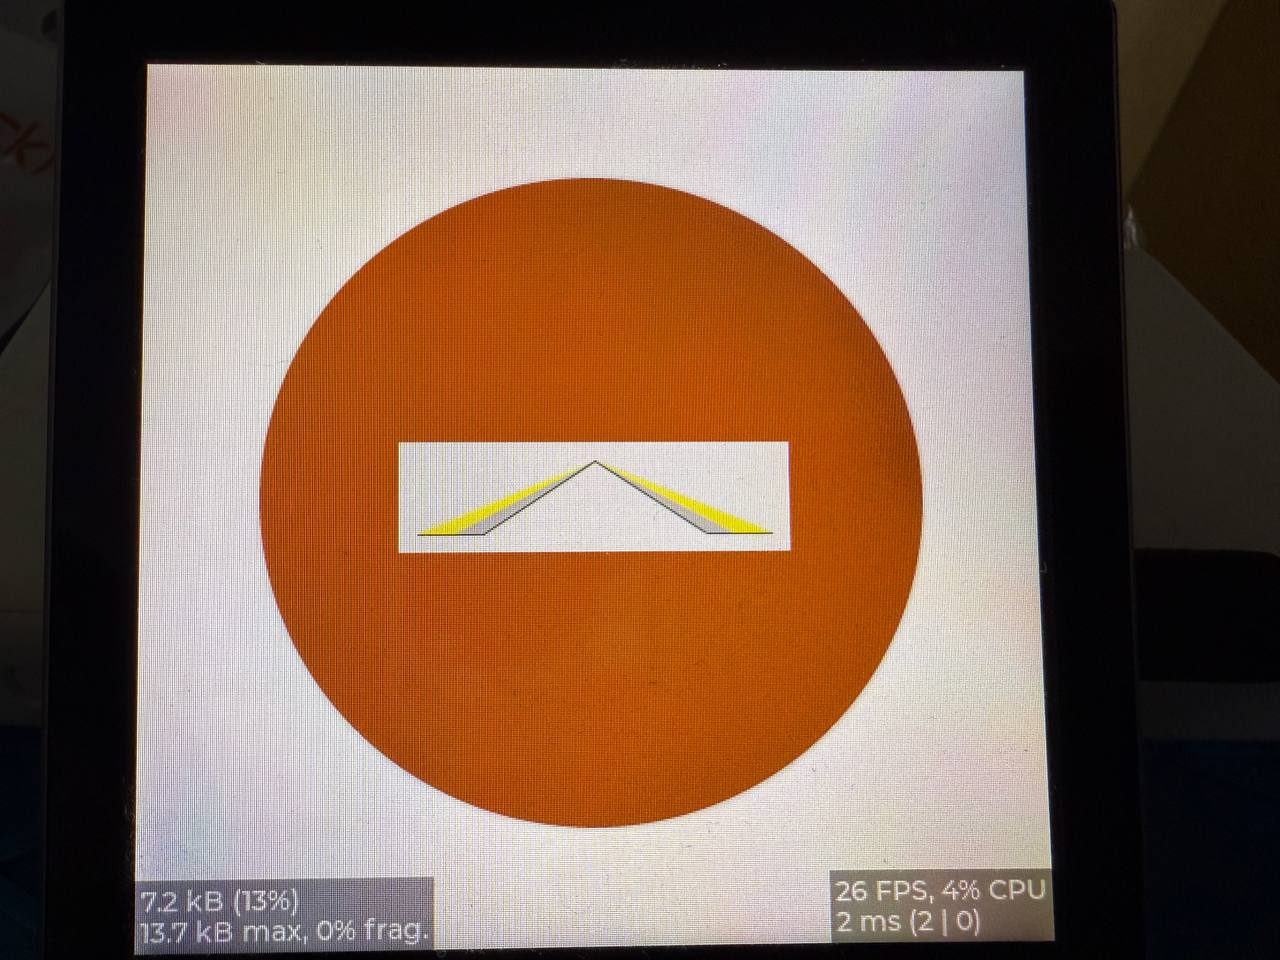
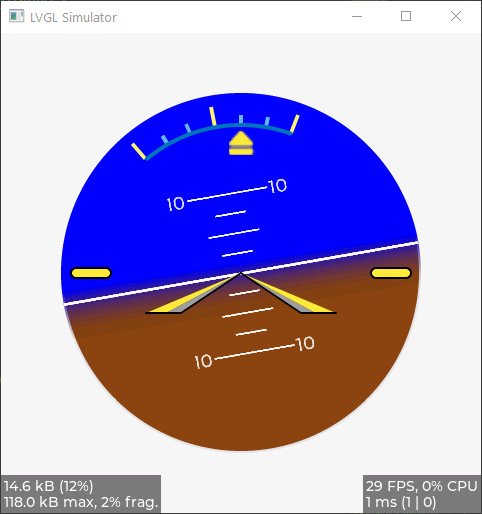
And the function code itself, which uses the function above to display the whole picture:

void pitch_scale_v5(int roll_deg, int pitch_deg)
{
// Define canvas size and line thickness
// Doesn't load when LV_MEM_SIZE is low, less than 128 - we need to think about how to solve the problem for ESP32
#define CANVAS_PITCH_SCALE_WIDTH 120
#define CANVAS_PITCH_SCALE_HEIGHT 180
#define PITCH_LINE_THICKNESS 2
#define PITCH_LINE_CENTER CANVAS_PITCH_SCALE_HEIGHT / 2

/*Create a buffer for the canvas*/
LV_DRAW_BUF_DEFINE_STATIC(draw_pitch_scale_buf, CANVAS_PITCH_SCALE_WIDTH, CANVAS_PITCH_SCALE_HEIGHT, LV_COLOR_FORMAT_ARGB8888); // does not load at all on a real device

// LV_DRAW_BUF_DEFINE_STATIC(draw_pitch_scale_buf, CANVAS_PITCH_SCALE_WIDTH, CANVAS_PITCH_SCALE_HEIGHT, LV_COLOR_FORMAT_RGB565); // no way to set transparency

// LV_DRAW_BUF_DEFINE_STATIC(draw_pitch_scale_buf, CANVAS_WIDTH, CANVAS_HEIGHT, LV_COLOR_FORMAT_AL88); // black and white image

// LV_DRAW_BUF_DEFINE_STATIC(draw_pitch_scale_buf, CANVAS_WIDTH, CANVAS_HEIGHT, LV_COLOR_FORMAT_ARGB8565); // not displayed at all on a real device

// LV_DRAW_BUF_DEFINE_STATIC(draw_pitch_scale_buf, CANVAS_WIDTH, CANVAS_HEIGHT, LV_COLOR_FORMAT_RGB565A8); // the image falls apart
LV_DRAW_BUF_INIT_STATIC(draw_pitch_scale_buf);

/*Create a canvas and initialize its palette*/
lv_obj_t * canvas_pitch_line = lv_canvas_create(lv_screen_active());
lv_canvas_set_draw_buf(canvas_pitch_line, &draw_pitch_scale_buf);
// canvas is visible
// lv_canvas_fill_bg(canvas_pitch_line, lv_color_hex3(0xccc), LV_OPA_COVER);
// makes the canvas layer transparent
lv_canvas_fill_bg(canvas_pitch_line, lv_color_hex3(0xccc), LV_OPA_TRANSP);
// centers the entire canvas in the center of the display
lv_obj_center(canvas_pitch_line);
lv_obj_set_pos(canvas_pitch_line, 0, 0); // X->, Y-⌄

// Draw lines using the new function
// Positive
create_line_v5(canvas_pitch_line, (CANVAS_PITCH_SCALE_WIDTH / 2) - 25, PITCH_LINE_CENTER - 120, (CANVAS_PITCH_SCALE_WIDTH / 2) + 25, PITCH_LINE_CENTER - 120, lv_color_hex(0xFFFFFF), PITCH_LINE_THICKNESS); // label 15, width 50 
create_line_v5(canvas_pitch_line, (CANVAS_PITCH_SCALE_WIDTH / 2) - 15, PITCH_LINE_CENTER - 100, (CANVAS_PITCH_SCALE_WIDTH / 2) + 15, PITCH_LINE_CENTER - 100, lv_color_hex(0xFFFFFF), PITCH_LINE_THICKNESS); // label 12_5, width 30 
create_line_v5(canvas_pitch_line, (CANVAS_PITCH_SCALE_WIDTH / 2) - 40, PITCH_LINE_CENTER - 80, (CANVAS_PITCH_SCALE_WIDTH / 2) + 40, PITCH_LINE_CENTER - 80, lv_color_hex(0xFFFFFF), PITCH_LINE_THICKNESS, true); // label 10, width 80 
create_line_v5(canvas_pitch_line, (CANVAS_PITCH_SCALE_WIDTH / 2) - 15, PITCH_LINE_CENTER - 60, (CANVAS_PITCH_SCALE_WIDTH / 2) + 15, PITCH_LINE_CENTER - 60, lv_color_hex(0xFFFFFF), PITCH_LINE_THICKNESS); // label 7_5, width 30 
create_line_v5(canvas_pitch_line, (CANVAS_PITCH_SCALE_WIDTH / 2) - 25, PITCH_LINE_CENTER - 40, (CANVAS_PITCH_SCALE_WIDTH / 2) + 25, PITCH_LINE_CENTER - 40, lv_color_hex(0xFFFFFF), PITCH_LINE_THICKNESS); // label 5, width 50 
create_line_v5(canvas_pitch_line, (CANVAS_PITCH_SCALE_WIDTH / 2) - 15, PITCH_LINE_CENTER - 20, (CANVAS_PITCH_SCALE_WIDTH / 2) + 15, PITCH_LINE_CENTER - 20, lv_color_hex(0xFFFFFF), PITCH_LINE_THICKNESS); // label 2_5, width 30 
// Negative 
create_line_v5(canvas_pitch_line, (CANVAS_PITCH_SCALE_WIDTH / 2) - 15, PITCH_LINE_CENTER + 20, (CANVAS_PITCH_SCALE_WIDTH / 2) + 15, PITCH_LINE_CENTER + 20, lv_color_hex(0xFFFFFF), PITCH_LINE_THICKNESS); // label 2_5, width 30 
create_line_v5(canvas_pitch_line, (CANVAS_PITCH_SCALE_WIDTH / 2) - 25, PITCH_LINE_CENTER + 40, (CANVAS_PITCH_SCALE_WIDTH / 2) + 25, PITCH_LINE_CENTER + 40, lv_color_hex(0xFFFFFF), PITCH_LINE_THICKNESS); // label 5, width 50 
create_line_v5(canvas_pitch_line, (CANVAS_PITCH_SCALE_WIDTH / 2) - 15, PITCH_LINE_CENTER + 60, (CANVAS_PITCH_SCALE_WIDTH / 2) + 15, PITCH_LINE_CENTER + 60, lv_color_hex(0xFFFFFF), PITCH_LINE_THICKNESS); // label 7_5, width 30 
create_line_v5(canvas_pitch_line, (CANVAS_PITCH_SCALE_WIDTH / 2) - 40, PITCH_LINE_CENTER + 80, (CANVAS_PITCH_SCALE_WIDTH / 2) + 40, PITCH_LINE_CENTER + 80, lv_color_hex(0xFFFFFF), PITCH_LINE_THICKNESS, true); // 1label 10, width 80 
create_line_v5(canvas_pitch_line, (CANVAS_PITCH_SCALE_WIDTH / 2) - 15, PITCH_LINE_CENTER + 100, (CANVAS_PITCH_SCALE_WIDTH / 2) + 15, PITCH_LINE_CENTER + 100, lv_color_hex(0xFFFFFF), PITCH_LINE_THICKNESS); // label 12_5, width 30 
create_line_v5(canvas_pitch_line, (CANVAS_PITCH_SCALE_WIDTH / 2) - 25, PITCH_LINE_CENTER + 120, (CANVAS_PITCH_SCALE_WIDTH / 2) + 25, PITCH_LINE_CENTER + 120, lv_color_hex(0xFFFFFF), PITCH_LINE_THICKNESS); // label 15, width 50

lv_obj_set_style_transform_pivot_x(canvas_pitch_line, CANVAS_PITCH_SCALE_WIDTH / 2, LV_PART_MAIN); 
lv_obj_set_style_transform_pivot_y(canvas_pitch_line, (CANVAS_PITCH_SCALE_HEIGHT / 2), LV_PART_MAIN); 
// lv_obj_set_style_transform_rotation(canvas_pitch_line, 0 * 10, LV_PART_MAIN); 
// lv_obj_set_style_transform_rotation(canvas_pitch_line, 10 * 10, LV_PART_MAIN); 
// lv_obj_set_style_transform_rotation(canvas_pitch_line, 20 * 10, LV_PART_MAIN); 
lv_obj_set_style_transform_rotation(canvas_pitch_line, -roll_deg * 10, LV_PART_MAIN);

}

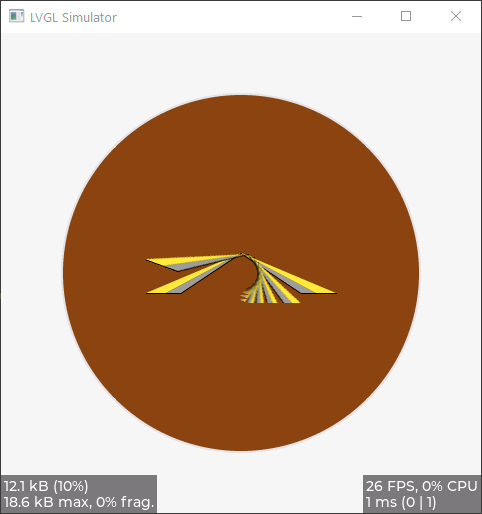
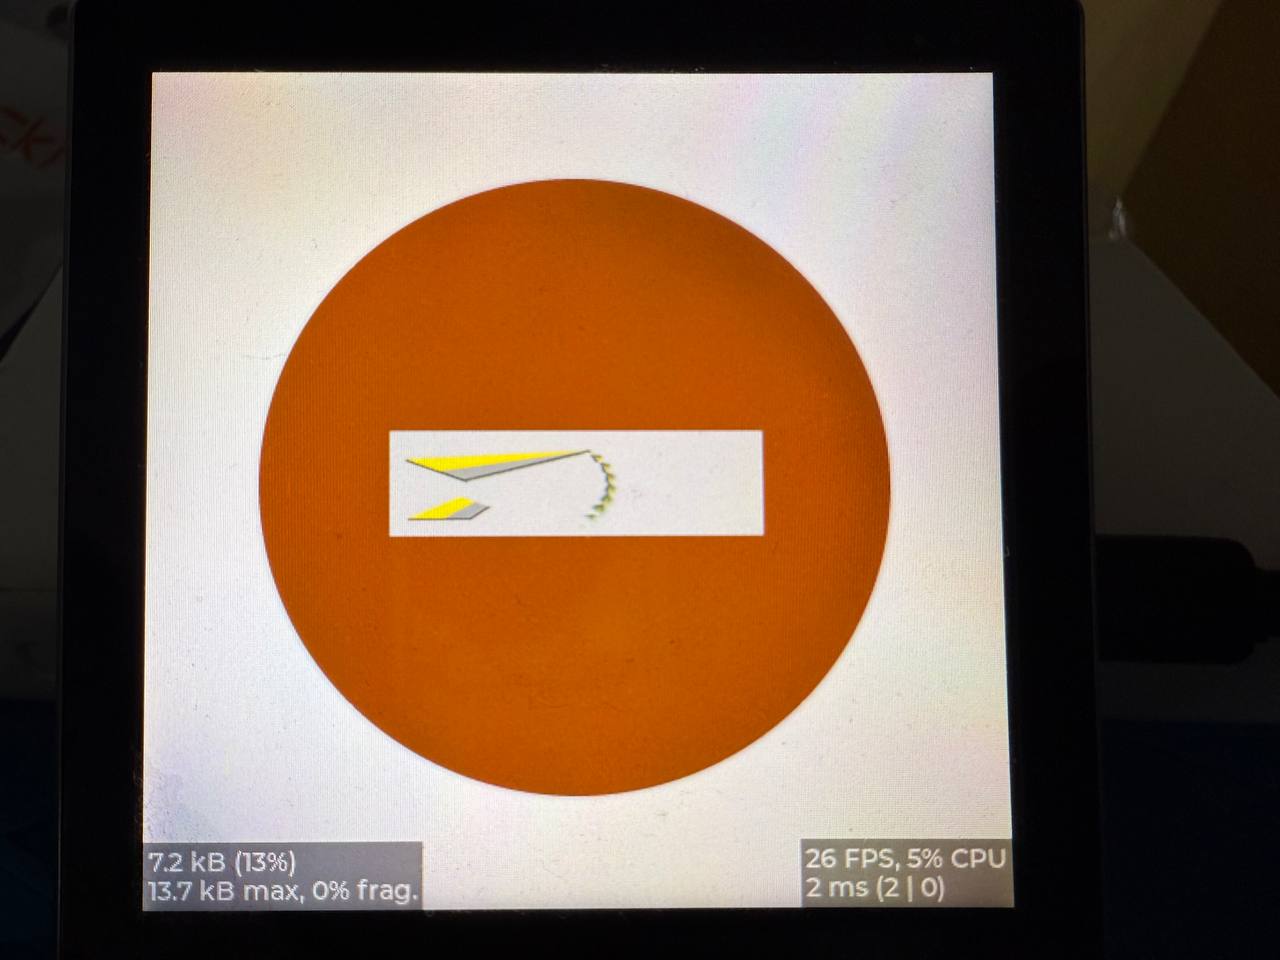
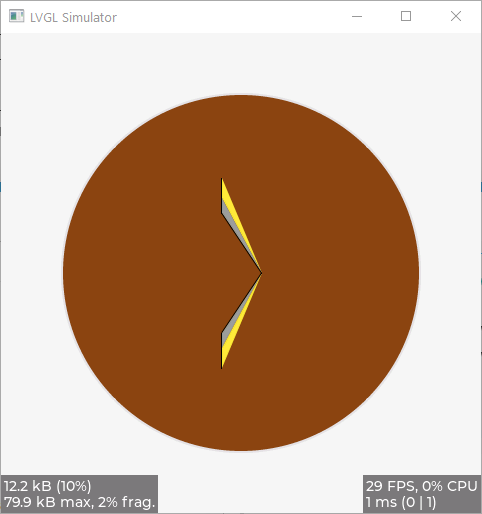
For now this is the idea, all that remains is to animate it :grinning:

Tried to increment via timer function, but it doesn’t work yet:

// Callback function for rotation
static void time_cb(lv_timer_t* t) {
lv_obj_t* gauge_moved = static_cast<lv_obj_t*>(lv_timer_get_user_data(t));
static int i = 0;
i = i++;
roll_deg = roll_deg + i;
}

void animator(void) {
lv_obj_t * gauge_moved;
// Create a timer to animate the gauge
lv_timer_create(time_cb, 1000, gauge_moved);
}

As far as I understand, you need to use LVGL timers :roll_eyes:

https://docs.lvgl.io/master/details/main-modules/timer.html

or rewrite them for freeRTOS.

OK so here is an example.

This is pseudo code so it is untested. It will give you a general idea of what needs to be done.

#include <stdlib.h>
#include <stdint.h>
#include <lvgl.h>


#define DISPLAY_WIDTH   (480)
#define DISPLAY_HEIGHT   (480)


lv_obj_t *screen = lv_screen_active();


void convert_coords(lv_point_t *p, int32_t width, int32_t height)
{
    p->x = width / 2 + p->x;
    p->y = height / 2 + p->y;
}


void render_pitch_label(lv_layer_t *layer, int32_t large_len, int32_t label_height, 
                        lv_draw_label_dsc_t *desc, in32_t y, int32_t width, int32_t height) 
{
    lv_area_t coords;
    lv_point_t point;

    point.x = (large_len / 2) + 3;
    point.y = -(y - (label_height / 2));
            
    convert_coords(&point, width, height);
    coords.x1 = point.x;
    coords.y1 = point.y;

    point.x = (large_len / 2) + 43;
    point.y = -(y + (label_height / 2));
            
    convert_coords(&point, width, height);
    coords.x2 = point.x;
    coords.y2 = point.y;
            
    lv_draw_label(&layer, desc, &coords);
    
}


lv_obj_t *create_pitch(lv_obj_t *canvas, lv_draw_buf_t *buf, bool flip_text)
{
    
    int32_t pitch_step = DISPLAY_HEIGHT / 80;
    int32_t width = DISPLAY_WIDTH / 2;

    // 360 degrees.
    int32_t height = pitch_step * 360;

    if (canvas == NULL) {
        canvas = lv_canvas_create(screen);
        lv_obj_set_style_width(canvas, width, LV_PART_MAIN);
        lv_obj_set_style_height(canvas, height, LV_PART_MAIN);

        lv_obj_set_style_transform_pivot_x(canvas, width / 2, LV_PART_MAIN);
        lv_obj_set_style_transform_pivot_y(canvas, height / 2, LV_PART_MAIN);

        lv_obj_center(canvas);
    }

    lv_canvas_set_draw_buf(canvas, buf);
    lv_canvas_fill_bg(canvas, lv_color_hex(0x000000), 0);

    int32_t large_len = DISPLAY_WIDTH / 10;
    int32_t small_len = large_len / 2;
    in32_t large_step = pitch_step * 10;
    int32_t small_step = large_step / 2;

    lv_layer_t layer;
    lv_canvas_init_layer(canvas, &layer);

    lv_draw_line_dsc_t desc;
    lv_draw_line_dsc_init(&desc);

    // set the color and the width of the line
    desc.color = lv_color_hex(0xFFFFFF);
    desc.width = 3;
    desc.opa = 255;

    lv_draw_label_dsc_t label_desc;

    lv_draw_label_dsc_init(&label_desc);

    int32_t label_height = lv_font_get_line_height(lv_font_montserrat_14);

    label_desc.font = lv_font_montserrat_14;
    label_desc.color = lv_color_hex(0xFFFFFF);
    label_desc.opa = 255;

    char label[5];

    for (int32_t y=0;y<=height / 2;y+=large_step) {
    
        if (flip_text) {
            label_desc.text = (const char *)itoa((int)(-y / 10), label, 10);
        else {
            label_desc.text = (const char *)itoa((int)(y / 10), label, 10);
        }
            
        render_pitch_label(&layer, large_len, label_height, &desc, -y, width, height);
        
        desc.p1.x = -(large_len / 2);
        desc.p1.y = y;

        desc.p2.x = large_len / 2;
        desc.p2.y = y;

        convert_coords(&desc.p1, width, height);
        convert_coords(&desc.p2, width, height);

        lv_draw_line(&layer, &desc);

        if (y != 0 && y != height / 2) {
            if (flip_text) {
                label_desc.text = (const char *)itoa((int)(y / 10), label, 10);
            else {
                label_desc.text = (const char *)itoa((int)(-y / 10), label, 10);
            }
                        
            render_pitch_label(&layer, large_len, label_height, &desc, y, width, height);

            desc.p1.x = -(large_len / 2);
            desc.p1.y = -y;

            desc.p2.x = large_len / 2;
            desc.p2.y = -y;

            convert_coords(&desc.p1, width, height);
            convert_coords(&desc.p2, width, height);

            lv_draw_line(&layer, &desc);
        }

        // small ticks
        if (y != height / 2) {
            desc.p1.x = -(small_len / 2);
            desc.p1.y = y + small_step;

            desc.p2.x = small_len / 2;
            desc.p2.y = y + small_step;

            convert_coords(&desc.p1, width, height);
            convert_coords(&desc.p2, width, height);

            lv_draw_line(&layer, &desc);

            desc.p1.x = -(small_len / 2);
            desc.p1.y = -(y + small_step);

            desc.p2.x = small_len / 2;
            desc.p2.y = -(y + small_step);

            convert_coords(&desc.p1, width, height);
            convert_coords(&desc.p2, width, height);

            lv_draw_line(&layer, &desc);
        }
    }

    lv_canvas_finish_layer(canvas, &layer);

    return canvas;
}

lv_obj_t *create_horizon(void)
{
    int32_t size = sqrt((DISPLAY_WIDTH * DISPLAY_WIDTH) + (DISPLAY_HEIGHT * DISPLAY_HEIGHT))
    lv_draw_buf_t *buf = lv_draw_buf_create(size, size, LV_COLOR_FORMAT_ARGB8888, 0);

    lv_obj_t *canvas = lv_canvas_create(screen);

    lv_obj_set_style_width(canvas, size, LV_PART_MAIN);
    lv_obj_set_style_height(canvas, size, LV_PART_MAIN);

    lv_obj_set_style_transform_pivot_x(canvas, size / 2, LV_PART_MAIN);
    lv_obj_set_style_transform_pivot_y(canvas, size / 2, LV_PART_MAIN);

    lv_obj_center(canvas);

    lv_canvas_set_draw_buf(canvas, horizon_buf);
    lv_canvas_fill_bg(canvas, lv_color_hex(0x000000), 0);


    lv_draw_rect_dsc_t desc;
    lv_draw_rect_dsc_init(&desc);

    desc.bg_opa = 255;
    desc.bg_color = lv_color_hex(0x895129);
    desc.border_color = lv_color_hex(0xFFFFFF);
    desc.border_width = 4;
    desc.border_opa = 255;
    desc.border_side = LV_BORDER_SIDE_TOP;

    lv_area_t coords;

    coords.x1 = 0;
    coords.y1 = size / 2;
    coords.x2 = size;
    coords.y2 = size;

    lv_layer_t layer;

    lv_canvas_init_layer(canvas, &layer);

    lv_draw_rect(&layer, &desc, &coords);

    lv_canvas_finish_layer(canvas, &layer);

    return canvas;
}


lv_obj_t *horizon_canvas = create_horizon();

lv_draw_buf_t *pitch_buf1 = lv_draw_buf_create(DISPLAY_WIDTH / 2, DISPLAY_HEIGHT / 80 * 360, LV_COLOR_FORMAT_ARGB8888, 0);
lv_draw_buf_t *pitch_buf2 = lv_draw_buf_create(DISPLAY_WIDTH / 2, DISPLAY_HEIGHT / 80 * 360, LV_COLOR_FORMAT_ARGB8888, 0);

lv_obj_t *pitch_canvas = create_horizon(NULL, pitch_buf2, true);
create_horizon(pitch_canvas, pitch_buf1, false);


void set_roll(int16_t roll)
{
    if (roll < 0) roll += 360;
    
    if (roll < 0) roll = 0;
    else if (roll > 360) roll = 360;
    
    lv_obj_set_style_transform_rotation(horizon_canvas, roll * 10, LV_PART_MAIN);
    lv_obj_set_style_transform_rotation(pitch_canvas, roll * 10, LV_PART_MAIN);
    
    if (roll > 180) {
        lv_canvas_set_draw_buf(pitch_canvas, pitch_buf2);
    } else {
        lv_canvas_set_draw_buf(pitch_canvas, pitch_buf1);
    }
}


void set_pitch(int16_t pitch)
{
    int32_t pitch_step = DISPLAY_HEIGHT / 80;
    int32_t y = pitch_step * pitch;
    lv_obj_set_style_y(horizon_canvas, y, LV_PART_MAIN);
    lv_obj_set_style_y(pitch_canvas, y, LV_PART_MAIN);
    
    if (pitch > 180 || pitch < -180) {
        lv_canvas_set_draw_buf(pitch_canvas, pitch_buf2);
    } else {
        lv_canvas_set_draw_buf(pitch_canvas, pitch_buf1);
    }
}

set_roll(45);
set_pitch(30);

1 Like

you don’t have to use the timers you can do the animation right from your main loop if that is all you are going to be doing. All you need to do is change whatever is needed to make the animation work then call lv_refr_now(NULL) right after you have done your updates.