Hello,
since a few Day’s I search for a Solution how I can make the Touch Area fit to the Button position from LVGL.
The Display was successful calibrated witch the Calibration Example from TFT_eSPI.
I have to say that i’m a beginner and English is not my first language, so please forgive me if I have not found the right search therm!
Code to reproduce
If I run This example Code:
#include <lvgl.h>
#include <TFT_eSPI.h>
/*If you want to use the LVGL examples,
  make sure to install the lv_examples Arduino library
  and uncomment the following line.
#include <lv_examples.h>
*/

//#include <lv_demo.h>

/*Change to your screen resolution*/
static const uint16_t screenWidth  = 480;
static const uint16_t screenHeight = 320;

static lv_disp_draw_buf_t draw_buf;
static lv_color_t buf[ screenWidth * 10 ];

TFT_eSPI tft = TFT_eSPI(screenWidth, screenHeight); /* TFT instance */

#if LV_USE_LOG != 0
/* Serial debugging */
void my_print(const char * buf)
{
    Serial.printf(buf);
    Serial.flush();
}
#endif

/* Display flushing */
void my_disp_flush( lv_disp_drv_t *disp, const lv_area_t *area, lv_color_t *color_p )
{
    uint32_t w = ( area->x2 - area->x1 + 1 );
    uint32_t h = ( area->y2 - area->y1 + 1 );

    tft.startWrite();
    tft.setAddrWindow( area->x1, area->y1, w, h );
    tft.pushColors( ( uint16_t * )&color_p->full, w * h, true );
    tft.endWrite();

    lv_disp_flush_ready( disp );
}

/*Read the touchpad*/
void my_touchpad_read( lv_indev_drv_t * indev_driver, lv_indev_data_t * data )
{
    uint16_t touchX, touchY;

    bool touched = tft.getTouch( &touchX, &touchY, 600 );

    if( !touched )
    {
        data->state = LV_INDEV_STATE_REL;
    }
    else
    {
        data->state = LV_INDEV_STATE_PR;

        /*Set the coordinates*/
        data->point.x = touchX;
        data->point.y = touchY;

        Serial.print( "Data x " );
        Serial.println( touchX );

        Serial.print( "Data y " );
        Serial.println( touchY );
    }
}

void setup()
{
    Serial.begin( 115200 ); /* prepare for possible serial debug */

    String LVGL_Arduino = "Hello Arduino! ";
    LVGL_Arduino += String('V') + lv_version_major() + "." + lv_version_minor() + "." + lv_version_patch();

    Serial.println( LVGL_Arduino );
    Serial.println( "I am LVGL_Arduino" );

    lv_init();

#if LV_USE_LOG != 0
    lv_log_register_print_cb( my_print ); /* register print function for debugging */
#endif

    tft.begin();          /* TFT init */
    tft.setRotation( 1 ); /* Landscape orientation, flipped */

    /*Set the touchscreen calibration data,
     the actual data for your display can be acquired using
     the Generic -> Touch_calibrate example from the TFT_eSPI library*/
    //uint16_t calData[5] = { 275, 3620, 264, 3532, 1 };

    uint16_t calData[5] = { 257, 3673, 220, 3522, 7 }; //direction 1
    tft.setTouch( calData );

    lv_disp_draw_buf_init( &draw_buf, buf, NULL, screenWidth * 10 );

    /*Initialize the display*/
    static lv_disp_drv_t disp_drv;
    lv_disp_drv_init( &disp_drv );
    /*Change the following line to your display resolution*/
    disp_drv.hor_res = screenWidth;
    disp_drv.ver_res = screenHeight;
    disp_drv.flush_cb = my_disp_flush;
    disp_drv.draw_buf = &draw_buf;
    lv_disp_drv_register( &disp_drv );

    /*Initialize the (dummy) input device driver*/
    static lv_indev_drv_t indev_drv;
    lv_indev_drv_init( &indev_drv );
    indev_drv.type = LV_INDEV_TYPE_POINTER;
    indev_drv.read_cb = my_touchpad_read;
    lv_indev_drv_register( &indev_drv );

#if 0
    /* Create simple label */
    lv_obj_t *label = lv_label_create( lv_scr_act() );
    lv_label_set_text( label, LVGL_Arduino.c_str() );
    lv_obj_align( label, LV_ALIGN_CENTER, 0, 0 );
#else
    /* Try an example from the lv_examples Arduino library
       make sure to include it as written above.
    lv_example_btn_1();
   */

lv_example_get_started_2();
//lv_example_get_started_1();
    // uncomment one of these demos
    // lv_demo_widgets();            // OK
    // lv_demo_benchmark();          // OK
    // lv_demo_keypad_encoder();     // works, but I haven't an encoder
    // lv_demo_music();              // NOK
    // lv_demo_printer();
    // lv_demo_stress();             // seems to be OK
#endif
    Serial.println( "Setup done" );
}

void loop()
{
    lv_timer_handler(); /* let the GUI do its work */
    delay( 5 );
}


static lv_style_t style_btn;
static lv_style_t style_btn_pressed;
static lv_style_t style_btn_red;

static lv_color_t darken(const lv_color_filter_dsc_t * dsc, lv_color_t color, lv_opa_t opa)
{
    LV_UNUSED(dsc);
    return lv_color_darken(color, opa);
}

static void style_init(void)
{
    /*Create a simple button style*/
    lv_style_init(&style_btn);
    lv_style_set_radius(&style_btn, 10);
    lv_style_set_bg_opa(&style_btn, LV_OPA_COVER);
    lv_style_set_bg_color(&style_btn, lv_palette_lighten(LV_PALETTE_GREY, 3));
    lv_style_set_bg_grad_color(&style_btn, lv_palette_main(LV_PALETTE_GREY));
    lv_style_set_bg_grad_dir(&style_btn, LV_GRAD_DIR_VER);

    lv_style_set_border_color(&style_btn, lv_color_black());
    lv_style_set_border_opa(&style_btn, LV_OPA_20);
    lv_style_set_border_width(&style_btn, 2);

    lv_style_set_text_color(&style_btn, lv_color_black());

    /*Create a style for the pressed state.
     *Use a color filter to simply modify all colors in this state*/
    static lv_color_filter_dsc_t color_filter;
    lv_color_filter_dsc_init(&color_filter, darken);
    lv_style_init(&style_btn_pressed);
    lv_style_set_color_filter_dsc(&style_btn_pressed, &color_filter);
    lv_style_set_color_filter_opa(&style_btn_pressed, LV_OPA_20);

    /*Create a red style. Change only some colors.*/
    lv_style_init(&style_btn_red);
    lv_style_set_bg_color(&style_btn_red, lv_palette_main(LV_PALETTE_RED));
    lv_style_set_bg_grad_color(&style_btn_red, lv_palette_lighten(LV_PALETTE_RED, 3));
}

/**
 * Create styles from scratch for buttons.
 */
void lv_example_get_started_2(void)
{
    /*Initialize the style*/
    style_init();

    /*Create a button and use the new styles*/
    lv_obj_t * btn = lv_btn_create(lv_scr_act());
    /* Remove the styles coming from the theme
     * Note that size and position are also stored as style properties
     * so lv_obj_remove_style_all will remove the set size and position too */
    lv_obj_remove_style_all(btn);
    lv_obj_set_pos(btn, 10, 10);
    lv_obj_set_size(btn, 120, 50);
    lv_obj_add_style(btn, &style_btn, 0);
    lv_obj_add_style(btn, &style_btn_pressed, LV_STATE_PRESSED);

    /*Add a label to the button*/
    lv_obj_t * label = lv_label_create(btn);
    lv_label_set_text(label, "Button");
    lv_obj_center(label);

    /*Create another button and use the red style too*/
    lv_obj_t * btn2 = lv_btn_create(lv_scr_act());
    lv_obj_remove_style_all(btn2);                      /*Remove the styles coming from the theme*/
    lv_obj_set_pos(btn2, 10, 80);
    lv_obj_set_size(btn2, 120, 50);
    lv_obj_add_style(btn2, &style_btn, 0);
    lv_obj_add_style(btn2, &style_btn_red, 0);
    lv_obj_add_style(btn2, &style_btn_pressed, LV_STATE_PRESSED);
    lv_obj_set_style_radius(btn2, LV_RADIUS_CIRCLE, 0); /*Add a local style too*/

    label = lv_label_create(btn2);
    lv_label_set_text(label, "Button 2");
    lv_obj_center(label);
}
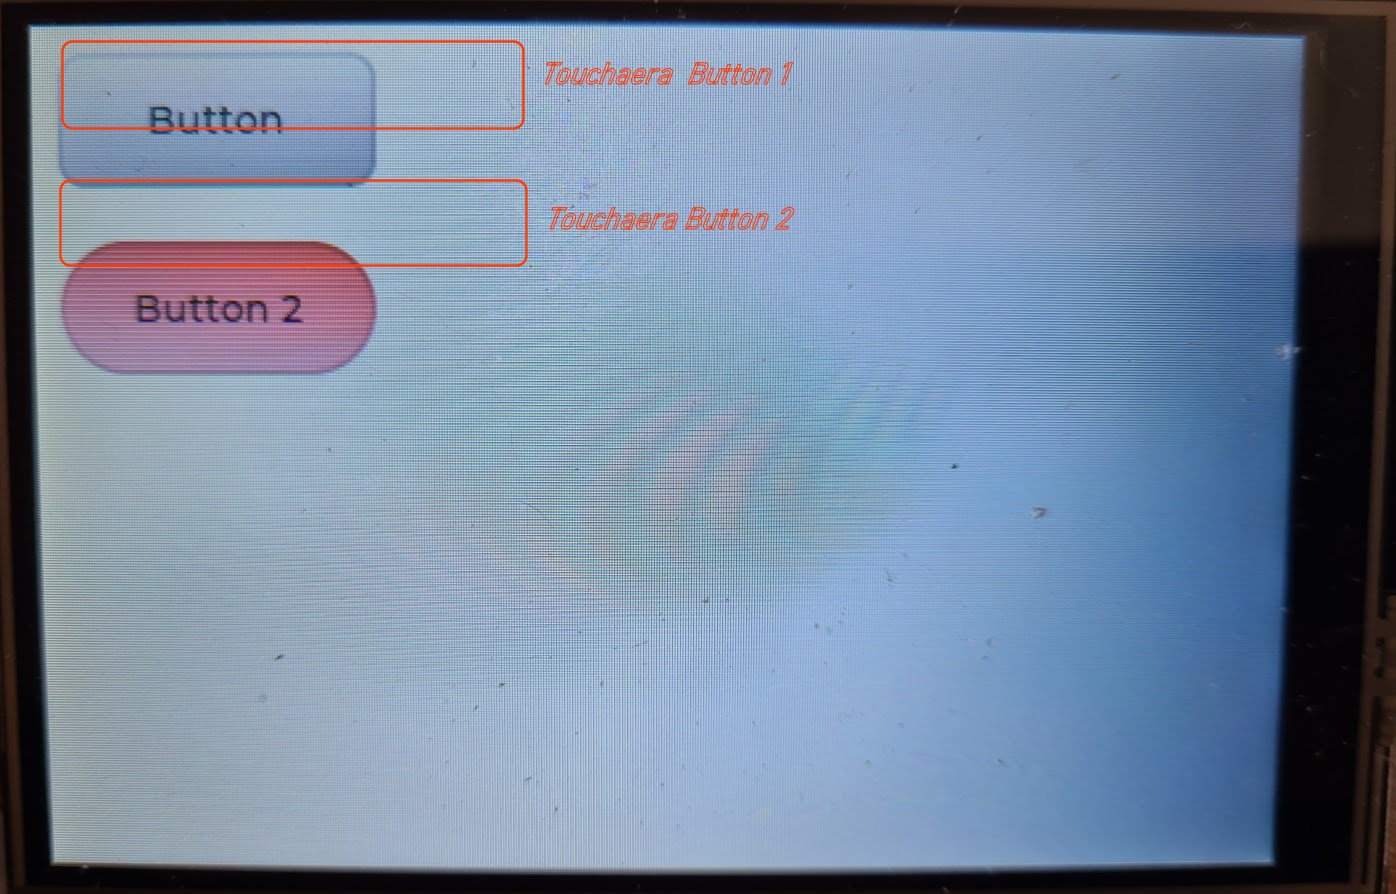
The Touch Area don’t fit to the Button position, see here:
What MCU/Processor/Board and compiler are you using?
ESP32 with Arduino IDE 1.8.19 and the Display from www.waveshare.com/wiki/4inch_RPi_LCD_(A)
What LVGL version are you using?
LVGL 8.2 Installed with the Arduino IDE
What do you want to achieve?
My question is where is the trick to fit the button to the touch position?
I hope someone can point me in to the right Direction to Solve my Issue.
Greets
Andy