Esp32 use with LVGL library...need a little example

ESP32_Screen_Fade.zip (3.3 KB)
I have modified this example for setup screen brightness with a slider (need GPIO32 pin of Esp32 Dev Kit V1 to LED pin of 9488 touch screen), any can post a example that use C code generated by Edgeline in example that i have send?..i use also Bodmer library in this example that work very well and fast.
I post also a PDF that i have generated for Bodmer Library (if any need) with all commands in bookmarks at left of Pdf, and in appendix the connection from Esp32 and Ili9488 screen, and setup files of Bodmer library.
TFT_eSPI.pdf (1.2 MB)
I post also little example generated with Edgeline, but how can merge this with Screen_Fade example that i post first for made result ?
Also without use Bodmer Library ( if not need )…just i want see this result of Edgeline in Ili9488 screen.
Test.ZIP (15.7 KB)
image

2 Likes

I start try use slider with shadow and 7.0 library…some work and some no and freeze the sketch.
Shadow around slider work if not use also lv_obj_set_style_local_shadow_spread(slider, LV_SLIDER_PART_BG, LV_STATE_DEFAULT, 1); // NO or we get a solid shadow where need a transparent shadow.
This lines work:
lv_obj_set_style_local_bg_color(slider, LV_SLIDER_PART_INDIC, LV_STATE_DEFAULT, lv_color_hex(107 * 256 * 256 + 0 * 256 + 0));
lv_obj_set_style_local_bg_opa(slider, LV_SLIDER_PART_INDIC, LV_STATE_DEFAULT, 255);
lv_obj_set_style_local_bg_grad_color(slider, LV_SLIDER_PART_INDIC, LV_STATE_DEFAULT, lv_color_hex(194 * 256 * 256 + 198 * 256 + 0));
lv_obj_set_style_local_bg_grad_dir(slider, LV_SLIDER_PART_INDIC, LV_STATE_DEFAULT, LV_GRAD_DIR_HOR);
lv_obj_set_style_local_outline_color(slider, LV_SLIDER_PART_INDIC, LV_STATE_DEFAULT, lv_color_hex(254 * 256 * 256 + 255 * 256 + 227));

lv_obj_set_style_local_outline_opa(slider, LV_SLIDER_PART_INDIC, LV_STATE_DEFAULT, 255);
lv_obj_set_style_local_outline_width(slider, LV_SLIDER_PART_INDIC, LV_STATE_DEFAULT, 1);
lv_obj_set_style_local_outline_pad(slider, LV_SLIDER_PART_INDIC, LV_STATE_DEFAULT, 2);
lv_obj_set_style_local_bg_color(slider, LV_SLIDER_PART_KNOB, LV_STATE_DEFAULT, lv_color_hex(166 * 256 * 256 + 254 * 256 + 164));
and :
lv_obj_set_style_local_shadow_color(slider, LV_SLIDER_PART_KNOB, LV_STATE_DEFAULT, lv_color_hex(183 * 256 * 256 + 254 * 256 + 211));
lv_obj_set_style_local_shadow_opa(slider, LV_SLIDER_PART_KNOB, LV_STATE_DEFAULT, 255);
lv_obj_set_style_local_shadow_width(slider, LV_SLIDER_PART_KNOB, LV_STATE_DEFAULT, 60);
lv_obj_set_style_local_shadow_spread(slider, LV_SLIDER_PART_KNOB, LV_STATE_DEFAULT, 10);

lv_obj_set_style_local_shadow_spread work only if you use little value (not more that 10)

I dont have still test the background gradient.
But my question is this: WHAT LIBRARY VERSION NEED USE ?..seem is 7.0…but why not all commands of Edgeline work on 7.0 and stop sketch work?
Ty for reply

Ok, with [Release v7.11.0] also lv_obj_set_style_local_shadow_spread(slider, LV_SLIDER_PART_BG, LV_STATE_DEFAULT, 4); work good, also gradient on Knob work good.
Here a photo with light theme:
image
or a dark theme
image
But photo of a screen is no so good as usual, i need implement a switch on Esp32 for save a screenshot or wifi or Sd or by serial.
The author of this library and of Edgeline has done and is doing a great job, but I have to make a note on the explanations of the installation of the library and the setting according to the machine that must use it, also regarding where the file is to be saved. configuration, which depending on the version of the library sometimes had to be placed in the SRC directory, other times it worked in the sketch directory.
And even saying NEXT TO doesn’t make it clear to me, just say clearly that it should be placed in the main branch of the libraries directory.
Then for example in the lv_conf.h file, for use with ESP32 and the Arduino Gui, you need to change the line where there is HAL setting in #define LV_TICK_CUSTOM 1 otherwise the touch screen does not respond.
And sincerely i dont have see any reply at this request of a simple example by users of this forum…ok

I have tried here to give an answer and I hope it will be useful to someone else in the near future who has the same configuration problems. And I also attach the file that works with version 7.11, integrated with the C file generated by Edgeline, and in my mind I have a converter (in VB.net) that generates the .ino file from Edgeline file (if the author has not already thought about it) ready to use.
ESP32_Screen_Fade_LVGL3.zip (3.1 KB)

I spent several hours making a routine that worked to take a screenshot of this display (ILI9488), but I finally managed it.
I read several forums and tested the various solutions, but none worked, also because I never found an entire listing for my configuration (ESP32 Dev Kit V1, touchScreen Ili 9488 480x320 and Arduino Ide with Espressif ESP32 libraries), but only scattered routines in which other program blocks to which they referred were missing, or routines that contained instructions not recognized by the compiler and of which I could not find a reference even on the internet.
So, I posted in this .zip file that I attach both the complete .ino file, both the setups I used for the TFT_eSPI and LVGL libraries, and an image with the connections between ESP32 and Touchscreen.
The solution I adopted is this: save the screenshot (which already includes a BMP header) on SPIFFS and then send it to the PC via the serial port in 2 ways that can be seen by opening the serial monitor (115200 baud) of Arduino Ide (by resetting ESP32 or by pressing key 2 which corresponds to a DIR command):
with key 1 followed by a space and the name of the file to be saved always preceded by /, for example 1 /shot1.bmp you get the screenshot of the display that is saved on SPIFFS.
Transfer to PC:
option 1:
3 /shot1.bmp reads all the data of the file saved on SPIFFS and prints them in hexadecimal in the serial monitor, at this point the hexadecimal data are selected, copied, pasted in Notepad ++, in the Notepad ++ plugins there is the option to convert from HEX TO ASCII, you save the converted file with the .bmp extension.
Our file is still 16-bit, so a normal image viewer displays it as a black screen, you must instead open it with XnView (Image Viewer | Photo Viewer | Image Resize | XnView) and at this point you can save it in the format favorite.
Option 2:
using RealTerm (https://realterm.sourceforge.io) in capture mode (you have to close the Arduino Ide serial monitor) and using the capture option and sending the command “t /shot1.bmp” in RealTerm (without brackets), Esp32 transfers the file without other writings to the terminal, the capture is stopped and the file is saved which must in any case be converted with XnView.
I also include a batch file to launch RealmTerm, because the program does not save the configuration (incredible but true), you have to change the serial port number and the default directory to save the file.
The next steps are for the wifi connection, horizontal keyboard, web browser and saving preferences on SPIFF.
Ah obviously the slider that controls the brightness of the screen does not work if you connect the LED pin to 3.3 volts, it only works if it is connected to the PWM of pin 32 of ESP32.
The connection I used is the one represented in the ConnectionDiagram.png image that I attached in the .zip file.
Good fun
shot1
Esp32ScreenShot.zip (199.9 KB)

I missed to say that i use still 7.11 of LVGL library, because also Edgeline support this for now

Another thanks to the author of this graphics library, it allows you to create really nice interfaces for such an inexpensive processor like ESP32.
Having created a basic interface, I am now proceeding with the wifi connection.
It must be said that the code must be perfect, and I have wasted a lot of time figuring out that the variable char TT [0]; dimensioned to 0 created problems also to the screenshot, in addition to blocking the code without reporting any error … it had to be dimensioned to a number higher than 0, I dimensioned it to char TT [1024]; which is sufficient to create the table of available SSIDs with a signal level from 0 to -70.
So I am attaching the correct code which also includes a horizontal keyboard with a custom style that I hope will be of interest to those who read the forum.
The program starts with a scan of the wifi peripherals, so the startup takes a few more seconds before bringing up the graphical interface, but later I will save the SSID and the Password on the SPIFFS memory and, if the program finds those data all start, it will no longer scan but by pressing the WIFI button it will try to connect directly.
Questa è l’interfaccia di partenza:
AaShot1

Pressing the WIFI button opens a roller in which you can choose the SSID to connect to

aaShot2

and the shadow behind the key changes color as if it were a backlit key …
A long press on the selected SSID will close the roller and bring up the keyboard to enter the password

aaShot3

You can also use the keyboard to hide the entered password … but all these privacy things make me laugh when everyone also knows how much toilet paper we use … however it is up to you to change the code.
However, once the password has been entered, the connection will be made … soon on these screens if anyone is interested, please show up.
aaShot4

Buon divertimento a tutti
Esp32_ScreenFade.zip (202.8 KB)

Now connection is made with WIFI label, and, if connected, appear this screen:

aaShot5

With next press on WIFI label you can disconnect.
At start the scan of networks is made only if not are preferences saved on SPIFFS, and from preferences is load default SSID and Password.
If want delete file Pref.txt you can use serial (command 4 /Pref.txt) or a long press on Pref label…in this mode you can reboot and perform scan of network and rewrite default SSID and Passw.
I have lost time with SSID and Passw string (also converted in C_str()) that cause connection not work.
So i convert em in chars and connection work:
char ssid_char[50]; char wifipw_char[50];
ssid.toCharArray(ssid_char, ssid.length()); wifipw.toCharArray(wifipw_char, wifipw.length());
//WiFi.begin(ssid.c_str(), wifipw.c_str());
WiFi.begin(ssid_char, wifipw_char);

Now i work on client transmit/receive data …next step
Esp32ScreenShot22.zip (203.6 KB)

I wasted some time to test if saving the screen in 32 bit mode changed something in the final result, but, since my touch (Ili9488) works in 16 bit, the final result was identical.
The only thing that changed was the size of the file which became huge and therefore it took longer to transfer it to the PC.
So I restored the old way of saving it, that is with the .bmp extension to also save the BMP header (I recommend it, at least there are already the dimensions and the bit depth saved in the header) and once transferred to the PC I read it with Xnwiew directly and I save it in .png or whatever format you want.
Or you can save it with the extension .raw and in this way the bmp header is not attached.
I have removed the slider that is used to set the brightness of the screen because I have included the settings in the preferences.
So I added a table that allows you to change preferences (SSID, Passw and Brightnes for now), with a side scroll bar.
A long press on the lines brings out the keyboard.
A long press on >>> EXIT <<< closes the preferences window.
The next step is connecting with a client and I have yet to decide which mode to use.
Hi everyone
aaShot6

aaShot7

aaShot8

Lvgl27.zip (204.1 KB)

1.413 / 5.000

Risultati della traduzione

I introduced the FTP connection (300Kb at second transfer). I modified the table, I introduced a first column with the numbers of the row, I introduced a variable in row 4 for the wifi scan limit, and in row 5 there is the possibility to enable or not the FTP connection, any value other than “ON” does not automatically connect to FTP when making wifi connection, also in main Loop, ftp handle is not executed. Also in the table, I introduced the ADD ROW and DELETE ROW commands, which allow you to add custom commands (at the moment they are not yet intercepted by the Table eventhandler, but they can be easily implemented. Now a LONG PRESS on the PREFS button does not cause the deletion of the preferences file (it was too dangerous if you do not have a backup file and if various commands have been introduced). However with the FTP connection the transfer of screenshots is really fast, and if you save them with the BMP header (for example 1 /shot.bmp in serial monitor) it is a moment to transfer them to your PC and read them directly in Xnview to save them later in the desired format. For the FTP connection I used the libraries https://github.com/xreef/SimpleFTPServer, username and password are both set by default with “Esp32”. On the PC I use Total commander or Filezilla portable for the FTP connection (below the settings with Total Commander)

aaShot11

and send command for bring connection alive

aaShot12

And here a screenshot of new commands in table (i have also hidden scrollbars that not need)

aaShot10

I forgot to say that now you can scan wifi networks by deleting the SSID in the preferences and then pressing the WIFI button

What interests me now is to download cutting files in .plt format to send them to a printer / cutter with the serial 2 of Esp32 (Uart) to cut the films to put on the phones (which I have already done with Esp32 but not with this pleasant graphical interface) … which can be created with Ftp transfer or with Json to query the server on the files available for the given phone model … but I think this does not interest many users.
Hello everyone again

here is the last code:
Lvgl31.zip (228.6 KB)

I introduced the connection to the web server, so in the preferences you can set both the FTP connection and the Web Server, which can both be active at the same time, the connection to both starts when you connect Esp to WiFi.
To limit battery consumption (if Esp is not connected to the USB) I have introduced a sleep timer (the time in seconds is set in the preferences).
After considering the various types of sleep that can be used, I decided to use a Light Sleep which simply decreases the frequency of the CPU (80 Mhz against 240 Mhz in normal use) and lowers the brightness of the screen to 0 ( always if you use the touch screen led power supply via the PWM pin and not directly at 3.3 Volts).
In this way Esp32 is reactivated the next time you press the screen, and the WiFi connection remains active.
Below 80 Mhz (it can also be set to 20) the touch screen stops responding. As far as I understand (and tried), the other Deep Sleep modes deactivate the wifi and the touch screen, so they must be reactivated with an external button.
Sleep works like this: as long as there is activity in the screen handler a variable is updated with the current time, when this value is exceeded in the main loop (with the addition of the time set in the preferences) Esp32 goes into sleep.
If you want to disable Sleep mode, just set the variable in the preferences to 0 (or even leave the field blank).
I also introduced another variable to take the screenshot without using the serial (always in the preferences).

aaSho17

In order not to put other conditions in the main loop, the ScreenShot variable is linked to the sleep timer, so if for example you have 30 seconds in the sleep timer and you set the Screenshot variable to ON (capital letters), you have 30 seconds to position yourself on the screen you want to screenshot, and a message appears confirming that the screenshot has been saved to SPIFFS.
The screenshot variable is reset to OFF automatically so that no more screenshots are taken the next time the screen is reactivated … after transferring the image with FTP you can take another screenshot by resetting the variable to ON in the preferences.
I started using the CMDs that can always be set in the preferences and put an example of their use.
For now, a long press in the cell with the inscription CMD 01 displays a text file present on SPIFFS (index.html) in a form Text Area which is relative to the container of the preferences table.
In the text area words can be selected and highlighted.

aaSho16

I haven’t done it yet, but if you put an Eventhandler connected to this text area, perhaps with a Long press, you can call up the keyboard with the selected text, edit it and save the changes to SPIFFS.
see you next time … and I always hope this will help someone
bye

and remember to put the new preferences and the index.html file in the data subdirectory in the .zip file on your SPIFFS
33.zip (227.9 KB)

I think this is my last post for this project which I hope will be of help to new users of this great graphics library.
The novelties of this latest release are the possibility to edit small text files, line by line, for example an html file to be sent to a web server as in this example:

or in this:

In CMD01 and CMD02 I put an example of how to read a directory of a remote FTP server and how to download a file from it.
To use these 2 commands you have to put the address of the remote server, username and password in the initial variables and in CMD02 the name of the file you want to download from the remote server.
In CMD03 I implemented the use of Serial2 (which I use to send .plt files to printers / cutters), leave the Uart Baud value at 0 if you have nothing connected to the port (GPIO 16 and 17) and the ground connected to the device, otherwise random characters will enter the serial monitor (unless you use the Serial2.end () command, but it is preferable not to use it for memory consumption).
In the example I am sending here, there is no name of the .plt file to send, but you can download it from your remote FTP server or upload it to the SPIFFS with the Data Upload of the Arduino Ide interface, and send it to your printer / cutter with the command CMD03.
These 3 commands are obviously just an example of how to implement the program, it is up to you to modify or exclude parts that do not interest you.
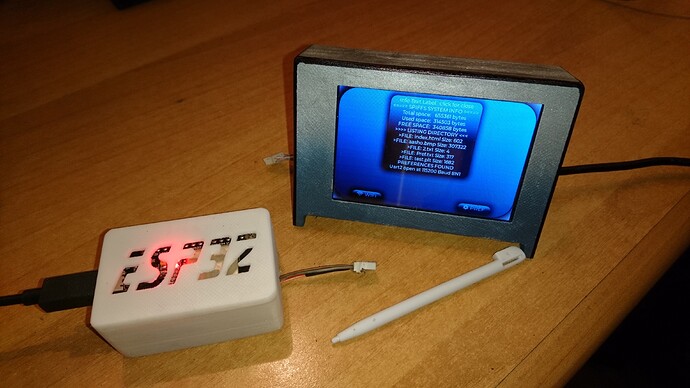
In the .zip file I have also attached 2 cases for Esp32, the big one for ESP32 + Ili9488 touch screen (found on Thingiverse but modified to have more space inside and to have better ventilation), and a smaller one for single Esp32 which offers good protection to the pins and ventilation thanks to the Esp32 writing on the lid.

Again a greeting to all the users of the forum (even if you did not help me at the beginning of the post, when I was groping in the dark in HOW to insert the code generated by Edgeline in your own project :woozy_face: :joy: :grinning:… but all is well that that ends well …
i made a Video in YouTube about this project and use with LVGL library
thanks again and goodbye.

Source File here:
EDIT: response.replace(“\r\n”, “”); not work correctly in case (2) : {/* EXAMPLE Copy file from FTP to SPIFFS */
so i replace routine and now is ok, because response give more “\r\n” that original file
now is correct:
SourcesFiles38.zip (301.4 KB)

And here the link to YouTube Video:
Enable Subtitles for see descriptions
Remember that i use this project with LVGL V 7.11
3 Likes